
 | ||
Similar Suez Crisis, Raid on the Suez Canal, Operation Tarnegol, Italian invasion of Egypt, Battle of Romani | ||
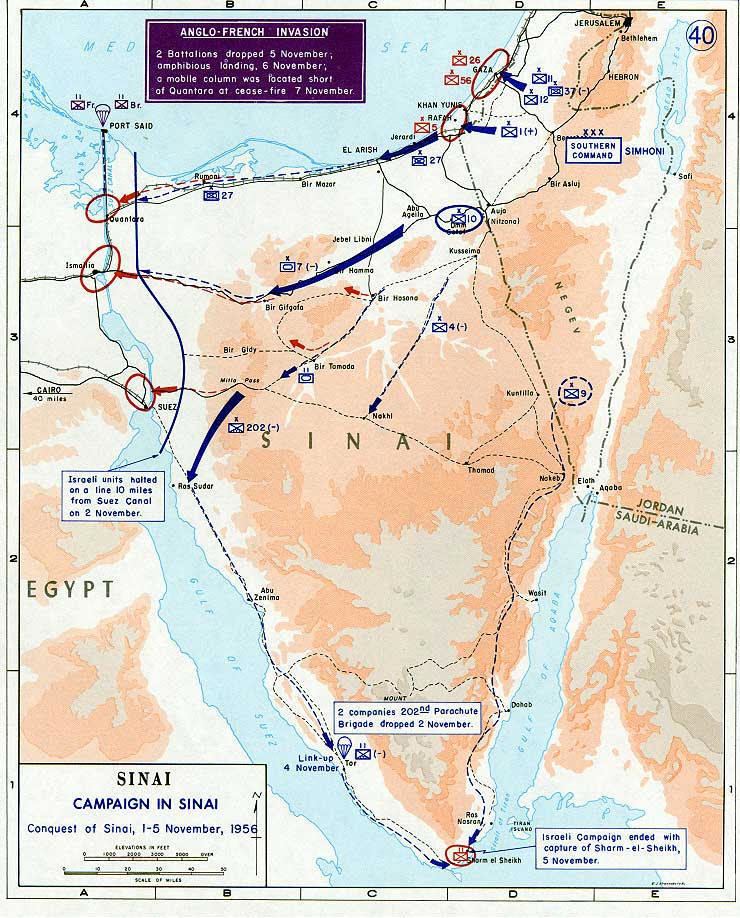
Operation Musketeer (French: Opération Mousquetaire) was the Anglo-French plan for the invasion of the Suez canal zone to capture the Suez Canal during the Suez Crisis in 1956. Israel, which invaded the Sinai peninsula, had the additional objectives of opening the Straits of Tiran and halting fedayeen incursions into Israel. The Anglo-French military operation was originally planned for early September, but the necessity of coordination with Israel delayed it until early November.
Contents
- The operation
- Reaction
- End of operation
- Military support
- Aftermath
- French order of battle
- Royal Air Force
- British Army
- Royal Marines
- Royal Navy
- Fleet Air Arm
- Royal Fleet Auxiliary
- Civilian auxiliary ships
- Royal New Zealand Navy
- References

The operation

Headed by British Army General Charles Keightley, it was conducted in November 1956 in close coordination with the Israeli armored thrust into the Sinai, which was called Operation Kadesh. Egypt's government, led by Colonel Gamal Abdel Nasser, was seeking political control over the canal, an effort resisted by the Europeans. The army was originally to land at Alexandria, but the location was later switched to Port Said since a landing at Alexandria would have been opposed by most of the Egyptian army, necessitating the deployment of an armoured division. Furthermore, a preliminary bombardment of a densely populated area would have involved tens of thousands of civilian casualties. The naval bombardment of Port Said was rendered less effective by the decision to only use 4.5-inch guns instead of large caliber guns, in order to minimise the number of civilian casualties.
The final land order of battle involved the Royal Marine Commando Brigade, the 16th Parachute Brigade, and the 3rd Infantry Division. To bring these formations to war establishment, the regular army reserve and selected national service reservists were mobilised. Most of the latter were sent to units in home stations (Britain and Germany) to replace regulars posted to the Musketeer force. Lieutenant General Sir Hugh Stockwell was appointed to command the landing force. A French parachute brigade joined 16th Parachute Brigade as it returned to Cyprus. The Commando Brigade completed refresher training in shore landings from helicopters, in association with the Mediterranean fleet, which was preparing to support the amphibious operation. Over the summer the Royal Air Force selected a range of targets whose loss would cripple Egyptian resistance.
Details of the secret plan for Israeli forces to invade the Sinai desert were revealed to the Chiefs of the Defence staff in October. On 29 October Israeli armour, preceded by parachute drops on two key passes, thrust south into the Sinai, routing local Egyptian forces within five days. Affecting to be alarmed by the threat of fighting along the Suez Canal, the UK and France issued a twelve-hour ultimatum on 30 October to the Israelis and the Egyptians to cease fighting. When, as expected, no response was given, Operation Musketeer was launched.
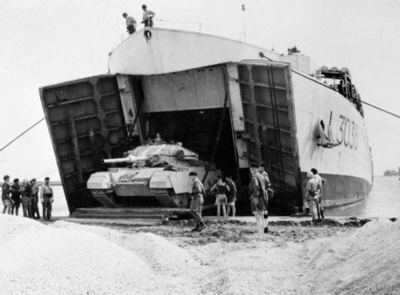
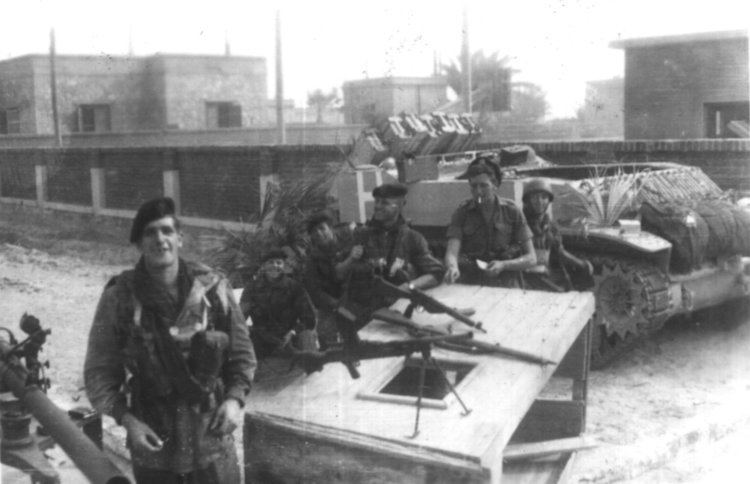
The air offensive began. The 3rd Division, minus the Guards Brigade, embarked on 1 November. The 45th Commando and 16th Parachute Brigade landed by sea and air on 5 November. Although landing forces quickly established control over major canal facilities, the Egyptians were able to sink obstacles in the canal, rendering it unusable. The Anglo-French air offensive suppressed Egyptian airfields not already attacked by the Israelis, but failed to destroy oil stocks or cripple the Egyptian army. Cairo Radio continued to broadcast. The 3rd Battalion Parachute group captured El Cap airfield by airborne assault. The remaining units, held back initially for deep airborne targets, travelled by sea to Port Said. The Commando Brigade captured all its objectives. The French parachutists took Port Fuad, opposite Port Said. Elements of the 16th Parachute Brigade led by Brigadier M.A.H. Butler and a contingent of the Royal Tank Regiment set off south along the canal bank on 6 November to capture Ismailia.
Reaction
Worldwide reaction against Musketeer was massive and negative. The United States unexpectedly led condemnations of the action at the United Nations and in other forums, marking a sharp break in the "special relationship" between the United States and the United Kingdom. Of the countries in the Commonwealth, only Australia, South Africa and New Zealand supported the military operation, with Canada strongly opposing it. Just before midnight Brigadier Butler was ordered to stop on the hour, when a ceasefire would come into effect. This raised a difficulty. There were Egyptian forces ahead; the British column was in open desert with no defensible feature to hand. Brigadier Butler compromised, advancing until 0:15 a.m. to reach El Cap, where he sited the 2nd Battalion of the Parachute Regiment, with supporting detachments.
While the military operation itself had been completely successful, political pressure from the United States obliged the British and French governments to accept the ceasefire terms drawn up by the United Nations. The 3rd Division landed to relieve the parachutists. While accepting a United Nations Emergency Force to replace the Anglo-French presence, Nasser nevertheless ensured the Canal could not be used by sinking or otherwise disabling 49 ships in the channel. Anglo-French forces were withdrawn by 22 December.
End of operation
When the United States threatened to devalue the British currency (the Pound Sterling), the British cabinet was divided. Prime Minister Sir Anthony Eden called a ceasefire, without Israeli or French officials being notified. This caused France to doubt the reliability of their allies. A few months later, French president René Coty ordered the creation of the brand new military experiments facility C.S.E.M. in the Sahara. It was used by his successor Charles de Gaulle to develop an autonomous nuclear deterrent against potential threats. The French atomic bomb Gerboise Bleue was tested in February 1960. In 1966, de Gaulle further loosened his ties with the Western Allies by leaving NATO.
Military support
Britain had a treaty with Jordan, and had a plan (Cordage) to give assistance to Jordan in the event of an attack by Israel. This led to the First Lord of the Admiralty (Hailsham) sending a memo to Eden on 2 October 1956 proposing the use of the light cruiser HMS Royalist for Cordage as well as Musketeer. HMS Royalist had just been modernised as an anti-aircraft radar picket ship, and was regarded as the most suitable ship for protection against the Mystère fighter-bombers supplied by France to Israel. But HMS Royalist had just been transferred to the Royal New Zealand Navy, and New Zealand's Prime Minister Sidney Holland did not in the end allow the Royalist to be used with the British fleet in the Mediterranean for Cordage or Musketeer (where her presence would indicate support by New Zealand). The memo indicates that Hailsham did not know of the negotiations of Eden and Lloyd with France and Israel for concerted moves against Egypt.
Aftermath
Launched without a clear aim other than revenge, with the abandonment of international diplomacy, Operation Musketeer was a failure in strategic terms. By mischance it covered the Soviet Union's military intervention in Hungary on 4 November. On this issue and, more generally, on the principle of premature military action against Egypt, the operation divided public opinion in the UK. It demonstrated the limitations of the UK's military capacity, and exposed errors in several staff functions, notably intelligence and movement control. Tactically successful, both in the sea and airborne assaults and the subsequent brief occupation, it was undertaken on the margin of capability. It was the last venture of its kind.
French order of battle
Most French units involved came from the 10th Parachute Division (10e DP).
Royal Air Force
British Army
These were supported by units from: