
Dates 8 Dec 1940 – 9 Feb 1941 | Result British victory | |
 | ||
36,000 soldiers120 guns275 tanks142 aircraft 150,000 soldiers1,600 guns600 tankettes and tanks331 aircraft 500 killed1,373 wounded55 missing26 aircraft 5,500+ killed10,000 wounded133,298 captured420 tanks845 guns564 aircraft (incl. reinforcements) Combatants Similar | ||
Operation compass 1940 41 battlestorm north african campaign documentary
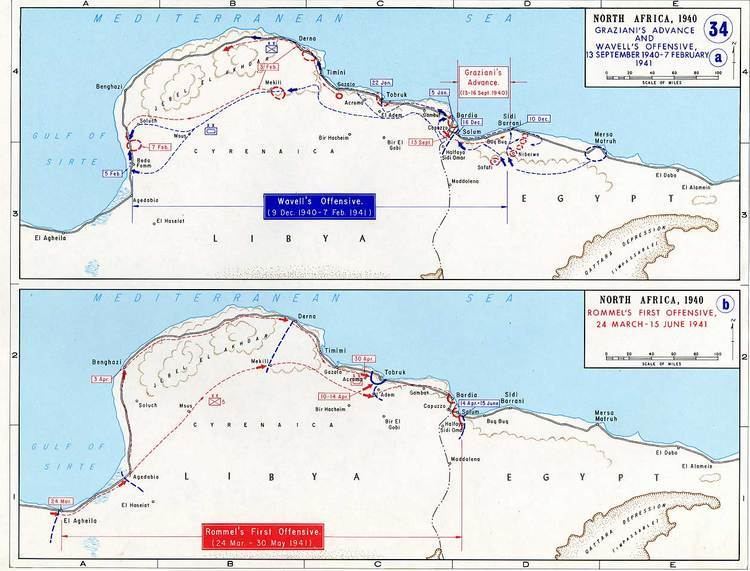
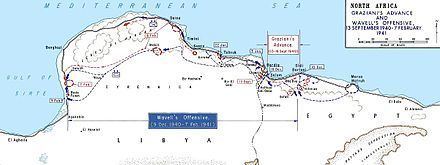
Operation Compass was the first large Allied military operation of the Western Desert Campaign (1940–1943) during the Second World War. British and other Commonwealth forces attacked Italian forces in western Egypt and Cyrenaica, the eastern province of Libya, from December 1940 to February 1941, with great success. The Western Desert Force (Lieutenant-General Richard O'Connor) with about 30,000 men, advanced from Mersa Matruh in Egypt on a five-day raid against the Italian positions of the 10th Army (Marshal Rodolfo Graziani), which had about 150,000 men in fortified posts around Sidi Barrani and in Cyrenaica.
Contents
- Operation compass 1940 41 battlestorm north african campaign documentary
- Operation compass 100 000 or 150 000 italian pows
- 10th Army
- Western Desert Force
- Border skirmishes
- Operazione E
- British plan
- Nibeiwa
- The Tummars
- Maktila
- Sidi Barrani Buq Buq and Sofafi
- Exploitation
- Sollum Halfaya and Fort Capuzzo
- Bardia
- Capture of Tobruk
- DernaMechili
- Battle of Beda Fomm
- Giarabub Kufra and Uweinat
- Analysis
- Casualties
- Subsequent operations
- References
The 10th Army was swiftly defeated and the British prolonged the operation, to pursue the remnants of the 10th Army to Beda Fomm and El Agheila on the Gulf of Sirte. The British took 138,000 Italian and Libyan prisoners, hundreds of tanks and over 1,000 guns and aircraft for a loss of 1,900 men killed and wounded, about 10 percent of their infantry. The British were unable to continue beyond El Agheila, due to broken down and worn out vehicles and the diversion, beginning in March 1941, of the best-equipped units to the Greek Campaign in Operation Lustre.
Operation compass 100 000 or 150 000 italian pows
10th Army
When war was declared, the 5th Army (General Italo Gariboldi) was in Tripolitania the western Libyan province and the 10th Army (General Mario Berti) was in Cyrenaica to the east. Once the French in Tunisia no longer posed a threat to Tripolitania, units of the 5th Army were used to reinforce the 10th Army. When Governor-General of Libya Italo Balbo was killed by friendly fire, Marshal Graziani took his place. Graziani expressed doubts about the capabilities of the large non-mechanized force to defeat the British, who though smaller in numbers were motorised. After being reinforced from the 5th Army, the 10th Army controlled the equivalent of four corps with 150,000 infantry, 1,600 guns, 600 tankettes and tanks and 331 aircraft. The XX Corps had the 60th Infantry Division Sabratha and the XXI Corps had the 1st Blackshirt Division 23 Marzo, the 2nd Blackshirt Division 28 Ottobre and the 63 Infantry Division Cirene. XXII Corps had the 61st Infantry Division Sirte and XXIII Corps had the 4th Blackshirt Division 3 Gennaio and the 64th Infantry Division Catanzaro.
The new Group of Libyan Divisions (Gruppo Divisioni Libiche) had the Maletti Group, the 1st Libyan Division Sibelle (Major-General Luigi Sibelle) and the 2nd Libyan Division Pescatori (Major-General Armando Pescatori). The only non-infantry formation was the partially motorised and lightly armoured Maletti Group. The Raggruppamento Maletti (General Pietro Maletti) was formed at Derna on 8 July 1940, with seven Libyan motorised infantry battalions, a company of Fiat M11/39 tanks, a company of L3/33 tankettes, motorised artillery and supply units as the main motorised unit of the 10th Army. On 29 August, as more tanks arrived from Italy, the Comando carri della Libia (Libyan Tank Command) was formed under the command of Colonel Valentini, with three Raggruppamenti. Raggruppamento Aresca (Colonel Aresca) with the I Medium Tank Battalion and the 31st, 61st and 62nd light tank battalions, Raggruppamento Trivioli (Colonel Antonio Trivioli), with the II Medium Tank Battalion, less one company and the IX, XX, and LXI light tank battalions and Raggruppamento Maletti with the LX light tank battalion and the remaining M11/39 company from the II Medium Tank Battalion. Raggruppamento Maletti became part of the Regio Corpo Truppe Coloniali della Libia (Royal Corps of Libyan Colonial Troops), with the 1st Libyan Division Sibelle and the 2nd Libyan Division Pescatori.
Western Desert Force
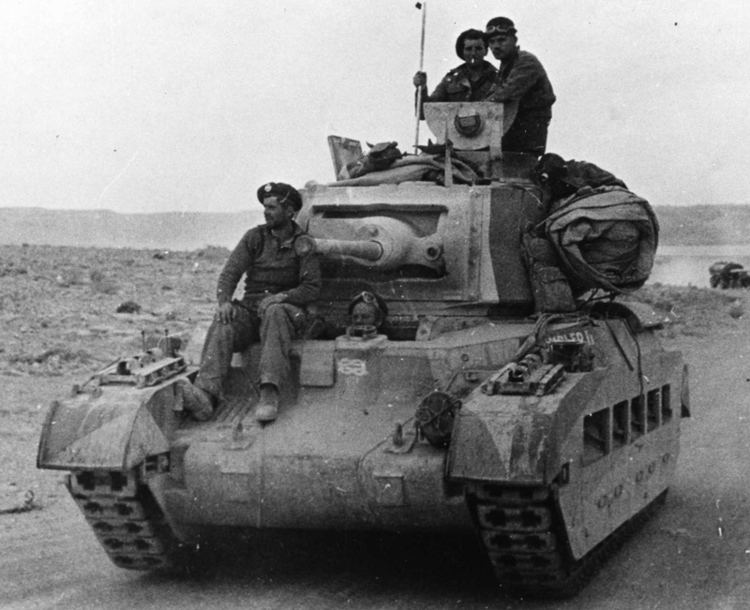
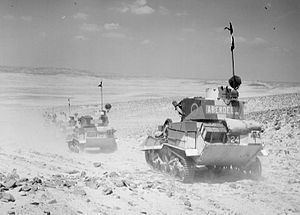
Middle East Command under General Archibald Wavell had about 36,000 soldiers, 120 guns, 275 tanks and 142 aircraft, in two squadrons of Hurricanes, one of Gloster Gladiators, three of Bristol Blenheims, three of Vickers Wellingtons and one of Bristol Bombays, about 46 fighters and 116 bombers. The Western Desert Force (WDF) was commanded by Lieutenant-General Richard O'Connor with the 4th Indian Infantry Division (Major-General Noel Beresford-Peirse) and the 7th Armoured Division (Major-General Sir Michael O'Moore Creagh). From 14 December, troops of the 6th Australian Infantry Division (Major-General Iven Giffard Mackay), replaced the 4th Indian Division, which was sent to East Africa, less one brigade. The British had some fast Cruiser Mk I, Cruiser Mk II and Cruiser Mk III tanks with Ordnance QF 2-pounder guns, which were superior to Fiat M11/39 tanks. The British also had a battalion Matilda II infantry tanks that while slow, were also equipped with the 2-pounder; the armour of the Matildas could not be penetrated by Italian anti-tank guns or field guns.
Border skirmishes
Italy declared war on Britain and France on 10 June 1940. During the next few months there were raids and skirmishes between Italian forces in Libya and British and Commonwealth forces in Egypt. On 12 June 1940, the Mediterranean Fleet bombarded Tobruk. The force included the cruisers HMS Liverpool and HMS Gloucester also exchanged fire with the Italian cruiser San Giorgio. Royal Air Force Blenheim bombers from No. 45, No. 55 and No. 211 squadrons, hit the San Giorgio with one bomb. On 19 June, the British submarine HMS Parthian fired two torpedoes at San Giorgio but missed. San Giorgio's role was then to support the local anti-aircraft units and claimed 47 British aircraft shot down or damaged. San Giorgio also shot down the Savoia-Marchetti SM.79 aircraft carrying Italo Balbo, the Governor-General of Libya and Commander-in-chief of Italian forces in North Africa.
Operazione E
On 13 September 1940, the Italian 10th Army advanced into Egypt in Operazione E. As the Italians advanced, the small British force at Sollum withdrew to the main defensive position east of Mersa Matruh. The Italian advance was harassed by the 3rd Coldstream Guards, attached artillery and other units. After recapturing Fort Capuzzo, the Italians advanced approximately 95 kilometres (59 mi) in three days and on 16 September, the advance stopped at Maktila, 16 kilometres (9.9 mi) beyond Sidi Barrani. The Italians dug in and awaited reinforcements and supplies along the Via della Vittoria, an extension of the Via Balbia being built from the frontier. Five fortified camps were built around Sidi Barrani from Maktila, 24 kilometres (15 mi) east along the coast, south to Tummar East, Tummar West and Nibeiwa and Sofafi on the escarpment to the south-west.
British plan
Following the Italian advance, Wavell ordered the commander of British Troops Egypt, Lieutenant-General Sir Henry Maitland Wilson, to plan a limited operation to push the Italians back. Operation Compass, for administrative reasons, was originally planned as a five-day raid but consideration was given to continuing the operation to exploit success. On 28 November, Wavell wrote to Wilson that,
I do not entertain extravagant hopes of this operation but I do wish to make certain that if a big opportunity occurs we are prepared morally, mentally and administratively to use it to the fullest.
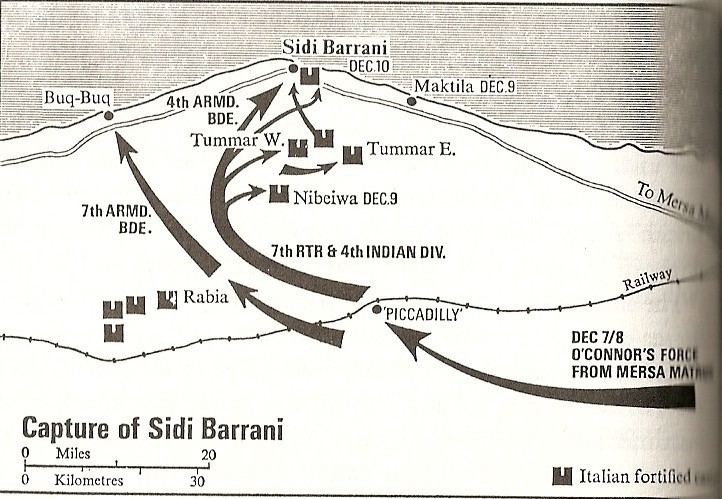
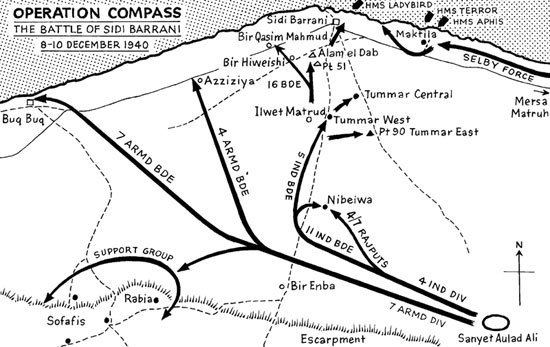
The 7th Support Group was to observe the Italian camps on the escarpment around Sofafi, to prevent the garrisons from interfering, while the rest of the division and 4th Indian Division passed through the Sofafi–Nibeiwa gap. An Indian brigade and Infantry tanks of 7th Royal Tank Regiment (7th RTR) would attack Nibeiwa from the west, as the 7th Armoured Division protected their northern flank. Once Nibeiwa was captured, a second Indian brigade and the 7th RTR would attack the Tummars. Selby Force (3rd Battalion Coldstream Guards plus some artillery) from the Matruh garrison was to contain the enemy camp at Maktila on the coast and the Royal Navy would bombard Maktila and Sidi Barrani. Preparations were kept secret and only a few officers knew during the training exercise held from 25–26 November, that the objectives marked out near Matruh were replicas of Nibeiwa and Tummar; the troops were also told that a second exercise was to follow and did not know that the operation was real until 7 December, as they arrived at their jumping-off points.
Late on 8 December, an Italian reconnaissance aircrew reported that attack on Maktila and Nibeiwa was imminent but Maletti was not informed. On 9 December, the 1st Libyan Division Sibelle was at Maktila and the 2nd Libyan Division Pescatori was at Tummar. The Maletti Group was at Nibiewa and the 4th Blackshirt Division 3 Jennaio and the headquarters of the Libyan Corps were at Sidi Barrani. The 63rd Infantry Division Cirene and the headquarters of XXI Corps were at Sofafi and the 64th Infantry Division Catanzaro was at Buq Buq. The headquarters of the XXIII Corps and the 2nd Blackshirt Division 28 Ottobre were in Sollum and Halfaya Pass respectively and the 62nd Infantry Division Marmarica was at Sidi Omar, south of Sollum. Berti was on sick leave and Gariboldi, the 1st Blackshirt Division 23 Marzo and the 10th Army Headquarters were far back at Bardia. (By the time Berti arrived in Libya, so had the British.) Operation Compass (la battaglia della Marmarica/Battle of the Marmarica) began on the night of 7/8 December. The Western Desert Force with the 7th Armoured Division, 4th Indian Division and the 16th Infantry Brigade advanced 113 kilometres (70 mi) to their start line. The RAF made attacks on Italian airfields and destroyed or damaged 29 aircraft on the ground. Selby Force (Brigadier A. R. Selby) with 1,800 men (the maximum for whom transport could be found), moved up from Matruh, set up a brigade of dummy tanks in the desert and reached a position south-east of Maktila by dawn on 9 December. Maktila had been bombarded by the monitor HMS Terror and the gunboat HMS Aphis; Sidi Barrani had been shelled by the gunboat HMS Ladybird.
Nibeiwa
At 5:00 a.m. on 9 December, a detachment of artillery commenced diversionary fire from the east on the fortified camp at Nibeiwa for an hour, which was held by the Maletti Group and at 7:15 a.m. the divisional artillery began a preliminary bombardment. The 11th Indian Infantry Brigade, with 7th RTR under command, attacked Nibeiwa from the north-west, which reconnaissance had established as the weakest sector. By 8:30 a.m., Nibeiwa had been captured; Maletti had been killed in the fighting along with 818 men and 1,338 wounded; 2,000 Italian and Libyan soldiers were taken prisoner. Large quantities of supplies were captured for British casualties of 56 men.
The Tummars
The attack on Tummar West began at 1:50 p.m., after the 7th RTR had refuelled and artillery had bombarded the defences for an hour. Another north-west approach was made, the tanks broke through the perimeter and were followed twenty minutes later by the infantry. The defenders held out for longer than the Nibeiwa garrison but by 4:00 p.m. Tummar West was overrun except for the north-eastern corner. The tanks moved on to Tummar East, the greater part of which was captured by nightfall. The 4th Armoured Brigade had advanced to Azziziya, where the garrison of 400 men surrendered and light patrols of the 7th Hussars pushed forward to cut the road from Sidi Barrani to Buq Buq, while armoured cars of the 11th Hussars ranged further west. The tanks of 7th Armoured Brigade were held in reserve ready to intercept an Italian counter-attack. The 2nd Libyan Division lost 26 officers and 1,327 men killed, 32 officers and 804 men wounded, with the survivors being taken prisoner.
Maktila
Unaware of the situation at the Tummars, Selby sent units to cut the western exits from Maktila but the 1st Libyan Division Sibelle filtered through and escaped. Selby Force followed up the retreat as the 1st Libyan Division moved the 15 miles (24 km) from Maktila to Sidi Barrani and drove part of the column into sand dunes north of the coast road. Cruiser tanks of the 6th Royal Tank Regiment (6th RTR) arrived in a sandstorm and overran the Italians in the dunes at about 5:15 p.m., then joined Selby Force to continue the pursuit. The Italian defenders were caught at Sidi Barrani, in a pocket 10 by 5 miles (16.1 km × 8.0 km) backing on to the sea. When the British attacked again at dawn on 11 December, mass surrenders began everywhere. except at Point 90 where troops of the 2nd Libyan Division Pescatori held out for a short time, after which 2,000 troops surrendered.
Sidi Barrani, Buq Buq and Sofafi
On 10 December, the 16th Infantry Brigade was brought forward from 4th Indian Division reserve and with part of the 11th Indian Brigade under command, advanced in lorries to attack Sidi Barrani. While moving across exposed ground, some casualties were incurred but with support from artillery and the 7th RTR, it was in position barring the south and south western exits to Sidi Barrani by 1:30 p.m. The British attacked at 4:00 p.m. supported by the divisional artillery and the town fell by nightfall; the remains of the two Libyan Divisions and the 4th Blackshirt Division 3 Gennaio were trapped between the 16th Infantry Brigade and Selby Force. On 11 December, Selby Force and some tanks attacked and overran the 1st Libyan Division Sibelle and by the evening, the 4th Blackshirt Division 3 Gennaio had also surrendered. On 11 December, the 7th Armoured Brigade was ordered out of reserve and relieved 4th Armoured Brigade in the Buq Buq area to mop up and captured large numbers of men and guns. A patrol from the 7th Support Group entered Rabia and found it empty, the 63rd Division Cirene had withdrawn from Rabia and Sofafi overnight. An order to the 4th Armoured Brigade to cut them off west of Sofafi arrived too late and the Italians were able to retire along the escarpment to join Italian forces at Halfaya. Italian casualties were 2,184 men killed, 2,287 troops wounded and 38,000 prisoners.
Exploitation
Over the next few days the 4th Armoured Brigade, on top of the escarpment and the 7th Armoured Brigade on the coast, attempted a pursuit but supply problems and the large number of prisoners (twenty times the number planned for) impeded the advance. Italian forces crowded along the coast road and retreating from Sidi Barrani and Buq Buq, were bombarded by Terror and the two gunboats, which fired on the Sollum area all day and most of the night of 11 December. Late on 12 December, the only Italian positions left in Egypt were the approaches to Sollum and the area of Sidi Omar. The Italians had lost 38,289 Italian and Libyan casualties, most taken prisoner, 73 tanks and 237 guns, against 634 British casualties. The WDF paused to reorganise and then moved quickly west along the Via della Vittoria, through Halfaya Pass and re-captured Fort Capuzzo in Libya. On 12 December, Wellington and Blenheim bombers from Malta and Egypt carried out raids on the Italian air bases in Castel Benito, Benina and El Adem, inflicting heavy losses and damage on aircraft and ground facilities.
Sollum, Halfaya and Fort Capuzzo
Exploitation continued by the two armoured brigades and the 7th Support Group, with the infantry of 16th Infantry Brigade (which had been detached from the 4th Indian Division) following up. By 15 December, Sollum and the Halfaya Pass had been captured and the British by-passed Italian garrisons further south in the desert. Fort Capuzzo, 64 kilometres (40 mi) inland at the end of the frontier wire, was captured en passant by 7th Armoured Division in December 1940, as it advanced westwards to Bardia. The 7th Armoured Division concentrated south-west of Bardia, waiting for the arrival of 6th Australian Division. By this time the WDF had taken 38,300 prisoners and captured 237 guns and 73 tanks, while suffering casualties of 133 killed, 387 wounded and eight missing.
Bardia
The 6th Australian Division (Major General Iven Mackay) attacked the Italian XXIII Corps (Lieutenant General Annibale Bergonzoli) Bardia from 3–5 January 1941, assisted by air support, naval gunfire and artillery barrages. The 16th Australian Infantry Brigade attacked at dawn from the west, where the defences were known to be weak. Sappers blew gaps in the barbed wire with Bangalore torpedoes, then filled in and broke down the sides of the anti-tank ditch with picks and shovels. The Australian infantry and 23 Matilda II tanks of the 7th RTR, overran the Italian defences and took 8,000 prisoners. The 17th Australian Infantry Brigade exploited the breach made in the perimeter and pressed south, as far as a secondary line of defences known as the Switch Line. On the second day, the 16th Australian Infantry Brigade captured Bardia, cutting the fortress in two. Thousands of prisoners were taken and the remnants of the Italian garrison held only the northern and southernmost parts of the fortress. On the third day, the 19th Australian Infantry Brigade advanced south from Bardia, supported by artillery and the remaining six Matilda tanks. The 17th Australian Infantry Brigade attacked and the two brigades reduced the southern sector of the fortress. The Italian garrisons in the north surrendered to the 16th Australian Infantry Brigade and the 7th Support Group outside the fortress; about 25,000 prisoners were taken, along with 400 guns, 130 light and medium tanks and hundreds of motor vehicles. Italian casualties also included 1,703 killed and 3,740 men wounded.
Capture of Tobruk
The 2/3rd Australian Battalion attacked at 5:40 a.m. on 21 January and after an hour, the 16th Australian Brigade and 18 I tanks broke through to a depth of 1-mile (1.6 km) on a 1-mile (1.6 km) front. The 16th Australian Brigade fanned out at 8:40 a.m. and the 19th Australian Brigade advanced north, behind an artillery barrage and counter-battery fire on the Italian artillery. The 2/8th Australian Battalion was held up at the Bardia–El Adem crossroads, by a force of dug-in tanks and machine-gun nests but at 2:00 p.m., the Australians attacked again and broke through on the right. On the left, the Australians were counter-attacked by seven tanks and infantry behind an artillery barrage. The Italian attack was repulsed by the infantry, two anti-tank guns and two I tanks (after the tank crews realised that the tanks were Italian). More resistance was met near Pilastrino, which held out until 9:30 p.m. and the area around Solero was captured along with Mannella.
During the day, Blenheims of 55 and 113 squadrons flew 56 sorties against Tobruk; the Gladiators and Hurricanes of 3 Squadron RAAF and 73 and 274 squadrons RAF patrolled to the west. Half of the Tobruk area had been captured by nightfall and the Italians began demolitions at the harbour. The armoured cruiser San Giorgio, having been ordered to stay and help with the defence till the end, fired on the advancing Australian troops until the naval base fell, then she was blown up by her crew to avoid capture. At dawn, Major-General Della Mura, commander of the 61st Infantry Division Sirte, surrendered with several thousand troops. The 6th Australian Cavalry Regiment reached the port and took the surrender of Admiral Vietina and the naval garrison. By 3:45 p.m., 20,000 prisoners, 208 guns and 87 tanks had been captured for the loss of 400 men, 355 of them Australian. Italian casualties were 18 officers and 750 men killed, 30 officers and 2,250 men wounded. Most of the demolitions conducted by the Italians had been of stores rather than installations; the Inshore Squadron began mine sweeping and opened the port on 24 January.
Derna–Mechili
The area east of the Jebel Akhdar mountains was garrisoned by XX Corps (Lieutenant-General Annibale Bergonzoli) with the 60th Infantry Division Sabratha and the Babini Group, which had 120 tanks but these included 82 which needed ten days to be made battle-worthy but had been rushed forward anyway. The 60th Infantry Division Sabratha held a line from Derna, along Wadi Derna to Mechili, with the Babini Group at Mechili, Giovanni Berta and Chaulan, to guard the flank and rear of the infantry. On 23 January, the 10th Army commander, General Giuseppe Tellera ordered a counter-attack against the British, to avoid an envelopment of XX Corps from the south. Next day, the Babini Group with 10–15 M.13/40s, attacked the 7th Hussars as they headed west to cut the Derna–Mechili track north of Mechili. The British swiftly retired, calling for help from the 2nd RTR, which ignored the signals through complacency. The British lost several tanks and knocked out two M.13s; eventually the 2nd RTR was alerted, caught the Italian tanks while sky-lined on a ridge and knocked out seven M.13s, for the loss of a cruiser and six light tanks.
To the north, the 2/11th Australian Battalion engaged the 60th Infantry Division Sabratha and Bersaglieri companies of the Babini Group at Derna airfield, making slow progress against determined resistance. The 19th Australian Brigade began to arrive in the morning and Italian bombers and fighters attacked the Australians. The Italians swept the flat ground with field artillery and machine-guns, stopping the Australian advance 3,000 yards (2,700 m) short of the objective. On 26 January, the 2/4th Australian Battalion cut the Derna–Mechili road and a company crossed Wadi Derna during the night against bold Italian counter-attacks. The Italians disengaged on the night of 28/29 January, before the garrison was trapped and rearguards of the Babini Group cratered roads, planted mines and booby-traps and managed to conduct several skilful ambushes, which slowed the British pursuit. Derna was occupied unopposed on 29 January and the Australians began a pursuit along the Via Balbia, closing on Giovanni Berta during 31 January.
Battle of Beda Fomm
In late January, the British learned that the Italians were retreating along the Litoranea Balbo (Via Balbia) from Benghazi. The 7th Armoured Division was dispatched to intercept the remnants of the 10th Army by moving through the desert, south of the Jebel Akhdar (Green Mountain) via Msus and Antelat, as the 6th Australian Division pursued the Italians along the coast road, north of the jebel. The terrain slowed the British tanks and Combe Force (Lieutenant-Colonel J. F. B. Combe), a flying column of wheeled vehicles was sent ahead across the chord of the jebel. Late on 5 February, Combe Force arrived at the Via Balbia south of Benghazi and set up road blocks near Sidi Saleh, about 32 kilometres (20 mi) north of Ajedabia and 48 kilometres (30 mi) south-west of Antelat; the leading elements of the 10th Army arrived thirty minutes later. Next day, the Italians attacked to break through the road block and continued to attack into 7 February. With British reinforcements arriving and the Australians pressing down the road from Benghazi, the 10th Army surrendered. From Benghazi to Agedabia, the British took 25,000 prisoners, captured 107 tanks and 93 guns.
Giarabub, Kufra and Uweinat
Italian garrisons held Giarabub 150 miles (240 km) south of Sollum, Kufra Oasis, Jalo at the west end of the Great Sand Sea and Murzuk, 500 miles (800 km) south of Tripoli. The oasis of Giarabub was attacked in January 1941 and captured in March by the 6th Australian Cavalry Regiment and an Australian infantry battalion. Further south, on the far side of the Sand Sea, the oasis of Kufra was attacked by Free French from French Equatorial Africa, in concert with Long Range Desert Group (LRDG) patrols. (Kufra later fell after the two-month Capture of Kufra in March 1941.) Further west, on the border with Chad, the Italian base at Murzuk was raided in January, when a patrol of the new Long Range Patrol Unit and a local sheikh travelled 2,100 kilometres (1,300 mi) to rendezvous near Kayugi, with a small Free French detachment. The force attacked Murzuk and destroyed three aircraft and a hangar; the French commander was killed, most of the Italians surrendered and several prisoners were taken. The raiders then shot up three forts and departed.
At Jebel Uweinat, a 6,000 feet (1,800 m) massif 970 kilometres (600 mi) inland, at the junctions of Egypt, Libya and Sudan, were landing grounds with an Italian garrison. The base was the closest Italian outpost to the East African Empire and a raid from Uweinat on Wadi Halfa in Sudan was possible. Destruction of the dockyards and railway workshops and the sinking of vessels on the Nile, could cut the link between Khartoum and Cairo. British patrols visited Faya and met another French detachment with General Philippe Leclerc for an attack on Kufra. The British were strafed by aircraft and attacked by armoured cars of the Italian Auto-Saharan Company, which destroyed several lorries. Leclerc decided that an attack on Kufra was not possible and the remaining British returned to Cairo, after a 45-day journey of 6,900 kilometres (4,300 mi). Kufra was captured on 1 March, by the French and became the new LRDG base in April.
Analysis
The success of the 7th Armoured Division, encouraged a belief in the Royal Tank Regiment that manoeuvre could win battles but the engagement with the Babini Group on 24 January, also led to the conclusion that armoured divisions needed more artillery. No integration of tanks and infantry was considered necessary or that anti-tank guns should be used offensively. The lack of cover in the desert encouraged dispersion to avoid air attack but this reduced fire power at the decisive point. Due to the exiguous nature of supply and transport, conservation during lulls also encouraged the use of small jock columns, of a motorised infantry company, a field-gun battery and several armoured cars. The success of such columns against the Italians led to exaggerated expectations, which were confounded when better-equipped and trained German troops arrived in Libya. The 7th Armoured Division concluded that the defensive mentality of the Italians had justified the taking of exceptional risks, which would be unjustified against German troops.
Casualties
The WDF lost 500 killed, 55 missing, and 1,373 wounded. The RAF lost 26 aircraft, comprising six Hurricanes, five Gladiators, three Wellingtons, a Valentia and eleven Blenheims. A far larger number of aircraft became non-operational, due to damage which could not be repaired quickly for lack of spare parts, a problem made worse by increased use of explosive bullets by the Italians. (On 14 December, a raid on Bardia by nine Blenheims cost one aircraft shot down and seven damaged by this cause.) The Italian Tenth Army lost at least 5,500 men killed, about 10,000 wounded, 133,298 men taken prisoner, 420 tanks and 845 guns.
Subsequent operations
A week after the Italian surrender at Beda Fomm, the Defence Committee in London, ordered Cyrenaica to be held with the minimum of forces and the surplus sent to Greece. In the WDF (now XIII Corps), the 6th Australian Division was fully equipped and had few losses to replace. The 7th Armoured Division had been operating for eight months, had worn out its mechanical equipment and was withdrawn to refit. Two regiments of the 2nd Armoured Division with the WDF were also worn out, leaving the division with only four tank regiments. The 6th Australian Division went to Greece in March with an armoured brigade group of the 2nd Armoured Division; the remainder of the division and the new 9th Australian Division, minus two brigades and most of its transport sent to Greece, were replaced by two under-equipped brigades of the 7th Australian Division. The division took over in Cyrenaica, on the assumption that the Italians could not begin a counter-offensive until May, even with German reinforcements.
The 2nd Armoured Division in Cyrenaica had the 3rd Armoured Brigade, with an understrength light tank regiment, a second regiment using captured Italian tanks and a cruiser tank regiment from mid-March, with worn-out tanks. The 2nd Support Group had only one motor battalion, a field artillery regiment, one anti-tank battery and a machine-gun company; most of the divisional transport had gone to Greece. A few thousand men of the 10th Army escaped the disaster in Cyrenaica but the 5th Army in Tripolitania had four divisions. The Sirte, Tmed Hassan and Buerat strongholds were reinforced from Italy, which brought the 10th and 5th armies up to about 150,000 men. German reinforcements were sent to Libya to form a blocking detachment (Sperrverband) under Directive 22 (11 January), these being the first units of the Afrika Korps (Generalleutnant Erwin Rommel). On 25 March 1941, Graziani was replaced by Gariboldi.