
part of 1,9289 December 1940 – 9 February 1941 25,000 | Result British victory | |
 | ||
Similar World War II, Operation Compass, Battle of Bardia, Battle of Nibeiwa, Operation Brevity | ||
The rapid British advance during Operation Compass (9 December 1940 – 9 February 1941) forced the Italian 10th Army to evacuate Cyrenaica, the eastern province of Libya. In late January, the British learned that the Italians were retreating along the Litoranea Balbo (Via Balbia) from Benghazi. The 7th Armoured Division (Major-General Sir Michael O'Moore Creagh) was dispatched to intercept the remnants of the 10th Army by moving through the desert, south of the Jebel Akhdar (Green Mountain) via Msus and Antelat as the 6th Australian Division pursued the Italians along the coast road, north of the jebel. The terrain was hard going for the British tanks and Combeforce (Lieutenant-Colonel J. F. B. Combe), a flying column of wheeled vehicles, was sent ahead across the chord of the jebel.
Contents
- Libya
- Egypt
- Terrain
- Operation Compass
- DernaMechili
- Italian defensive preparations
- British plan and assembly
- Combeforce
- 5 February
- 6 February
- 7 February
- Analysis
- Casualties
- Subsequent operations
- References
Late on 5 February, Combeforce arrived at the Via Balbia south of Benghazi and set up road blocks near Sidi Saleh, about 48 kilometres (30 mi) south-west of Antelat and 32 kilometres (20 mi) north of Ajedabia. The leading elements of the 10th Army arrived thirty minutes later and were ambushed. Next day the Italians attacked to break through the road block and continued to attack into 7 February. With British reinforcements arriving and the Australians pressing down the road from Benghazi, the 10th Army surrendered later that day. From Benghazi to Agedabia, the British took 25,000 prisoners, captured 107 tanks and 93 guns of the Operation Compass totals of 133,298 men, 420 tanks and 845 guns.
On 9 February, Churchill ordered the advance to stop and troops to be dispatched to Greece to take part in the Greco-Italian War; Operation Marita, a German attack through Macedonia was thought imminent. The British were unable to continue beyond El Agheila anyway, because of vehicle breakdowns, exhaustion and the effect of the much longer supply transport distance from the base in Egypt. A few thousand men of the 10th Army escaped the disaster in Cyrenaica but the 5th Army in Tripolitania had four divisions. The Sirte, Tmed Hassan and Buerat strongholds were reinforced from Italy, which brought the 10th and 5th armies up to about 150,000 men. German reinforcements were sent to Libya to form a blocking detachment (Sperrverband) under Directive 22 (11 January), these being the first units of the Afrika Korps (Generalleutnant Erwin Rommel).
Libya
In 1936, General Alberto Pariani had been appointed Chief of Staff of the army and begun a reorganisation of divisions to fight wars of rapid decision, according to thinking that speed, mobility and new technology could revolutionise military operations. In 1937, three-regiment (triangular) divisions began to change to two-regiment binary divisions, as part of a ten-year plan to reorganise the standing army into 24 binary, 24 triangular, twelve mountain, three motorised and three armoured divisions. The effect of the change was to increase the administrative overhead of the army, with no corresponding increase in effectiveness as the new technology, tanks motor vehicles and wireless communications were slow to arrive and were inferior to those of potential enemies. The dilution of the officer class by the need for extra unit staffs, was made worse by the politicisation of the army and the addition of Blackshirt Militia. The reforms also promoted frontal assaults to the exclusion of other theories, dropping the previous emphasis on fast mobile warfare backed by artillery.
Cyrenaica the eastern province of Libya, had been an Italian colony since the Italo-Turkish War (1911–1912). With Tunisia, a part of French North Africa to the west and Egypt to the east, the Italians prepared to defend both frontiers through a North Africa Supreme Headquarters, under the command of the Governor-General of Italian Libya, Marshal of the Air Force Italo Balbo. The Supreme Headquarters in Libya had the 5th Army (General Italo Gariboldi) and the 10th Army (General Mario Berti), which in mid-1940 had nine metropolitan divisions of about 13,000 men each, three Milizia Volontaria per la Sicurezza Nazionale (Blackshirt) and two Libyan divisions with 8,000 men each.
Morale was considered to be high and the army had recent experience of military operations. The Italian navy had prospered under the Fascist regime, which had paid for fast, well-built and well-armed ships and a large submarine fleet but the navy lacked experience and training. The air force had been ready for war in 1936 but had stagnated by 1939 and was not considered by the British to be capable of maintaining a fast tempo of operations. The 5th Army with eight divisions was based in Tripolitania, the western half of Libya opposite Tunisia and the 10th Army with six infantry divisions, held Cyrenaica in the east. When war was declared, the 10th Army moved the 1st Libyan Division Sibelle to the frontier from Giarabub to Sidi Omar and XXI Corps from Sidi Omar to the coast, Bardia and Tobruk. The XXII Corps moved south-west of Tobruk, to act as a counter-attack force.
Egypt
The British had based forces in Egypt since 1882 but these were greatly reduced by the terms of the Anglo-Egyptian Treaty of 1936. The small British and Commonwealth force garrisoned the Suez Canal and the Red Sea route, which was vital to British communications with its Far Eastern and Indian Ocean territories. In mid-1939, Lieutenant-General Archibald Wavell was appointed General Officer Commanding-in-Chief (GOC-in-C) of the new Middle East Command, over the Mediterranean and Middle East theatres. Until the Franco-Axis armistice, the French divisions in Tunisia faced the Italian 5th Army on the western Libyan border. In Libya, the Regio Esercito ((Royal Army)) had about 215,000 men and in Egypt, the British had about 36,000 troops, with another 27,500 men training in Palestine.
British forces included the Mobile Division (Egypt) (Major-General Percy Hobart), one of only two British armoured training formations, which in mid-1939 was renamed the Armoured Division (Egypt). On 16 February 1940, it became the 7th Armoured Division. The Egypt–Libya border was defended by the Egyptian Fronter Force and in June 1940, the headquarters of the 6th Infantry Division (Major-General Richard O'Connor) took over command in the Western Desert, with instructions to drive back the Italians from their frontier posts and dominate the hinterland if war began. The 7th Armoured Division, less the 7th Armoured Brigade, assembled at Mersa Matruh and sent the 7th Support Group forward towards the frontier as a covering force, where the RAF also moved most of its bombers; Malta was also reinforced.
The HQ of the 6th Infantry Division, which lacked complete and fully trained units, was renamed the Western Desert Force on 17 June. In Tunisia, the French had eight divisions, capable only of limited operations and about 40,000 troops in three poorly armed and trained divisions in Syria, along with border guards, most as an army of occupation against the civilian population. Italian land and air forces in Libya greatly outnumbered the British in Egypt but suffered from poor morale and were handicapped by some inferior equipment and poor serviceability. In Italian East Africa were another 130,000 Italian and African troops, with 400 guns, 200 light tanks and 20,000 lorries; Italy declared war from 11 June 1940.
Terrain
The Western Desert was about 240 miles (390 km) wide, from Mersa Matruh in Egypt to Gazala on the Libyan coast, along the Litoranea Balbo (Via Balbia), the only paved road. The Sand Sea 150 miles (240 km) inland marked the southern limit of the desert at its widest at Giarabub and Siwa; in British parlance, Western Desert came to include eastern Cyrenaica in Libya. From the coast, extending inland lies a raised, flat plain of stony desert about 91–152 metres (300–500 ft) above sea level, that runs 200–300 kilometres (120–190 mi) in depth until the Sand Sea. Scorpions, vipers and flies populated the region, which was inhabited by a small number of Bedouin nomads. Bedouin tracks linked wells and the easier traversed ground; navigation was by sun, star, compass and "desert sense", good perception of the environment gained by experience. (When the Italian invasion of Egypt began in September 1940, the Maletti Group got lost leaving Sidi Omar, disappeared and had to be found by aircraft.) In spring and summer, days are miserably hot and the nights are bitter cold. The Sirocco (Gibleh or Ghibli), a hot desert wind, blows clouds of fine sand, which reduces visibility to a few metres and coats eyes, lungs, machinery, food and equipment; motor vehicles and aircraft need special oil filters and the barren ground means that supplies for military operations, have to be transported from outside.
Operation Compass
Following Operazione E the invasion of Egypt by the 10th Army and the advance to Sidi Barrani, Wavell ordered the commander of British Troops Egypt, Lieutenant-General Sir Henry Maitland Wilson, to plan a limited operation to push the Italians back. Operation Compass, for administrative reasons, was originally planned as a five-day raid but consideration was given to continuing the operation if it succeeded. On 28 November, Wavell wrote to Wilson that,
I do not entertain extravagant hopes of this operation but I do wish to make certain that if a big opportunity occurs we are prepared morally, mentally and administratively to use it to the fullest.
On 8 December, the British had begun the operation against the fortified Italian camps, which had been set up in a defensive line outside Sidi Barrani. (Berti was on sick leave and Gariboldi had temporarily taken his place.) The raid succeeded and the few units of the 10th Army in Egypt that were not destroyed, were forced to withdraw. By 11 December, the British converted the raid a counter-offensive and the rest of the 10th Army in Egypt was swiftly defeated. The British prolonged the operation, to pursue the remnants of the 10th Army to Sollum, Bardia, Tobruk, Derna and Mechili, then advanced through and around the Jebel Akhdar (Green Mountain) to cut off the Italian retreat to Beda Fomm and El Agheila on the Gulf of Sirte.
Derna–Mechili
The area east of the Jebel Akhdar mountains was garrisoned by the XX Motorised Corps (Lieutenant-General Annibale Bergonzoli) with the 60th Infantry Division Sabratha and the Babini Group (General Valentino Babini), which had already lost some of its tanks in the Capture of Tobruk. The Babini Group had an establishment of 120 tanks but these included 82 which had landed recently at Benghazi. The new tanks needed ten days to be made battleworthy and a three-day journey to reach Mechili but in the crisis, tanks had been rushed forward, which reduced the serviceability of the vehicles. A defensive position was established by the 60th Infantry Division Sabratha on a line from Derna, along Wadi Derna, with the Babini Group concentrating at Mechili Fort 170 miles (274 km) east of Benghazi, where several desert tracks converged, Giovanni Berta and Chaulan, to guard the flank and rear of the infantry. On 22 January, the British advanced towards Derna with the 19th Australian Brigade (Brigadier Horace Robertson) and sent another Australian brigade to reinforce the 4th Armoured Brigade (Brigadier J. A. L. Caunter) of the 7th Armoured Division (Major-General Michael O'Moore Creagh), south of the Jebel Akhdar, for an advance on Mechili.
On 23 January, Tellera the 10th Army commander, ordered a counter-attack against the British as they approached Mechili Fort, to avoid an envelopment of the XX Motorised Corps from the south but communication within the Babini Group was slow, because only the tanks of senior commanders had wireless. Next day, 10–15 M13/40s of the Babini Group attacked the 7th Hussars of the 4th Armoured Brigade, which was heading west to cut the Derna–Mechili track. The Italians fired on the move, hit several tanks and pursued as the British swiftly retired, calling for help from the 2nd RTR, which ignored the signals through complacency. By 11:00 a.m., the British had lost several light tanks and a cruiser tank, one cruiser had a jammed gun and the third was retiring at speed, after taking fifty rounds to knock out two M13s. Eventually the 2nd RTR was alerted, caught the Italian tanks while sky-lined on a ridge and knocked out seven M13s, for a British loss of the cruiser and six light tanks.
Tellera intended to use the Babini Group to harass the southern flank of the British and cover a withdrawal from Mechili but Graziani ordered him to wait on events. By the evening, a report had arrived from Babini that the group was down from 50–60 tanks and that their performance had been disappointing, along with alarmist tales of 150 British tanks advancing round the southern flank and Graziani ordered Tellera to disengage the Babini Group by next morning. Some tanks of the group had been held back at Benghazi and work had begun on a defensive position at Sirte, 440 miles (710 km) to the south. On 25 January, the 2/11th Australian Battalion near the coast engaged the 60th Infantry Division Sabratha and Bersaglieri companies of the Babini Group at Derna airfield, making slow progress against determined resistance. Italian bombers and fighters flew sorties against the 2/11th Australian Battalion, as it attacked the airfield and high ground at Siret el Chreiba. The Bersaglieri swept the flat ground with field artillery and machine-guns, stopping the Australian advance 3,000 yards (2,700 m) short of the objective.
The 4th Armoured Brigade was ordered to encircle Mechili and cut the western and north-western exits, while the 7th Armoured Brigade cut the road from Mechili to Slonta but the Babini Group had retreated from Mechili during the night. The group was attacked by RAF fighters south of Slonta the next day and pursued until 28 January, by the 4th Armoured Brigade. On 26 January, Graziani ordered Tellera to continue the defence of Derna and to use the Babini Group to stop an advance west from Mechili–Derna. Tellera requested more tanks but this was refused, until the defences of Derna began to collapse the next day. During the day, the 2/4th Australian Battalion in the Derna–Giovanni Berta area, attacked and cut the Derna–Mechili road and a company crossed Wadi Derna during the night. On the northern edge of the wadi, a bold counter-attack with artillery support was made across open ground by the 10th Bersaglieri of the Babini Group, which with reports in the morning that the group was attacking round the southern flank, deterred the Australians from continuing the advance on Derna, at the cost of 40 Bersaglieri killed and 56 captured.
During 27 January, Australian attempts to attack were met by massed artillery-fire, against which the Australian artillery were rationed to ten rounds per-gun-per-day; the 2/4th Australian Battalion repulsed another battalion-strength counter-attack. A column of Bren Carriers of the 6th Australian Cavalry Regiment was sent south to reconnoitre the area where the Italian tanks had been reported and was ambushed by a party of the Babini Group with concealed anti-tank guns and machine guns; four Australians were killed and three taken prisoner. The 11th Hussars found a gap at Chaulan south of Wadi Derna, which threatened the Babini Group and the defenders in Derna with encirclement and Bergonzoli ordered a retirement. The Italians disengaged on the night of 28/29 January before the garrison could be trapped and Babini Group rearguards cratered roads, planted mines, set booby-traps and managed to conduct several skilful ambushes, which slowed the British pursuit.
Italian defensive preparations
The Italians in Libya were dependent on Europe for supplies, which were moved internally by road and a few short stretches of railway. The section of the Via Balbia from Tripoli to Benghazi was 970 kilometres (600 mi) long, could flood and had become vulnerable to attacks by the Desert Air Force (DAF), when the British advance brought it into range. Driving on desert tracks increased vehicle wear and led to more accidents. The Babini Group had managed to avoid destruction at Mechili on 24 January but the inferiority of the Italian tanks and the belief that they were substantially outnumbered (possibly due to British attempts at deception with a dummy tank regiment) led to doubts that the defence of Derna could succeed. The 10th Army still had about 100 medium and 200 light tanks, about half being serviceable.
Rumours circulated about British intrigues in Tunisia and Algeria and the exploits of the Long Range Desert Group, French émigré forces and Senussi rebels in the southern province of Fezzan, which added to Italian apprehensions about the western and southern approaches to Tripolitania. It had soon become clear to Graziani that the British were going to advance beyond Tobruk and the Jebel Akhdar, intending to capture all of Cyrenaica. On 1 February, he reported to Mussolini that he intended to save the rest of the 10th Army by withdrawing to Sirte, where Gariboldi, the commander in Tripoli, had been ordered to prepare defences. On 3 February, Tellera took over command in Cyrenaica, after Graziani sacked Berti, with orders to command the retreat. The Australians had caught up with the Italians at Giovanni Berta on 31 January, 6 miles (9.7 km) west of Derna and air reconnaissance reported indications of a general withdrawal.
British plan and assembly
In late January 1941, the British learned from decoded messages, that the Italians were evacuating Cyrenaica along the Via Balbia through Benghazi. The 6th Australian Division pursued the Italians, along the coast road north of the Jebel Akhdar, with the 11th Hussars on their left flank. Babini Group reports about the Hussars led Tellera to assume that the 7th Armoured Division was behind the Australians so did not assemble a big flank guard or expect an outflanking move through Msus. The Australians closed up to Giovanni Berta on 1 February but the Italians eluded them by the speed of their withdrawal. O'Connor had intended to pause while supplies were built up around Mechili and wait for parts of the 2nd Armoured Division to arrive but the failure to trap the 10th Army, led O'Connor to ignore the lack of supplies and decrepitude of the British tanks, which were down to 40 serviceable cruisers and 80 light tanks. The 7th Armoured Division was ordered on 4 February, to intercept the remnants of the 10th Army, by moving inland 150 miles (240 km) from Mechili to Msus, to cut off the Italians between Soluch and Ghemines.
All British aircraft were to support the move and protect lorries carrying a day's supplies just behind the tanks and a big convoy with two day's supplies a short distance behind but ground attacks had been stopped on 3 February due to an engine shortage. Even if all the supplies arrived no more could be delivered for several days, which meant that a battle had to be won in three days or be defeated by lack of fuel, water and ammunition. Italian wireless interception of 11th Hussars messages revealed Soluch as its objective and Tellera inferred that the British armoured forces would advance on Msus and Sceleidima. Little could be done, apart from withdrawing through the jebel faster, sowing Thermos bombs along the path of the British advance and garrisoning Msus, Sceleidima and Antelat to delay the British forces. The rugged terrain was hard going for the British tanks and caused more delays than Italian counter-measures and if a tank broke down it was left behind, until a recovery team could tow it back to Tobruk. At dawn on 4 February, the 11th Hussars left Mechili over ground which had only been reconnoitred from the air, to avoid alerting the Italians. Low-flying aircraft had reported that the going was difficult and for the first 50 miles (80 km) the route was the worst yet encountered in the desert. By 3:00 p.m. armoured cars had reached Msus, 94 miles (151 km) away, where the garrison left hurriedly and some cars followed up for another 30 miles (48 km) to Antelat and the 7th Support Group reached the 4th Armoured Brigade, which was still preparing to move from Mechili.
Combeforce
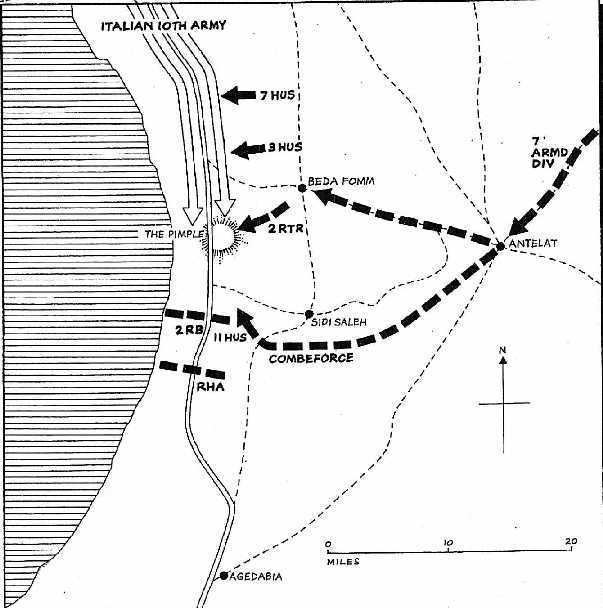
News arrived from air reconnaissance that a large Italian convoy was south of Benghazi, which was taken to mean that a general withdrawal from Cyrenaica had begun. (The convoy was actually one of rear-area personnel; most of the XX Motorised Corps was east of Benghazi and the Babini Group was covering the Italian rearguard, which was retiring from Barce.) Because the British tanks needed more time for maintenance, Creagh took a bold decision to send an improvised flying column of wheeled vehicles, south-west across the chord of the jebel, to block the Via Balbia between Benghazi and Agedabia as quickly as possible. The tracked vehicles were to follow on to the south-west, rather than continue westwards to Soluch. Combeforce (Lieutenant-Colonel J. F. B. Combe), consisted of an armoured car squadron from each of 11th Hussars and King's Dragoon Guards, the 2nd Rifle Brigade, an RAF armoured car squadron, six 25-pounder field guns of C Battery 4th Royal Horse Artillery (4th RHA) and the 106th (Lancashire Hussars) Battery RHA, with nine Bofors 37 mm anti-tank guns portée, a total of about 2,000 men.
5 February
In the Jebel Akhdar, the 6th Australian Division advanced down the Via Balbia, with the 17th Australian Brigade leap-frogging a battalion to Slonta, where the 19th Australian Brigade using the rest of the divisional transport and captured petrol, passed by and reached Barce despite mines and roadblocks on 5 February. (The Australians got to Benghazi before night on 6 February, despite more mines and heavy rain.) Combeforce reached Antelat during the morning and by 12:30 p.m. had observers overlooking the Via Balbia west of Beda Fomm and Sidi Saleh, about 48 kilometres (30 mi) south-west of Antelat and 32 kilometres (20 mi) north of Ajedabia, with the rest of Combeforce following on. An Italian convoy drove up about thirty minutes later, ran onto mines and was then engaged by the artillery, anti-tank guns and armoured cars, which threw the column into confusion. Some members of the 10th Bersaglieri tried to advance down the road and others looked for gaps in the ambush on either side of the road.
The Bersaglieri had little effect, being unsupported by artillery, most of which was with the rearguard to the north. The attempts by the Italians to break through became stronger and in the afternoon, the 2nd Rifle Brigade crossed the Via Balbia into the dunes, to block the route south between the road and the sea. Combe also brought up a company behind the roadblock, placed some 25-pounders behind the infantry and kept some armoured cars manoeuvring in the desert to the east, to deter an Italian outflanking move. Several hundred prisoners were taken but only a platoon of infantry could be spared to guard them. The vanguard of the Italian retreat had no tanks, contained few front-line infantry and had been trapped by the ambush which forced them to fight where they stood.
While waiting for the 4th Armoured Brigade, which had been brought up to establishment by transfers from the 7th Armoured Brigade and had the 3rd Hussars, 7th Hussars and the 2nd RTR under command, Combe reconnoitred to the north and near a small white mosque found several long, low, north-south ridges with folds between, in which tanks could hide from the road as they moved back and forth to fire at close range. The brigade set off from Msus at 7:30 a.m., led by light tanks and cruisers of the 7th Hussars, followed by the 3rd Hussars, brigade headquarters, 4th RHA, 2nd RTR and D Battery 3rd RHA in the rear, about 2 miles (3.2 km) back. The journey was delayed by moving in single-file through a field of Thermos bombs and the brigade took until 4:00 p.m. to cover the 40 miles (64 km) to Antelat, where they came into the range of Combforce wireless transmissions. Combe briefed Caunter to head for the mosque north of the roadblock and then attack all along the Italian column, to reduce the pressure on Combeforce. Caunter ordered the 7th Hussars and the artillery at full speed to the Via Balbia followed by the 2nd RTR in their slower tanks and the 3rd Hussars were sent north-east, to cut the routes from Soluch and Sceleidima. The brigade moved westwards on hard, flat sand, raising clouds of dust and soon reached the Via Balbia.
The tank going was found to be good but some tanks ran out of fuel; the rest pressed on to the ridges, from which they could see the traffic jam on the road. Despite the fuel shortage, the 7th Hussars attacked the Italian column at points 3 miles (4.8 km) apart, to create maximum confusion. The first attackers caught the Italians stationary and then split north and south to run past the convoy in both directions, shooting at everything on the road. Little return fire was offered, because most of the Italian troops were rear-area personnel or civilians and many Italian drivers tried to escape by heading west off the road into the sand dunes and got bogged down. Lorries carrying petrol caught fire and lit the dusk, illuminating targets for the British gunners and giving the tanks en route a mark to drive for. The British artillery was not needed so the crews rounded up about 800 prisoners and recovered undamaged Italian vehicles, particularly those carrying petrol to refuel stranded tanks.
Seven cruiser tanks from the 2nd RTR arrived north of the hussars and destroyed the anti-aircraft battery from Benina airfield by the light of burning vehicles. As dark fell the attacks were stopped despite the Italian disarray, because the 4th Armoured Brigade had been reduced to syphoning the petrol from artillery vehicles and looting Italian supplies to keep going. A better organised and supported Italian breakthrough attempt had to be anticipated for the morning and the tanks disengaged and moved about 2 miles (3.2 km) east of the road to refuel and rearm. Italian vehicle movements around Ghemines and air reconnaissance reports showed that the Italians had achieved a measure of co-ordination and that reinforcements were arriving from the north. Two tanks were seen in the gloom but the crews surrendered to a British soldier, when he knocked on their hatches. Further south, a Rifle Brigade patrol escorting two RHA anti-tank guns moved along the column, firing from different points to give the impression of a larger force and to keep the Italians pinned down, as Combeforce dug in deeper and sowed more mines.
To the north, the Australians captured Barce just after the Italians managed to detonate an ammunition dump and then pressed on towards Benghazi. Tellera had to retain part of the Babini Group, rather than send all of it south to reinforce Bergonzoli, for the attempts to break through to Agedabia. The 7th Armoured Brigade (with only the 1st RTR, after the reinforcement of the 4th Armoured Brigade) and most of the 7th Support Group, had driven west from Msus to capture Sceleidima. The fort had been garrisoned by the Bignami Group (Colonel Riccardo Bignami), to block the route towards the north end of the Italian column on the Via Balbia and Tellera detached another thirty tanks from the Babini Group as a reinforcement. The breakthrough attempts to the south could not be fully reinforced and the Italians could not expect to be undisturbed for long by British attacks along the convoy or the Australian advance down the Via Balbia, towards the tail of the column. When the rest of the Babini Group arrived at Beda Fomm it could be supported only by improvised artillery and infantry groups, which had little idea of British dispositions, in the absence of reconnaissance.
6 February
During the night, Bergonzoli organised an attack down the Via Balbia, to pin down the defenders and a flanking move by the Babini Group eastwards through the desert, just west of the Pimple to get behind Combeforce, because the retirement of the 4th Armoured Brigade into laager, led Bergonzoli to believe that the force would concentrate in defence of the road block. At 8:30 a.m. the Babini Group advanced without artillery support and with no knowledge of the situation beyond the first ridge to the east. Caunter had ordered the light tanks to continue the harassment of the flanks of the convoy and that Italian tanks were to be left to the cruiser tanks, with the artillery supporting both forces. The British had 32 cruisers and 42 light tanks left near the Italians on the Via Balbia, with ten cruisers and eight light tanks in the 1st RTR to the north but these were held back by Creagh and sent south from Sceleidima to Antelat as a reserve, after Creagh received reports that the 10th Army was already south of Ghemines. The 7th Support Group, which was left with only the 1st King's Royal Rifle Corps (1st KRRC) and some artillery, was held up at Sceleidima by minefields covered by artillery and the tanks of the Babini Group detachment. The 1st RTR lost contact with the brigade and got lost in a sandstorm and no air support was available, because the advanced airfields occupied by the RAF were out of range, as were those of the Regia Aeronautica, which could make only a few sorties to Beda Fomm.
At dawn on 6 February, the Australians continued their attacks on Benghazi from the north and the 1st KRRC made slow progress at Scledeima, where Bignami was ordered to retire at 10:00 a.m., send the Babini Group detachment south to reinforce the attack on the Pimple and keep the British off the rear of the column; the 7th Support Group followed the retirement, occupied Soluch and sent patrols towards Ghemines and Benghazi. During the morning of 6 February, patrols reported that the Italian column was several miles long. The 2nd Royal Tank Regiment (2nd RTR) held the Pimple, a low round hillock west of Beda Fomm, from where the road could be watched both ways; further west were 2 miles (3.2 km) of flat sands between the road and the beach. The 2nd RTR had 19 cruisers and seven light tanks still operational and was to stop 10th Army columns on the road by attacks from the east. To the north, the 7th Hussars with a cruiser and 29 light tanks, were sent to find the north end of the Italian column and to attack it from both sides of the road. A squadron of light tanks from the 3rd Hussars was to watch for the 1st RTR on the tracks leading north to Soluch and Scledeima from Antelat, which left seven cruisers and six light tanks to attack the convoy about 4 miles (6.4 km) north of Beda Fomm.
The 2nd RTR was left near the Pimple and A Squadron, equipped with A13s (Cruiser Mk III), received the attack of the Babini Group at 8:30 a.m. The first wave of ten M13s advanced slowly and were surprised, when turrets of the British cruisers appeared over a ridge 600 yards (550 m) away. The cruiser gunners rapidly knocked out eight M13s, before the tanks disappeared below the ridge. The cruisers drove to the ridge near the white mosque and knocked out another seven M13s with the same tactic. The Italian artillery opened fire on the mosque and every operational tank the Babini Group had left, advanced towards the Pimple and the mosque. C Squadron, in its slower A9s (Cruiser Mk I) and A10s (Cruiser Mk II), arrived and the commander of F Battery, 4th RHA drove in a truck next to the tank of the 2nd RTR commander, directing the guns, which threw up clouds of dust, obscuring the movements of the tanks. The British tanks had the advantage of radio, unlike most of the Italian tanks, which had to move to an objective and then stop while the commanders dismounted to receive orders.
At 10:30 a.m. and in poor visibility, the 7th Hussars tried to find the rear of the Italian column and cut the road west of Beda Fomm, just as another big convoy arrived from the north. The convoy was escorted by M13s, which forced back the hussars and showed that the 10th Army had far more than sixty tanks, since that many had already been knocked out. Support from the 1st RTR was needed but having emerged from the sandstorm near Antelat, it had to refuel before moving. The Babini Group M13s mixed in with the column, kept the light tanks at a distance but these still managed to cause much damage and confusion. The units of the 4th Armoured Brigade moved from position to position among the ridges near the Pimple and mosque, raiding the column as more M13s arrived from the north. Combeforce could see the fighting and picked up Italians who got through, C Battery bombarding any Italian party which looked organised and by noon a lull had fallen and the Rifle Brigade Officers' mess tent was put up behind the reserve company.
The weather turned to rain as more Italian columns arrived near the Pimple and were engaged by the cruisers and light tanks of the 2nd RTR, wherever there were no Italian tanks to stop them. By noon, forty Italian medium tanks had been knocked out, about fifty were left and the 2nd RTR was down to 13 cruisers, three of which were knocked out by Italian artillery. The Italian rearguard arrived in the afternoon and the concentration of tanks and artillery enabled the Italians to recapture the Pimple, open the road south and continue the outflanking move to the east. The attacks of the Babini Group left the convoy free to move past the Pimple and A Squadron pursued the Italians, firing into the convoy and setting many alight, forcing drivers to abandon their vehicles and others to leave the road for the dunes to the west, where they dodged British artillery-fire and attacks by light tanks of C Squadron, which took 350 prisoners.
At 3:00 p.m. the 7th Hussars found the north end of the Italian column and attacked, the 3rd Hussars north-east of Beda Fomm facing the Babini Group had been ordered to stand its ground and the 2nd RTR had been pushed back from the Pimple and had tried to get across the road to the west side and been repulsed by Italian artillery-fire. Communication with the British artillery had failed when the armoured observation post had been knocked out and took an hour to remedy before the artillery could accurately bombard the Pimple again. The 1st RTR arrived from Antelat as night was falling and intercepted the Babini Group as it was breaking out just to the north but several Italian vehicles and thirty tanks got past the Pimple. Bergonzoli abandoned attempts to hook round the eastern flank and sent the last of the Babini Group west through the dunes, just as the 2nd RTR had to rearm, which reported at 6:00 p.m. that it was incapable of stopping the main column, which had begun to move south, through the British artillery-fire. Caunter ordered the 4th Armoured Brigade, which still had fifteen operational cruisers and 55 light tanks, to take up night positions closer to Combeforce; the 1st RTR was almost intact.
7 February
On 6 February, Combeforce had faced some well-organised attacks with artillery and tank support, which had been repulsed by C Battery RHA and nine Bofors anti-tank guns of the 106th RHA. Italian infantry had used wrecked tanks as cover for their advance, while many more lost hope and surrendered. During the night, some tanks from the Pimple arrived and four were knocked out by mines and gunfire, four got through with some lorries and the rest gave up. O'Connor had spent 6 February with Creagh at the 7th Armoured Division HQ, in touch with Mackay at the 6th Australian Division HQ. Advanced troops of the 19th Australian Brigade had entered Benghazi unopposed during the afternoon, to a great welcome by the Libyan inhabitants and during the night O'Connor ordered Mackay to send two battalions of infantry past Benghazi, to attack the tail end of the columns of the 10th Army. Just before dawn on 7 February, the 7th Support Group attacked the north end of the Italian convoys, the 2nd RTR moved south along the west side of the Via Balbia and the 1st RTR moved east, to cover the desert flank of Combeforce. The Italians had only about thirty tanks left and planned to force their way through Combeforce at dawn, before the British could attack the flanks and rear of the column.
The attack had artillery support as soon as it was light enough to see movement by the anti-tank guns portée of the 106th RHA. The infantry of the 2nd Rifle Brigade stayed under cover as they were overrun by the Italian tanks, which concentrated on the RHA anti-tank guns. C Battery 4th RHA fired on the Rifle Brigade positions as the tanks passed and the Rifle Brigade resumed fire on Italian infantry following the tanks, to pin them down. The M13s knocked out all but one anti-tank gun and kept going into the reserve company area but the last gun was driven to a flank by the battery commander, his batman and the cook. The improvised crew commenced firing as the last M13s drove towards the Officers' mess tent put up the day before and knocked out the last tank 20 yards (18 m) from the tent. On the road, the Italians could hear British tank engines on the flanks and from the rear and further north, the 4th Armoured Brigade surrounded another group, at which point the Italians surrendered. The Australians had reached El Magrun, 15 miles (24 km) south of Ghemines, about half-way to the Pimple and the 19th Australian Brigade Group battalions were ferried onwards with all speed. The Beda Fomm area had become a 15-mile (24 km) line of destroyed and abandoned lorries, about 100 guns, 100 knocked out or captured tanks and 25,000 prisoners, including Tellera (found mortally wounded in one of the M13s), Bergonzoli and the 10th Army staff.
Analysis
The British plan to trap the 10th Army had worked, despite the British being outnumbered 4:1 in medium tanks and most of the Italian tanks being new, while the British tanks had covered more than 1,000 miles (1,600 km) since the beginning of Operation Compass. The speed of the dash from Mechili had surprised the Italians, despite the obvious danger of such a move, especially when the British reached Msus on 4 February; had the Italians on the Via Balbia been prepared for a road-block and made an organised attack, the 10th Army might have escaped. The British had gambled with the provision of fuel and supplies, which were capable only of sustaining a short operation and narrowly succeeded but the pursuit could not continue beyond El Agheila, due to broken-down and worn out vehicles. O'Connor requested through Wavell that the government reconsider the conquest of Tripolitania, just as the Greek government announced that it would resist German aggression and accept reinforcement by the British if sufficient forces could be made available.
The success of the 7th Armoured Division encouraged a belief in the Royal Tank Regiment, that manoeuvre could win battles but the engagement with the Babini Group on 24 January, also led to the conclusion that armoured divisions needed more artillery. No integration of tanks and infantry was considered necessary or that anti-tank guns should be used offensively and the lack of cover from air observation in the desert encouraged dispersion to avoid air attack, where the British lacked air superiority, at the expense of the concentration of fire power at the decisive point. Due to the exiguous nature of supply and transport, conservation during lulls also encouraged the use of small jock columns, of a motorised infantry company, a field-gun battery and several armoured cars. The success of such columns against the Italians, led to exaggerated expectations which were confounded, when better-equipped and trained German troops arrived in Libya. The 7th Armoured Division concluded that the defensive mentality of the Italians, had justified the taking of exceptional risks which would be unjustified against German troops.
Only a few thousand men of the 10th Army had escaped the disaster in Cyrenaica but the 5th Army had four divisions in Tripolitania and the Italians reinforced the Sirte, Tmed Hassan and Buerat strongholds from Italy, which brought the total of Italian soldiers in Tripolitania to about 150,000 men. The Italian forces in Libya experienced a "renaissance" during 1941, when the 132nd Armoured Division Ariete, the 102nd Motorised Division Trento, and the 101st Motorised Division Trieste arrived along with better equipment. Italian anti-tank units performed well during Operation Brevity, Operation Battleaxe and the Ariete Division defeated the 2nd Armoured Brigade at Bir el Gubi on 19 November, during Operation Crusader.
Casualties
At the Battle of Beda Fomm, the British took about 25,000 prisoners, over 100 tanks (many still operational), 216 guns and 1,500 wheeled vehicles. During Operation Compass, the British had advanced 800 kilometres (500 mi), destroyed or captured about 400 tanks and 845–1,290 artillery pieces, taken 133,298 Libyan and Italian prisoners of war, besides a vast quantity of other war material. The prisoners included 22 generals and the Italian general staff recorded 960 guns of all types lost. The British and Commonwealth forces suffered 500 dead, 1,373 wounded and 55 missing, a portion of which were incurred at Beda Fomm.
Subsequent operations
The defeat of the 10th Army appeared to mean that the British could hold Cyrenaica with fewer ships, men and aircraft, as long as the offensive was terminated. The Navy and RAF commanders were against another offensive, having supported two land campaigns, supplied Malta and protected Egypt from the growing threat from the Luftwaffe. On 9 February, Churchill ordered the advance to stop and troops to be dispatched to Greece (Operation Lustre), to take part in the Greco-Italian War and forestall a German invasion. On 11 February, Wavell made a lukewarm suggestion to the Chief of the Imperial General Staff (CIGS) to continue the offensive, emphasising the opposition of the RAF and Navy. On 8 February, the 11th Hussars patrolled westwards without air cover to the area 130 miles (210 km) east of Sirte, lifting prisoners and equipment and finding no organised Italian defences.
The first troops of the Deutsches Afrikakorps (DAK), landed in Tripolitania on 11 February, as part of Unternehmen Sonnenblume (Operation Sunflower). With the arrival of the DAK (Generalleutnant Erwin Rommel), the Axis rout ended and the British faced a better-equipped and led opponent, during a period of temporary weakness. On 25 March, General Italo Gariboldi replaced Marshal Rodolfo Graziani who had asked to be relieved as Governor-General of Libya. Wavell made Wilson the Military Governor of Cyrenaica and disbanded the headquarters of XIII Corps (the renamed Western Desert Force), dispersing its skilled and experienced personnel. On 14 February, as the 11th Hussars handed over to the King's Dragoon Guards, aircraft were seen through a haze, which made the most devastating attack that the Hussars had experienced; a few hours later Ju 87 Stuka dive-bombers arrived overhead and attacked.