
Name Kandelfels Name Pinguin Yard number 5 Length 155 m Endurance 6.8 months | Launched 1936 Beam 19 m Builder AG Weser | |
 | ||
Fate Requisition by Kriegsmarine, 1939 | ||
German auxiliary cruiser pinguin
Pinguin was a German auxiliary cruiser (Hilfskreuzer) which served as a commerce raider in World War II. Pinguin was known to the Kriegsmarine as Schiff 33, and designated HSK 5. The most successful commerce raider of the war, she was known to the British Royal Navy as Raider F.
Contents
- German auxiliary cruiser pinguin
- Early history
- Pinguin voyage
- Domingo de Larrinaga
- Filefjell captured
- British Commander
- Morviken
- Filefjell sunk
- Trafalgar
- Benavon
- Nordvard
- Storstad
- Passat and mine laying
- Nowshera
- Maimoa
- Port Brisbane
- Port Wellington
- Atlantis rendezvous
- Norwegian whaling fleet captured
- Replenishment
- Empire Light
- Clan Buchanan
- British Emperor
- Sinking
- Raiding career
- References

Early history
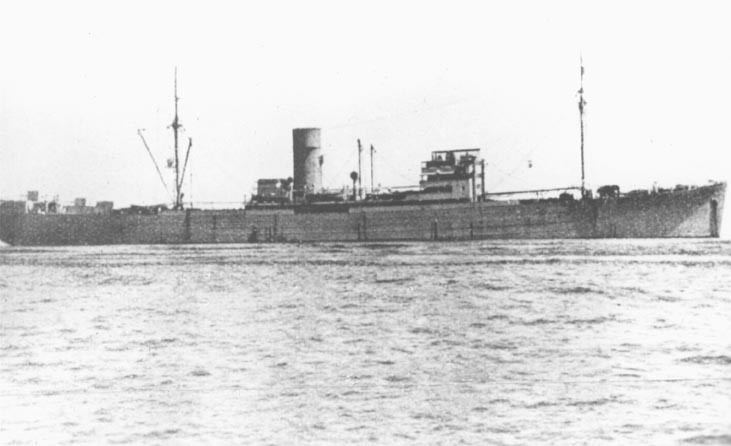
Formerly a freighter named Kandelfels, she was built by Deschimag A.G. Weser in 1936, and was owned and operated by the Hansa Line, Bremen. She was the sister-ship of Kybfels, and a half-sister of Goldenfels (built by Bremer Vulkan), which was converted into the raider Atlantis.
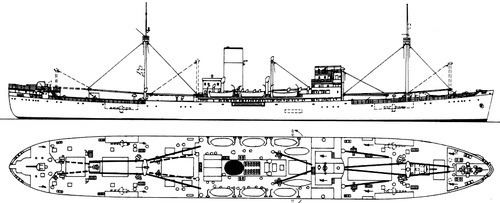
In the winter of 1939–40, she was requisitioned by the Kriegsmarine (KM) and converted to a warship by Deschimag A.G. Weser, Bremen. Her main armament, six 150 mm L/45 C/13 guns was taken from the obsolete battleship Schlesien and she was also fitted with one 75 mm cannon, one twin 37 mm anti-aircraft mounting, four 20 mm anti-aircraft guns, and two single 53.3 cm torpedo tubes for 16 torpedoes. She was supplied with two Heinkel He 114A-2 seaplanes and 300 seamines. She also carried 25 G7a torpedoes and 80 U-Boat mines for replenishing U-boats.
Pinguin voyage
Pinguin was one of the first wave of raiders sent out by the Kriegsmarine, sailing on 15 June 1940 under the command of Fregattenkapitän (later Kapitän zur See) Ernst-Felix Krüder and disguised as an anonymous naval transport ship with an escort from the minesweeper Nautilus. The escort duties were taken over by Sperrbrecher IV on 18 June and later by the Type 23 torpedo boat Falke and the Type 24 torpedo boat Jaguar. The convoy then sailed through the Great Belt into the Kattegat.
The three-ship convoy passed through the Skagerrak on 19 June with Luftwaffe air cover from a Dornier Do 18 flying boat and two fighters and entered the North Sea. Her escort was reinforced with the minesweepers M17 and M18, and they headed up the coast of Norway, passing Bergen on 20 June where the torpedo boats departed. Schiff 33 and the minesweepers carried on northwards to Sörgulenfjord. In the fjord the grey German auxiliary Schiff 33 was disguised as the black-hulled Soviet cargo ship Petschura with hammer and sickle markings. They emerged from the fjord on 22 June en route to the Denmark Strait. Schiff 33's mission was to rendezvous with and replenish submarine U-A off the Cape Verde and then to disrupt traffic in the Indian Ocean and lay mines off Australian and Indian ports. She was then to head south to seek out the British and Norwegian whaling fleets in the Antarctic.
The convoy headed into heavy weather and high winds and the two minesweepers turned back. Sailing westwards at 15 knots a surfacing submarine was spotted and on sighting Petschura disappeared. Assuming it was British Petschura headed northwards to give the impression of a Soviet ship headed for Murmansk. Surfacing again the submarine increased speed and gave chase signalling first "What ship?" and on being ignored "Heave to, or we open fire!" Petschura continued at full speed and left the submarine behind. Petschura continued northeasterly up the coast of Norway.
On 28 June Pinguin headed south surrounded by icebergs. She inched southwards until 29 June she sailed through the Denmark Strait into the Atlantic on 1 July to rendezvous with U-A on 18 July. On 10 July she was re-camouflaged as the Greek Kassos.
On 18 July U-A had serious engine troubles and because of bad weather it was not safe to transfer the torpedoes, water and stores. They decided to seek calmer waters to the south transferring 70 tons of diesel fuel to the submarine en route. On 20 July in calmer waters 700 miles south-west of the Cape Verde they started the replenishment. It was first time a submarine was ever re-supplied at sea by a raider. Unable to come alongside because of the risk of damaging her hydroplanes the first day was spent improvising methods to close the gap. The 11 torpedoes had to be ferried across on flotation bags and it was not completed until 25 July. Pinguin then continued south towing U-A to save fuel until the shipping lanes off Freetown where the U-Boat unsuccessfully pursued a tanker. Pinguin then towed her again until 28 July.
Domingo de Larrinaga
On 31 July 300 miles (480 km) north-west of Ascension Island, a ship was sighted. It also spotted the raider and turned away, sending a QQQ signal. Trying to jam the distress signals, Pinguin gave chase. She ran up her battle flag and dropped its camouflage, signalling to the vessel to stop and not to use her wireless or she would be fired upon. When the commands were ignored, warning shots were fired across her bows from her 75 mm gun. Four more warning shots were fired, but she did not stop; the distress signals continued and her crew were seen to be manning their stern-mounted gun. Pinguin opened fire with her main armament on the freighter's bridge with several hits. The freighter on fire slowed to a halt and her crew were seen to be abandoning ship. The British freighter Domingo de Larrinaga was on her way from Bahía Blanca to Newcastle with 7,000 tons of grain and a crew of 36. A heavily armed boarding party found eight crewmen dead on the ship. The party included Pinguin's surgeon, and two sick bay attendants were sent to care for the wounded. Scuttling charges were placed in the freighter's engine room. The charges failed to explode and she had to be sunk by a torpedo. The survivors were taken aboard Pinguin.
Filefjell captured
On 20 August Pinguin rounded the Cape of Good Hope. On 26 August south of Madagascar one of Pinguin's seaplanes with RAF markings was launched. It found a tanker and the pilot dropped a message onto its deck ordering her to "Alter course to 180° distance 140 miles on account of vicinity of enemy raider" "From that point take up cours direct to 31°N 37°E" "thence you get further informations" "Do not use wireless". This was to try to lead her straight to Pinguin. The tanker appeared to obey this command later was found trying to escape at top speed. The plane was relaunched. When it found her again it ripped away her radio aerials and strafed her bridge with cannon and machine gun fire. The plane set down and ordered her to "Remain stopping here" "cruiser Cumberland will go with you" and to show her navigation lights. The tanker was loaded with 10,000 tons of high-octane aviation fuel and 500 tons of oil surrendered and switched on its lights. Guided by the lights Pinguin arrived and her boarding party identified the ship as the Norwegian Filefjell chartered by the British Admiralty on her way from the Persian Gulf to Cape Town. A prize crew was placed aboard the tanker. It was decided to take Filefjell to a quiet area to transfer the 500 tons of oil to Pinguin.
British Commander
On 27 August a ship was spotted sailing blacked-out and with no lights. Filefjell was ordered to drop back. Pinguin shadowed the ship for an hour then signalled for her to stop and had a warning shot fired across her bows. The ship obeyed and identifying itself as the tanker British Commander. She then radioed QQQ distress signals giving her position and reported that she was being attacked by a merchant raider. Pinguin's searchlight spotted that the enemy's 4-inch gun mounted on her stern had been manned and ordered its gunners to open fire. The tanker was hit several times and set on fire. The tanker captain stopped the ship and instructed his crew to abandon ship. A torpedo failed to sink her, and 40 150 mm shells were then fired to sink her. Pinguin then picked up the tanker's 45-man crew and headed out into the Indian Ocean at full speed.
Morviken
Another freighter was then spotted. Pinguin came alongside. It signalled to her that she would sink her if she did not stop. A 75 mm warning shot was fired across her bows. The ship then halted with no resistance and no signal sent. It was identified by the boarding party as the Norwegian ship Morviken. It was heading for Calcutta from Cape Town. The crew of 35 was taken aboard along with her motor-cutter then the ship was scuttled.
Filefjell sunk
Pinguin and Filefjell sailed south-east away from the shipping routes to transfer the 500 tons of fuel oil and then scuttling charges were set on Filefjell. The charges detonated but the ship did not explode. 75 mm gunfire was then used to try and sink her, but two 150 mm shells were needed to ignite the petrol in the tanks, sending a massive fireball into the sky.
Trafalgar
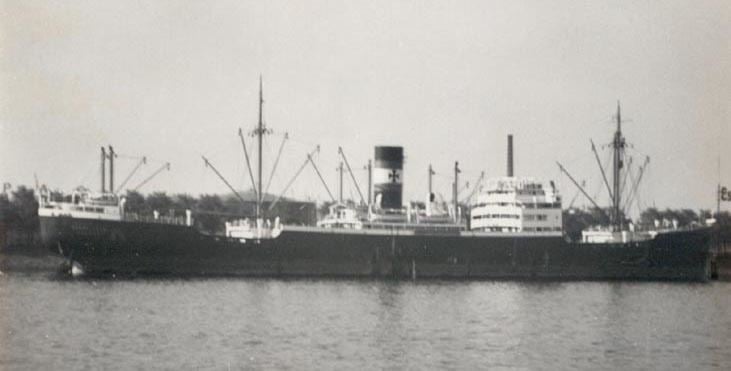
It was decided that Pinguin should adopt the identity of the Wilhelmsen cargo-liner Trafalgar. On 31 August the transformation took place at a remote spot. Pinguin drifted for five days until 5 September. Pinguin then launched its seaplane to survey the area but it crashed on take off. The plane burst into flames and sank. The crew were in the water. The ship's only radio telephone was on the plane. It operated on a wavelength undetectable to Allied shipping. Pinguin's technicians needed calm weather to assemble the second aircraft that was stowed below in a crate. Pinguin had lost the ability to silence enemy radios by tearing away their aerials and that future enemy ships that sent signals would have to be fired on, increasing the chance of crews being killed. By 10 September work was completed on Pinguin and it had a black hull with a white band all the way around, white upperworks and a black funnel with two light-blue bands.
Benavon
It was decided to make one more sortie off Madagascar before heading for Australian waters to lay mines. Early on 12 September, a freighter was spotted 330 miles east of the island. Pinguin closed quickly on a deliberate ‘collision course’; the freighter maintained hers in accordance with the International Collision Regulations until the two ships were just over a mile apart. At this point the freighter sounded a long warning blast of its whistle. The freighter turned away from the raider. Pinguin ran up its battle ensign and de-camouflaged. The freighter crew manned her 4-inch gun and increased her speed to escape. The freighter was signalled to stop and a 75 mm warning shot was fired. The freighter fired back, hitting Pinguin with a shell that ricocheted off the surface of the sea and pierced her port side ending up in the crew's quarters close to the storage compartment containing 300 high-explosive mines. The shells fired by Benavon had no fuse caps fitted and it did not explode. One of Pinguin's crew picked up the shell with his cap and threw it through the hole it had made in the ship's hull into the sea. Pinguin fired back, putting the freighter's gun and wireless out of action. It destroyed most of her lifeboats and set her on fire. The freighter's captain gave the order to abandon ship, but the bridge was hit and he was killed along with his deck officers and radio operator. A boarding party found five men aboard, three of them wounded. They and the 24 others that had already abandoned ship were taken aboard Pinguin. The total number of survivors was 28. The ship was identified as the British freighter Benavon on her way to London from Manila and Singapore with a cargo of hemp, jute and rubber. It had a crew of 49 and was armed with one 4-inch and one 3-inch anti-aircraft gun. Three of the wounded died of their injuries after boarding Pinguin, and they were buried with full military honours.
Nordvard
The Seekriegsleitung ordered Pinguin to set course eastward along the busy sea route between Australia and South Africa. Four days later, on 16 September, a ship was sighted and stopped without any signals being sent and no gunfire. The ship was identified by the boarding party as the Norwegian ship Nordvard en route from Fremantle to Port Elizabeth with a cargo of 7,500 tons of Australian grain and a crew of 30. A prize crew was put aboard the ship along with over 100 prisoners and was sent to Bordeaux and arrived there on 22 November.
Storstad
Pinguin headed north-eastwards towards the Sunda Strait to the shipping lanes between India and Australia. On 27 September the sea was calm enough to allow the spare seaplane to be assembled. Ernst-Felix Krüder and his navigation officer Leutnant Wilhelm Michaelsen conceived and developed a plan to lay mines in six Australian and Tasmanian sea lanes, but it would require two ships. On 7 October off Christmas Island a vessel crossing the raider's path was flagged down and ordered to stop with a 75 mm warning shot. The vessel stopped and surrendered. The vessel was identified as the Norwegian motor-tanker Storstad carrying a cargo of 12,000 tons of diesel oil and 500 tons of heavy fuel oil. She was on her way from British North Borneo to Melbourne. Storstad was suitable for use as an auxiliary minelayer. Under a prize crew Storstad was taken to a remote spot between Java and the north-west tip of Australia to be converted into an auxiliary minelayer. Storstad was stripped and her after accommodation space was transformed into a mine deck with launching rails. 110 mines were transferred from Pinguin in the motorboat that was taken from Morviken. 1,200 tons of the diesel oil was transferred from Storstad to Pinguin.
Passat and mine laying
Storstad was commissioned into the German navy as the auxiliary minelayer Passat. Passat was placed under the command of Lieutenant Erich Warning and had a crew of three officers, eight petty officers and 19 ratings plus five members of her original Norwegian crew who volunteered to work in the engine room. On 12 October Passat headed for the Banks Strait off Tasmania and for the east and west ends of the Bass Strait on the approaches to Melbourne. Pinguin headed for the ports of Sydney, Newcastle, Hobart and laid mines also in waters west-south-west of the Neptune Islands off the coast of South Australia. Between 28 October and 7 November the two ships laid their mines and arranged to meet again 700 miles west of Perth on 15 November. On 7 November refrigerated cargo liner Cambridge hit one of Passat's mines and sank at the eastern approach to the Bass Strait with the loss of one man. On 9 November at the western end of the strait American freighter City of Rayville hit another of its mines sinking with the loss of only one man. On 5 December mines laid by Pinguin sank the Australian coaster Nimbin with the loss of seven men. On 7 December another Pinguin laid mine exploded badly damaging the large freighter Hertford. On 26 March 1941 the fishing trawler Millimumul sank with the loss of one man. On 15 November the two ships rendezvoused at a point 700 miles west of Perth. The two ships maintained strict radio silence in the month-long operation.
Nowshera
On 16 November Passat was de-commissioned and resumed her original name of Storstad. Her German crew was reduced to 18 and 20 Norwegian volunteers supplementing the five already aboard. Storstad was instructed to act as a scout ship for Pinguin. The two ships headed northwards before swinging westwards and on 17 November smoke was sighted on the horizon ahead of a large freighter. Pinguin pinned the freighter in the beam of her searchlight and a warning shot was put across her bows. The freighter was signalled to stop and maintain radio silence or she would be fired upon. The freighter halted, and a boarding party identified the ship as the British motor ship Nowshera on her way from Adelaide to Durban and the UK. Her cargo was zinc ore, wheat, wool and other assorted piece goods. The freighter had a crew of 113, and was armed with a Japanese-made 4-inch gun on her stern and an even older Lewis machine gun on the bridge. Whatever goods and provisions Pinguin needed were taken from Nowshera and she was then scuttled.
Maimoa
Pinguin then departed southwards. On 20 November smoke was spotted on the horizon. Pinguin established that it was from a large westbound cargo ship. Pinguin launched its newly assembled seaplane in order to snatch the ship's wireless aerials or if necessary to bomb her. The seaplane failed to snatch the aerials on its first attempt. The aircrew then dropped a weighted bag onto the ship's bridge with a message commanding her captain to stop his engines and to maintain radio silence or be attacked. The commands were not obeyed, and the ship's radio operator sent signals reporting that they were being attacked from the air. The seaplane then dropped two small bombs in front of the ship. A second attempt was made to snatch the aerials which succeeded. The seaplane came under machine-gun and rifle fire hitting it several times. The seaplane fired back. The seaplane was forced to land on the water with a perforated petrol tank and one of its floats damaged. The aircrew crouched down in the cockpit, expecting the freighter's gunners to finish them off, which they could easily have done. Pinguin slowed down to half speed and in a risky manoeuvre ‘dropped’ a boat with a three-man crew beside the seaplane then pursued the cargo ship. Pinguin's battle flag was hoisted and at the maximum effective range of 12 nautical miles (22 km) for the 150 mm guns she opened fire. Two salvos were fired, one long and the other falling short, forcing the cargo ship to a halt. A boarding party identified the ship as the coal-burning refrigeration ship Maimoa. The ship was en route to the UK from Fremantle via Durban. Its cargo was 5,000 tons of frozen meat, 1,500 tons of butter, 1,500 tons of grain, 16 million eggs packed and 100 tons of piece goods. The ship was scuttled and her crew of 87 was taken aboard Pinguin. The next morning the seaplane was hoisted back aboard Pinguin.
Port Brisbane
Storstad reported an enemy freighter was nearby. Pinguin closed in on the freighter. When it was pitch dark Pinguin fixed her searchlight beam on the freighter. A warning shot was fired and she was signalled to stop and maintain radio silence. The searchlight beam revealed two manned 6-inch guns on the freighter's after deck so Pinguin opened fire on the freighter. All eight shots of the first salvo registering hits. The freighter's radio room was destroyed killing the radio operator and the bridge was set on fire. The funnel was smashed and the steering gear was jammed sending her around in circles. The crew then abandoned ship. The ship was identified as the refrigerated freighter Port Brisbane. The freighter was on her way from Adelaide to Britain via Durban. She had a cargo of 5,000 tons of frozen meat, butter and cheese and 3,000 tons of wool, lead and piece goods. Port Brisbane had a crew of 87 but only 60 men and one woman passenger were picked up by Pinguin. The other 27 slipped away in a lifeboat in the darkness. Scuttling charges failed to sink Port Brisbane quickly enough so a torpedo was fired to finish her off. After unsuccessfully looking for the missing lifeboat Pinguin headed south-westwards.
Port Wellington
Pinguin headed south and then west followed by Storstad. By 28 November Pinguin's appearance had been altered by being painted black. Two days later Storstad reported a ship on the horizon. Storstad was sent to a rendezvous point. Pinguin closed to within a mile of other ship and opened fire without warning. The first salvo destroying the control centre and the radio room killing the radio operator and mortally wounding the ship's captain. The ship's steering gear was out of action and she was on fire. The ship was identified as the British refrigerated freighter Port Wellington sister ship of Port Brisbane. Port Wellington was bound for England from Adelaide via Durban. She was armed with two 6-inch and one 3-inch gun. Port Wellington was carrying 4,400 tons of frozen meat, butter, eggs, and cheese and 1,750 tons of steel, 1,200 tons of wheat. She had a crew of 82 and seven passengers. 81 of the crewmen including the wounded captain (who would later die from his injuries aboard Pinguin) and the seven passengers, all of who were women, were picked up by Pinguin. Port Wellington was then scuttled.
Atlantis rendezvous
From 11 ships sunk by Pinguin she had 405 prisoners aboard. Ernst-Felix Krüder notified the Seekriegsleitung that he was sending them to Europe aboard Storstad. Storstad still had 10,800 tons of diesel oil aboard and 3,000 tons of diesel oil was transferred to Pinguin before she left. It was arranged for the Atlantis, Komet and the Orion to be re-fueled by Storstad. On 8 December Pinguin and Atlantis met in the western Indian Ocean. The next day Storstad arrived and the re-fuelling commenced. Pinguin then set course southwards for her rendezvous with the whaling fleets in the Antarctic Ocean south of Bouvet Island.
Norwegian whaling fleet captured
On 17 December the Seekriegsleitung signalled that the whaling fleet was to be found in the area around South Georgia and that the names of the Norwegian factory ships involved were Harpon, Pelagos, Thorshammer, Vestfjord and Ole Wegger. All of the factory ships were under British charter. On Christmas Eve Pinguin intercepted the open-frequency chatter between two of the factory ships Ole Wegger and Pelagos. They learned that the whalers were awaiting a supply ship which was overdue, that Pelagos was short of fuel and that Ole Wegger's whale oil tanks were full to capacity. Ole Wegger offered to transfer some of her surplus fuel to Pelagos. Ernst-Felix Krüder decided that they would wait until the two ships were transferring the oil before making any move on them as they would be unmanoeuverable. Another intercepted signal established that the approaching supply ship was the Norwegian whale-oil tanker Solglimt. Solglimt first attended to Thorshammer which was operating 400 miles to the south-west. Ernst-Felix Krüder then decided to wait for Solglimt to arrive. On 13 January 1941 Solglimt arrived and tied up alongside Ole Wegger.
On 14 January as the two ships lay side by side Pinguin approached from the west. Pinguin slipped alongside Solglimt and the two ships were ordered to maintain radio silence. Pinguin launched two prize crews. Solglimt had 4,000 tons of whale oil and 4,000 tons of fuel. She had a crew of 60. Ole Wegger had 7,000 tons of whale oil and 5,500 tons of fuel. She had a crew of 190. Both ships were captured within 45 minutes. The Norwegian captains were told to continue with their whaling and that the Reich would pay them for their work. Pinguin dispatched a motor boat to round up the whalers, three of which managed to escape. The remaining four, Torlyn, Pol VIII, Pol IX and Pol X, were captured without incident.
In order to confuse the Norwegians Pinguin sailed in the opposite direction to where the third factory ship was. Once out of sight, she turned and approached the brightly lit vessel in dense fog. Coming in at full speed to within 200 metres, Pinguin signalled warnings and dispatched prize crews. The factory ship Pelagos was captured within minutes. Its several catchers were nearby engaged in their work. Pelagos had 9,500 tons of whale oil and 800 tons of fuel. It had a crew of 210. The captain of Pelagos was instructed to recall his catchers - Star XIV, Star XIX, Star XX, Star XXI, Star XXII, Star XXIII and Star XXIV.
Pinguin's operation against the Norwegian whaling fleet was the single most successful performance by a German auxiliary cruiser in World War II. More than 36,000 tons of shipping, a supply-ship, two factory ships, 11 whalers, 20,000 tons of whale oil with a value of over four million US dollars, and 10,000 tons of fuel oil were captured. This was all done without a single shot being fired and without any casualties. The Norwegians continued to work as if nothing had happened and made no effort to resist. Pinguin then made a five-day dash at top speed to the north-west past Bouvet Island and over half-way to the South Sandwich Islands. Her wireless operators sent a long coded message home knowing that every wireless station in the region would pick it up and discover their position. Pinguin then sailed back to the captured Norwegian fleet, after intercepting various British signals confirming the success of the ploy.
The 15 ships set off eastwards with Pinguin in the lead and the three factory and supply ships at the rear. Pinguin could not provide prize crews for all the ships. Ole Wegger transferred 7,000 tons of whale oil to Solglimt's storage tanks. Solglimt and Pelagos then departed on 25 January with their 10,000 tons of whale oil to France, Pelagos reaching Bordeaux on 11 March and Solglimt on 16 March. The Seekriegsleitung ordered Pinguin to bring Ole Wegger and all 11 of the catchers to a mid-Atlantic rendezvous at Point Andalusia north of the island of Tristan da Cunha. There Pinguin was to meet the tanker Nordmark, which had aboard prize crews for the remaining whalers. This meeting took place on 15 February. Nordmark was towing the refrigerator ship Herzogin, formerly the British ship Duquesa. On 18 February the supply-ship Alstertor arrived as well. It had a fresh supply of torpedoes, mines, a crated Arado Ar-196 seaplane and mail for Pinguin's crew. They then proceeded with the whaling ships to the Kerguelen Islands, where the replenishing could take place in safety.
Herzogin which supplied half the German Navy with meat and eggs had run out of everything that could be burned to keep her refrigeration plant working. Her entire bridge structure, lifeboat derricks, masts and all teak decking had been burned and she was going to have to be sunk. Pinguin was restocked with 360,000 eggs, 47 sides of beef, 410 sheep and 17 sacks of oxtails from Herzogin before the scuttling charges were set. Ole Wegger and ten of the catchers arrived at the rendezvous and they were manned with skeleton crews of armed Germans before departing for Europe. The newest catcher Pol IX, was retained as an auxiliary minelayer and renamed Adjutant. Two of the catchers Star XIX and Star XXIV were stopped by the British sloop HMS Scarborough off Cape Finisterre on 13 March. The German crews scuttled them and were then picked up by the British. Ole Wegger and the other eight catchers arrived at Bordeaux on 20 March.
Replenishment
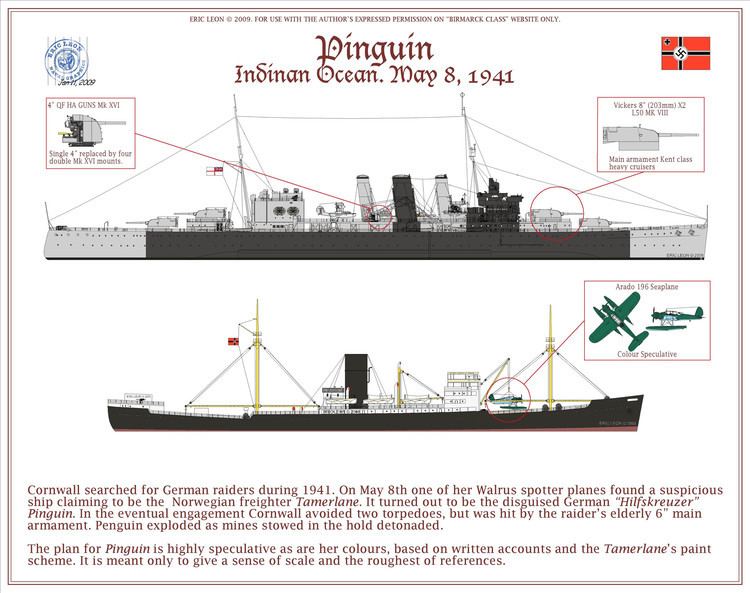
Pinguin received orders to rendezvous with the Kormoran to the south of Saint Helena on 25 February in order to deliver 210 kilos of the white metal WM80. Pinguin headed south past the Prince Edward Islands and Crozet Island. Pinguin rendezvoused with the Komet 120 miles east of the Kerguelen Islands on 12 March. Adjutant was sent ahead to take soundings at the entrances to the various bays and inlets of the Islands so that Pinguin could steer clear rocks. Pinguin followed Adjutant into Gazelle Bay the sheltered natural harbour at Port Couvreux and tied up alongside her on 13 March. Komet departed on 14 March. The replenishment of Pinguin began and one of the first items to be hoisted out of Alstertor's holds was the Arado Ar-196 seaplane. Adjutant was converted into an auxiliary minelayer for her role in mining the approaches to the port of Karachi. Pinguin's hull was scraped and cleaned of marine growth and barnacles by careening the ship from one side to the other to expose the hull. The new seaplane was assembled and Pinguin's appearance was changed to take on the identity of the Norwegian liner Tamerlane. Pinguin replenished her water supply from a waterfall using a gravity-feed system. By 22 March the replenishing of supplies from Alstertor was complete. Pinguin and Adjutant departed the islands on 25 March.
Empire Light
Pinguin and Adjutant headed north-eastwards for a rendezvous with a former Norwegian tanker and a supply-ship at Point Siberia, unaware that they had both been sunk. They spent a short time cruising the area around the Saya de Malha Bank before heading northwards, then spent the next three weeks searching to the north and south of the Seychelles. Pinguin's seaplane made 35 flights looking for a tanker that would be a suitable auxiliary minelayer, but without success. On 24 April Adjutant searching further to the north off the island of Mahé came across a large freighter. The vessel's course and speed was reported to Pinguin. On the following day Pinguin steamed past Adjutant at full speed and opened fire shooting the freighter's wireless aerials away and crippling her steering gear with the first salvo, bringing her to a halt. Pinguin dispatched a boarding party which identified the vessel as the British freighter Empire Light, on her way from Madras to Durban with a cargo of ore, hides and piece goods and a crew of 70. Her steering had been so badly disabled that it could not be repaired and the ship had to be scuttled.
Clan Buchanan
On 27 April Pinguin's seaplane spotted a ship, which Pinguin chased for five hours until another freighter was spotted. The first vessel was let go and Pinguin turned after the second one. Pinguin opened fire on the freighter from 5,000 metres (2.7 nmi) the next morning. The freighter's radio room and steering gear were destroyed. The second salvo blew her 4.7-inch gun into the engine room and she was abandoned by her 110-man crew. Signals had been transmitted from an auxiliary wireless but they were weak. The freighter was identified as the British Clan Buchanan, en route from the United States to Madras with a cargo of military equipment. Her steering gear had been destroyed so she was scuttled.
British Emperor
Pinguin altered course towards the shipping routes between the Persian Gulf and Mozambique. Adjutant was given instructions to proceed to Point Violet in the event of enemy activity. Clan Buchanan's signals had been picked up by two stations. This resulted in the mobilisation of powerful naval forces on both sides of the Indian Ocean. Pinguin was searching for a tanker to the north-west of the Indian Ocean near to the entrance of the Persian Gulf. On 7 May a small tanker was spotted. Pinguin signaled to the tanker to heave to, but she refused to obey. Her radio operator transmitted distress signals describing their attacker and identifying herself as the British tanker British Emperor. Pinguin's gunners fired a salvo of deliberate near misses to encourage British Emperor to stop. British Emperor held her course and continued sending SOS messages. Pinguin then fired a salvo that destroyed the tanker's bridge and wheelhouse. British Emperor veered off course and went round in circles trailing dense black smoke as her cargo ignited. British Emperor came to a halt and the crew were seen jumping overboard. Pinguin sent boats to pick them up. While Pinguin's rescue party was alongside British Emperor more distress signals were detected coming from the tanker. When Pinguin's rescue boats hauled off the blazing tanker the raider's guns opened fire again tearing away the bridge structure and silencing the signals. In order to sink British Emperor as quickly as possible a torpedo was fired. The torpedo began to circle requiring Pinguin to turn sharply to her starboard. The torpedo passed 20 metres in front of Pinguin's bows. A second torpedo missed the tanker but the third hit British Emperor square amidships sinking her. Pinguin departed south-eastwards.
Sinking
British Emperor's SOS signals were picked up as far away as Germany. They were also picked up aboard the British cruiser HMS Cornwall 500 nautical miles (930 km) to the south of Pinguin. Cornwall altered course to the north on the assumption that Pinguin would probably be heading south as it indeed was. On 8 May Pinguin spotted the silhouette of a British warship on the horizon. Pinguin immediately altered course away from it at maximum speed in a south-westerly direction. Cornwall's Supermarine Walrus aircraft searching the surrounding seas spotted the disguised Pinguin but was anxious not to attack an innocent ship. The Walrus returned four hours later and circled Pinguin. The aircrew saw what appeared to be a typical Norwegian freighter. Pinguin was flying the Norwegian ensign and displayed the name Tamerlane on both sides of her bridge. Cornwall was just 65 nautical miles (120 km) away from Pinguin. Pinguin's crew were wearing typical merchant marine clothing. The Walrus returned again an hour and a half later requesting the ship's identity, cargo and port of destination. The silhouette outline of Tamerlane shown in Talbot-Booth's Merchant Ships matched what the Walrus's observer had seen. Tamerlane was not among the names on the list of merchant ships known to be in the area at that time. The Walrus aircrew had suspicions. Cornwall at full speed headed south-west and launched seaplanes on the way. Pinguin's lookouts sighted Cornwall rapidly approaching. Pinguin's crew were called to action stations. Pinguin's guns remained concealed as she was still depending on her disguise as long as she could. Pinguin sent raider reports identifying herself as the Norwegian Tamerlane and claiming that she was being attacked by a German warship. Cornwall's wireless operator reported that the signals were being sent on a British Merchant Navy transmitter. Cornwall radioed to the circling Walrus to inform the 'Norwegians' that the ship bearing down on them was British and to order them to heave to. Pinguin adopted the classic defensive response of presenting her stern. Cornwall closed to within 20,000 metres (11 nmi) of Pinguin and signalled to her three times by lamp ordering her to "Heave to, or I fire!". A warning shot was fired from one of Cornwall's 8-inch guns high and to the left of Pinguin. The warning signals were repeated and another warning shot was fired. Cornwall's second Walrus was prepared for launching armed with two 250-pound bombs. It was ordered to drop the first bomb in front of the fleeing Pinguin and if that failed to halt her the second bomb was to be dropped on her forecastle. Cornwall closed to 12,000 metres (6.5 nmi) of Pinguin.
At 17:14 hrs on 8 May 1941 as the range of 8,000 metres (4.3 nmi) Pinguin dropped her disguise, ran up her battle flag, turned sharply to port to bring her full broadside to bear and opened up with five guns simultaneously, straddling Cornwall. Cornwall suffered a failure in the electrical circuit that controlled the training of her main gun turrets. Cornwall broke off and retired out of range of Pinguin's guns to carry out repairs. Cornwall suffered a complete breakdown in the telephone link between the bridge and the guns and the line to the aircraft catapult. An officer was dispatched aft to order the waiting Walrus to bomb Pinguin. However, it had suffered splinter damage and was unable to take off. Pinguin registered her first direct hit putting Cornwall's engine-room telegraph out of action and severing crucial wiring in her steering system. Cornwall was put out of control. Another hit on Cornwall started a small fire. Out of range of Pinguin's guns the damage to her turret circuits on Cornwall had been repaired. The first Walrus was spotting for the Cornwall's gunners who soon began to straddle Pinguin. Cornwall registered her first hit bringing down the foremast. Ernst-Felix Krüder gave the orders to release the prisoners and to set the scuttling charges and abandon ship. At that very moment a four-gun salvo from the Cornwall's 8-inch forward turrets destroyed Pinguin. The first shell struck the foredeck wiping out the two 150 mm guns on the forecastle head and their crews. The second shell hit the meteorological office and shattered the bridge killing Krüder and all but one other instantly. The third shell devastated the engine room. The fourth shell exploded in Hold Number 5 detonating the 130 high-explosive mines stored there, ripping the after part of Pinguin to pieces. Flames were sent thousands of feet into the air. Fragments of Pinguin were scattered across the surface of the sea. Pinguin was gone within five seconds.
From beginning to end the action had lasted just 27 minutes. Pinguin had fired over 200 shells at Cornwall. Cornwall fired 136. Cornwall's boats picked up 60 members of Pinguin's crew and 24 of her former prisoners. Of the 401 Germans aboard Pinguin only three officers, one prize officer and 57 petty officers and men survived. Of the 238 prisoners on Pinguin only nine officers and 15 seamen survived. 214 prisoners and 341 of Pinguin's crew were killed.
Raiding career
Schiff 33, the Pinguin had sailed over 59,000 miles more than twice the circumference of the Earth in 357 days at sea. She sank or captured 28 ships, a total of 136,642 gross register tons. 52,000 tons was sent back to Germany under prize crews. A further four ships were sunk by mines, a total of 18,068 tons. Pinguin's grand total amounts to 154,710 gross register tons. Pinguin was the first of the Kriegsmarine's Auxiliary Cruisers to be sunk.