
Dates 16 Mar 1943 – 27 Mar 1943 | Result British victory | |
 | ||
90,000 of 123,690 men 73,500 of 115,000 men455 guns139–220 tanks480 AT gunsseventy-five 88 mm guns 4,000 casualties not available7,000 captured Combatants United Kingdom, Nazi Germany, Kingdom of Italy, Free French Similar World War II, North African Campaign, Battle of Wadi Akarit, Battle of Medenine, Tunisian Campaign | ||
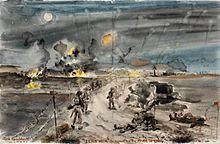
The Battle of the Mareth Line or the Battle of Mareth was an attack in the Second World War by the British Eighth Army (General Bernard Montgomery) in Tunisia, against the Mareth Line held by the Italo-German 1st Army (General Giovanni Messe). It was the first big operation by the Eighth Army since the Second Battle of El Alamein 4 1⁄2 months previously. Operation Pugilist, the first British attack, established a bridgehead but a break-out attempt was defeated by Axis counter-attacks. Pugilist established an alternative route of attack and Operation Supercharge II, an outflanking manoeuvre via the Tebaga Gap was planned. Montgomery reinforced the flanking attack, which from 26–31 March, forced the Axis 1st Army to retreat to Wadi Akarit, another 40 mi (64 km) back in Tunisia.
Contents
- Axis retreat from El Alamein
- Terrain
- Battle of Medenine
- Operation Pugilist
- Left hook
- Tebaga Gap
- Operation Supercharge II
- Casualties
- References
Axis retreat from El Alamein
The retreat of Panzer Army Africa (known as the Deutsch-Italienische Panzerarmee/Armata Corazzata Italo-Tedesca from October 1942) took place from 5 November 1942 – 15 February 1943. On 8 November, Operation Torch began in Morocco, Algeria and Tunisia, as Panzeramee Afrika in Egypt managed to evade British outflanking moves but traffic jams, fuel shortages, poor weather and air attacks reduced the speed of the retreat to 6–7 mi (9.7–11.3 km) per day. Comando Supremo in Rome and OKW in Berlin took an optimistic view of the situation and Comando Supremo chose the Mersa-el-Brega–El Agheila position as the terminus of the retreat, despite the position having a front of 110 mi (180 km), strong points up to 5 mi (8.0 km) apart, which was too far for mutual support and only 30,000 mines. When the Panzerarmee arrived, the Afrika Korps had only 5,000 men, 35 tanks, 16 armoured cars, 12 anti-tank guns, 12 field howitzers and deliveries of only 50 long tons (51 t) of the 400 long tons (410 t) of supplies needed daily.
Rommel wanted to retreat to Wadi Akarit in the Gabès area, 120 mi (190 km) further west, where the non-motorised troops could defend a narrow gap between the Mediterranean and the Chott Djerid. The tanks and motorised infantry would join the 5th Panzer Army (Colonel-General Hans-Jürgen von Arnim) further north, drive back the British First Army from Tunisia into Algeria, then swiftly return to force back the Eighth Army. At a meeting with Hitler on 28 November, Rommel discussed the proposal but only received a promise of more supplies. On the night of 11/12 December, the British attacked and on the following evening, the Panzerarmee resumed its retreat and despite the chronic fuel shortage, evaded another outflanking move. The Panzerarmee took up a defensive position at Buerat on 29 December but this was poorly fortified, wide open to an outflanking manoeuvre and vulnerable to an attack on Gabès by the First Army in southern Tunisia. The supply situation was a little better, with 152 long tons (154 t) tons of the 400-long-ton (410 t) daily requirement being delivered but 95 percent of the fuel was used distributing supplies or for withdrawals.
The Long Range Desert Group (LRDG) attacked Axis supply lines and hundreds of lorries were stranded along roads for lack of fuel, while the Eighth Army massed fuel and ammunition for its next attack. On 13 January 1943, the infantry of 21st Panzer Division were sent north to the 5th Panzer Army to protect Gabès and on 15 January, the Eighth Army attacked with 450 tanks against 36 German and 57 Italian tanks. In the evening Rommel ordered another withdrawal; lack of fuel and apprehension about the threat to Gabès, led to the retreat passing beyond the Tarhuna–Homs line. Tripoli was occupied by the British on 23 January, the Axis retreat from El Alamein having covered 1,400 mi (2,300 km). On 13 February, the last Axis soldiers left Libya and on 15 February, the rearguard reached the Mareth Line, 80 mi (130 km) inside Tunisia. Comando Supremo intended that the line would be held indefinitely but Rommel considered it to be too vulnerable to another flanking move, unlike the Wadi Akarit position further back.
Terrain
The broken terrain of southern Tunisia, with difficult rocky ridge lines and desert, limited manoeuvre; opposite the bight where the north–south coast opens to the east, a semi-arid, scrub covered coastal plain is met inland by the Matmata Hills which lie south to north. Across the plain in a line roughly south-west to north-east, was the Mareth Line, fortifications built by the French in the 1930s. In the north, the hills and line of forts terminated at the Tebaga Gap, a low pass between the Matmata Hills and the Djebel Tebaga, another line of high ground to the west of the gap running east–west. North and west of this feature is the Chott el Djerid and west of the Matmata Hills, dry Jebel Dahar country and then the impassable sand of the Grand Erg Oriental. Gabès lies on the coast, where the plain meets the route from the Tebaga Gap. North of Gabès, the road to Sfax passes between the sea and the Chotts, was the only route north for the Eighth Army and was blocked by the Mareth Line.
The Mareth Line followed the line of Wadi Zigzaou, a natural tank obstacle with steep banks rising up to 70 feet (21 m); the north-west side had been fortified by the French and subsequently reinforced. The wadi crosses the coastal plain from Zarat to Toujane and into the Matmata Hills beyond. In 1938, the French judged Jebel Dahar to be impassable to motorised transport and so had not extended the Mareth Line any further inland but in 1943, motor vehicles had much better performance. The British had an advantage because General Georges Catroux, the designer and garrison commander of the Mareth Line in the 1930s, was available in Algiers, to provide information and advice for the attack. In the original plan, Montogmery wrote "...the object of Operation Pugilist is to destroy the enemy now opposing Eighth Army in the Mareth Line and to advance and capture Sfax".
Battle of Medenine
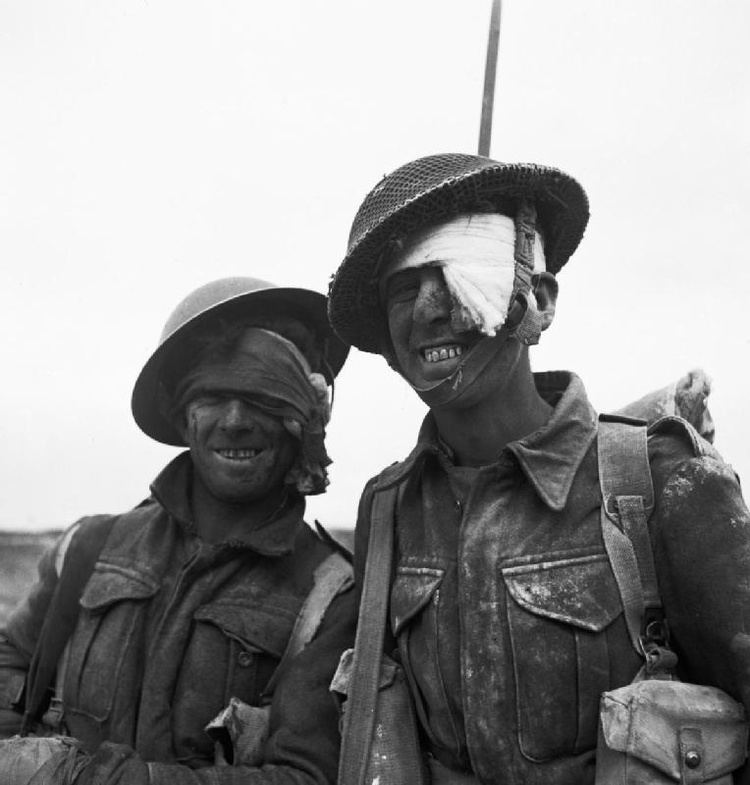
The Battle of Medenine (Unternehmen Capri/Operation Capri), was an Axis spoiling attack at Medenine in Tunisia on 6 March 1943. The operation was intended to delay an attack by the British Eighth Army on the Mareth Line. The British had been forewarned by Ultra decrypts of German wireless communications and rushed reinforcements from Tripoli and Benghazi before the Axis attack, which was a costly failure. General Erwin Rommel, the commander of Army Group Africa (Heeresgruppe Afrika), could not afford to lose forces needed for the defence of the Mareth Line and the effort was abandoned at dusk. During the night, the Eighth Army remained alert in case of another Axis attempt and sent forward patrols for reconnaissance and to demolish knocked-out Axis tanks. During the day the Luftwaffe and Regia Aeronautica had made a maximum effort with little effect against the Allied anti-aircraft defence and the Desert Air Force and on 7 March, the Axis forces began a withdrawal northwards towards the Mareth Line, the Eighth Army pursuit being slowed by rain. The Battle of Medenine was the last battle commanded by Rommel in the North African Campaign, who returned to Europe for good soon afterwards.
Operation Pugilist
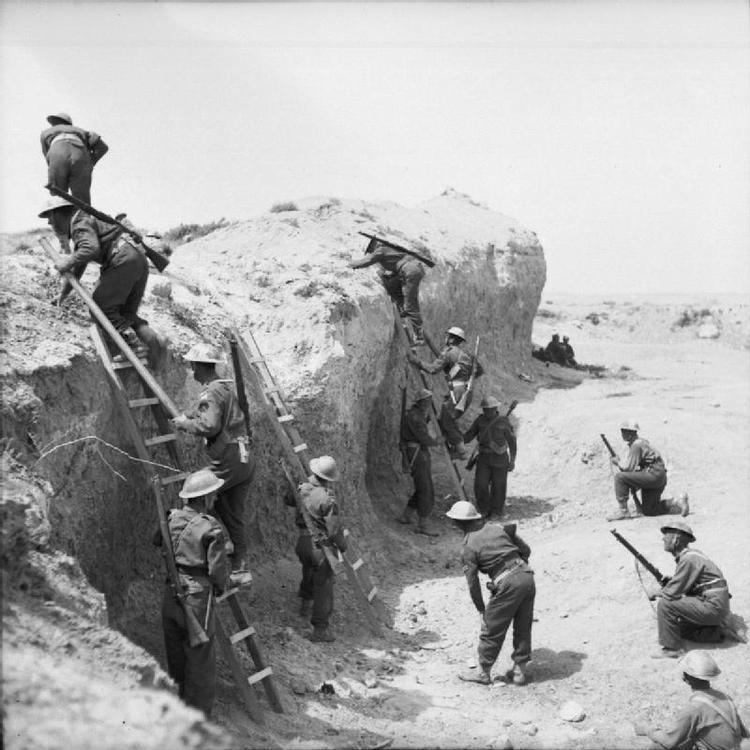
On 19 March 1943, XXX Corps (Lieutenant-General Sir Oliver Leese) of the Eighth Army commenced Operation Pugilist. The 50th (Northumbrian) Infantry Division (Major-General John Nichols) managed to penetrate the Italian-held line near Zarat. The terrain and heavy rain prevented deployment of tanks and anti-tank guns, which left the infantry isolated and a counterattack by the 15th Panzer Division on 22 March, recaptured much of the bridgehead. XXX Corps prepared a new attack towards Tallouf, in which the 4th Indian Infantry Division (Major-General Francis Tuker) was to make a night attack on 23/24 March, around the inland end of the line. This would coincide with the wide "left hook" manoeuvre Montgomery was planning.
Left hook
In early January 1943, a LRDG patrol had found a pass into the Jebel Dahar, which was given the name Wilder's Gap. A later patrol penetrated to the Tebaga Gap, proved the route was practicable and demonstrated the weakness of the Axis defences by going further north to Gafsa and on 2 February, making contact with the First Army which was advancing from the west. Montgomery reinforced the 2nd New Zealand Division (Lieutenant-General Bernard Freyberg) and renamed it the New Zealand Corps, for an attack through the Matmata Hills, via Wilder's Gap, into the Jebel Dahar, with the assembly concealed from Axis reconnaissance. Staff from X Corps (Lieutenant-General Sir Brian Horrocks) were seconded to provide adequate HQ personnel for the new New Zealand Corps, which caused some friction between the generals.
The New Zealand Corps advance was planned in three stages, from 19 March, a 20 miles (32 km) night march to Wadi bel Krecheb, a second night march of 40 miles (64 km) to just short of the Tebaga Gap and then the capture of the entrance to the Gap at first light on 21 March or as soon as possible afterwards. The corps would then advance to El Hamma, which overlooked the coast road north of Gabès. The flank of the advance was to be protected by Free French forces (General Philippe Leclerc) and the 1st King's Dragoon Guards. An attack by X Corps from El Hamma to Gabès would cut off the 1st Army defending the Mareth positions and provide the New Zealand Corps with the opportunity to advance to Sfax, some 80 miles (130 km) up the coast from Gabès and the landing grounds on the west side of the town.
During planning, emphasis was laid on the need for surprise and the ability to "blitz" Axis positions. The corps had relatively few infantry and was reliant on its artillery to break enemy troop concentrations and morale. Extensive efforts were made to co-ordinate air support by fighter and bomber aircraft. A simultaneous frontal attack by XXX Corps on the Mareth Line would divide enemy attention and hamper an Axis counter-attack. The II US Corps of the First Army, advancing from the west through El Guettar, was to threaten Axis communications and pin reinforcements from the Sfax area.
Tebaga Gap
The New Zealand Corps engaged the Axis troops in the Tebaga Gap on 21 March but progress over the next four days against the 164th Light Afrika Division and 21st Panzer Division was very slow, although the entrance to the gap was secured. On the Mareth Line, XXX Corps made some progress but there was no breakthrough. On 23 March, Montgomery ordered the 1st Armoured Division (Major-General Raymond Briggs) of X Corps to reinforce the New Zealand Corps from reserve, where it was waiting to exploit the anticipated breakthrough either by XXX Corps or the New Zealand Corps and Horrocks, with the X Corps Headquarters to take control of operations in the Tebaga Gap.
Operation Supercharge II
Operation Supercharge II was planned to start on the afternoon of 26 March, with a preliminary operation on the night of 25/26 March to capture Height 184. The New Zealand Corps was to attack into the Tebaga Gap on a two-brigade front and capture the Axis defences from Djebel Tebaga to Djebel Melab, which would be exploited by the 1st Armoured Division. After assembling during the night and lying in concealed positions all day, the 5th New Zealand Brigade was to attack on the right and the 6th New Zealand Brigade on the left, preceded by the 8th Armoured Brigade and a creeping barrage by the New Zealand and X Corps artillery. They were to move to high ground 2,000 yards (1,800 m) forward and then to a second objective at a wadi 2,500 yards (2,300 m) further on. The 1st Armoured Division, led by the 2nd Armoured Brigade, was to move through at 6:15 p.m. to an area 3,000 yards (2,700 m) beyond the New Zealand Corps final objective and as soon as the moon rose (at about 11:15 p.m.), advance on El Hamma.
RAF heavy bombers would begin harassment of the Axis defenders led by General Messe the night before, with attacks on transport and communications until 3:30 p.m. Day bombers would then begin low-level pattern-bombing, to add to Axis disorganisation, followed by relays of fighter-bombers every 15 minutes for 2 1⁄2 hours. Spitfires would escort the bombers and fighter-bombers and the remainder of the Northwest African Tactical Air Force (NATAF) would bomb Axis airfields. An RAF forward observation officer was to brief pilots by nominating landmarks, marking targets with red and blue smoke, friendly troops using orange smoke and the artillery firing smoke shells to signal to the aircrews. On 24 March, Arnim doubted that an Eighth Army attack was likely and was more concerned about Maknassy further north. Despite the slow advance in the south, Arnim wanted the 1st Army to withdraw to Wadi Akarit on 25 March but Liebenstein and Messe preferred to counter-attack with the 15th Panzer Division instead. The threat to Maknassy and the possibility of the US II Corps reaching Gabès and cutting off the 1st Army, meant that they had to retire from Mareth and then from Tebaga.
Height 184 fell at 2:50 a.m. to the 21st New Zealand Battalion and the Allied artillery commenced firing at 4:00 p.m.. The attack began with the 8th Armoured Brigade, followed by infantry battalion carriers and then infantry on foot. It appeared that the 164th Light and 21st Panzer Divisions had not expected a daylight assault and were taken by surprise; the setting sun, wind and dust made observation difficult. The tanks had been ordered to press on and the infantry also managed a quick pace, arriving on the first objective and then kept going, despite increasing resistance and delays. An armoured regiment pressed on to Wadi Aisoub beyond the second objective, followed by the 23rd New Zealand Battalion. On the left, a minefield covered by anti-tank guns was bypassed on both sides to close up to the second objective, clearing a gap for the 1st Armoured Division, despite many Axis posts holding out in the vicinity.
By dark a gap in the defences had been made; pausing until moonrise at 11:00 p.m., the 1st Armoured Division advanced through the gap and rapidly moved on El Hamma, 20 mi (32 km) to the north-east, halfway to Gabès on the coast. On the morning of 27 March, the 15th Panzer Division was brought out of reserve to counter-attack the New Zealand Corps on their right flank. By 9:00 a.m., the attack had been repulsed and the New Zealand Corps advanced into the hills on their right. By the evening of 27 March, German resistance had been broken and the line of communication forward to the 1st Armoured Division secured, the division having been halted by the defences of El Hamma, while the tanks had waited for the moonlight. Freyberg persuaded Horrocks that the New Zealand Corps, en route to El Hamma to link with the 1st Armoured Division, should branch off to the right to avoid the Axis defences at El Hamma and head across the broken ground direct to Gabès.
By 28 March, General Messe gave the order that all Axis forces on the Mareth Line be withdrawn to face the X and New Zealand corps on their right flank but by holding up the 1st Armoured Division at El Hamma, managed to avoid encirclement. On 29 March, the New Zealand Corps took Gabès, which forced a further Axis withdrawal to a new line 15 mi (24 km) to the rear of Gabès at Wadi Akarit, while the 164th Light, 15th Panzer and 21st Panzer divisions fought rearguard actions. El Hamma was evacuated on 29 March, leaving the way open for the 1st Armoured Division to advance northward with the New Zealand Corps on their right.
Casualties
On 31 March, Operation Supercharge II was terminated, having cost the Eighth Army 4,000 casualties, many from the 50th Division and a large number of tanks; the New Zealand Corps lost 51 tanks and 945 men. The corps was disbanded and its elements were distributed between X and XXX corps. On 30 March, Montgomery sent the following message to Freyberg,
My very best congratulations to NZ Corps and 10 Corps on splendid results achieved by the left hook. These results have led to the complete disintegration of the enemy resistance and the whole Mareth position. Give my congratulations to all your officers and men, and tell them how pleased I am with all they have done.
The Axis forces, despite withdrawing in relatively good order, lost over 7,000 prisoners, of whom 2,500 were German. The 15th Panzer Division had suffered many losses, the 164th Light Division lost most of its weapons and vehicles. The 80th Infantry Division La Spezia suffered losses of nearly 50 percent and the 16th Infantry Division Pistoia was almost annihilated and several Italian divisions were amalgamated. The 1st Army withdrew in good order to Wadi Akarit.