
346 Royal Navy265 Commandos 5,000 troops | Date 28 March 1942 | |
 | ||
Results British victory, All objectives achieved, All targets destroyed Similar World War II, Dieppe Raid, Channel Dash, Battle of Rorke's Drift, Operation Biting | ||
The St Nazaire Raid or Operation Chariot was a successful British amphibious attack on the heavily defended Normandie dry dock at St Nazaire in German-occupied France during the Second World War. The operation was undertaken by the Royal Navy and British Commandos under the auspices of Combined Operations Headquarters on 28 March 1942. St Nazaire was targeted because the loss of its dry dock would force any large German warship in need of repairs, such as the Tirpitz, to return to home waters via either the English Channel or the GIUK gap, both of which were heavily defended by British units including the Royal Navy's Home Fleet, rather than having a haven available on the Atlantic coast.
Contents
- Background
- Plan
- Composition of the raiding force
- German forces
- Outward journey
- Ramming the dry dock
- Disembarkation from Campbeltown and the MLs
- Small ships
- Return journey
- Campbeltown explodes
- Aftermath
- Legacy
- References
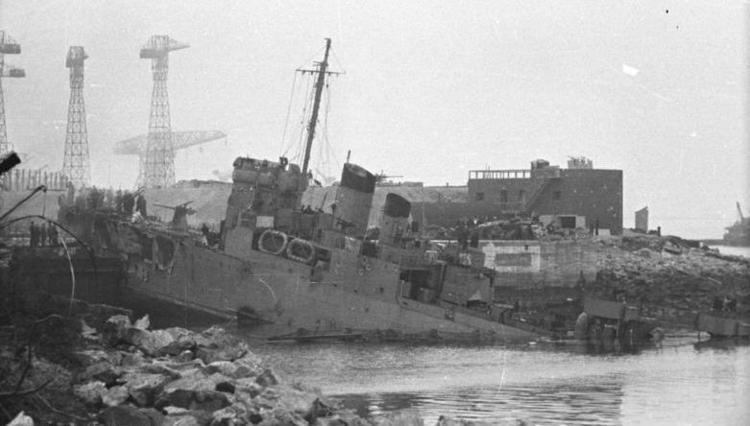
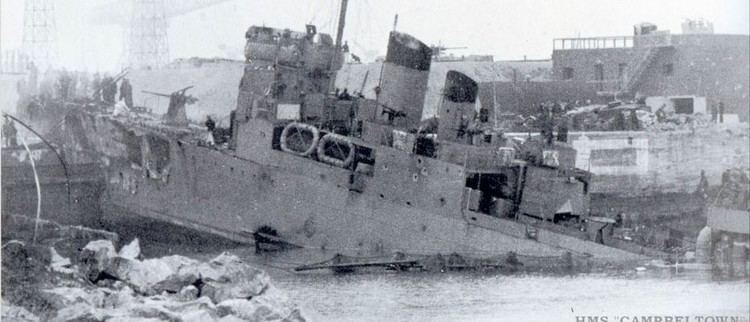
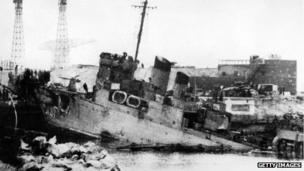
The obsolete destroyer HMS Campbeltown, accompanied by 18 smaller craft, crossed the English Channel to the Atlantic coast of France and was rammed into the Normandie dock gates. The ship had been packed with delayed-action explosives, well hidden within a steel and concrete case, that detonated later that day, putting the dock out of service for the remainder of the war and up to five years after.
A force of commandos landed to destroy machinery and other structures. Heavy German gunfire sank, set ablaze or immobilised virtually all the small craft intended to transport the commandos back to England; the commandos had to fight their way out through the town to try to escape overland. Almost all were forced to surrender when their ammunition was expended and they were surrounded.
After the raid 228 men of the force of 611 returned to Britain; 169 were killed and 215 became prisoners of war. German casualties were over 360 dead, some killed after the raid when Campbeltown exploded. To recognise their bravery, 89 decorations were awarded to members of the raiding party, including five Victoria Crosses. After the war, St Nazaire was one of 38 battle honours awarded to the Commandos; the operation has since become known as The Greatest Raid of All within military circles.
Background
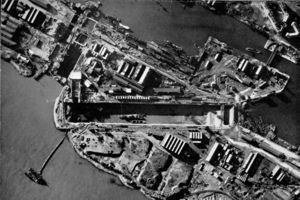
St Nazaire is on the north bank of the Loire 400 km (250 miles) from the nearest British port. In 1942, it had a population of 50,000. The St Nazaire port has an outer harbour known as the Avant Port, formed by two piers jutting out into the Atlantic Ocean. This leads to two lock gates before the Bassin de St Nazaire. These gates control the water level in the basin so that it is not affected by the tide.
Beyond the basin is the larger inner dock called the Bassin de Penhoët, which can accommodate ships up to 10,000 tons. There is also an old entrance to the Bassin de St Nazaire located southwest of the Normandie dry dock. Built to house the ocean liner SS Normandie, this dock was the largest dry dock in the world when it was completed in 1932. The "Old Mole" jetty juts into the Loire halfway between the southern pier of the Avant Port and the old entrance into the basin.
On 24 May 1941, the Battle of the Denmark Strait was fought between the German ships Bismarck and Prinz Eugen and the British ships HMS Prince of Wales and HMS Hood. Hood was sunk and the damaged Prince of Wales was forced to retire. Bismarck, also damaged, ordered her consort to proceed independently while she headed for the French port of St Nazaire, which was the only port on the Atlantic coast with a dry dock able to accommodate a ship of her size. She was intercepted by the British and sunk en route.
Britain's Naval Intelligence Division first proposed a commando raid on the dock in late 1941. When the German battleship Tirpitz was declared operational in January 1942, the Royal Navy (RN) and Royal Air Force (RAF) were already drawing up plans to attack her. Planners from Combined Operations Headquarters were looking at potential scenarios if Tirpitz escaped the naval blockade and reached the Atlantic. They decided the only port able to accommodate her was St Nazaire, especially if, like the Bismarck, she was damaged en route and needed repairs. They came to the conclusion that if the dock at St Nazaire were unavailable the Germans were unlikely to risk sending Tirpitz into the Atlantic.
Combined Operations examined a number of options while planning the destruction of the dock. At this stage of the war the British government still tried to avoid civilian casualties. This ruled out a bombing attack by the RAF, which at the time did not possess the accuracy needed to destroy the dock without serious loss of civilian life.
The Special Operations Executive were approached to see if its agents could destroy the dock gates. They decided that the mission was beyond their capabilities because the weight of explosives required would have needed too many agents to carry them. The Royal Navy was also unable to mount an operation, as St Nazaire is 8 km (5 miles) up the Loire estuary. Any naval ships large enough to cause sufficient damage would be detected well before they were within range.
The planners then examined whether a commando force was feasible to accomplish the task. An unusually high spring tide was due in March 1942 which would allow a light ship to pass over the sand banks in the estuary and approach the docks, bypassing the heavily defended dredged channel. The approach was too shallow for an infantry landing ship, but the planners believed if a destroyer could be lightened it might have a draft shallow enough to enable it to get through.
Plan
The purpose of the raid was to destroy three objectives: the Normandie dock, the old gates into the Bassin de St Nazaire together with the water pumping machinery and other installations, and any U-boats or other shipping in the area. The initial Combined Operations plan required two specially lightened destroyers to carry out the raid. The first would be packed with explosives and rammed into the dock gates.
Commandos on board would then disembark and use demolition charges to destroy nearby dock installations, searchlights and gun emplacements. The destroyer would then be blown up, and the second ship would come in and evacuate the ship's crew and the commandos. At the same time the RAF would carry out a number of diversionary air raids in the area.
When the plan was presented to the Admiralty they refused to support it. The certain loss of one or both destroyers to eliminate the dry dock was out of the question. They suggested they could provide an old Free French destroyer, the Ouragan, and a flotilla of small motor launches to transport the commandos and evacuate them afterwards.
Approval for the mission, codenamed Operation Chariot, was given on 3 March 1942. Using a French ship would involve using the Free French forces and increase the number of people aware of the raid. Consequently, it was decided the navy would have to provide a ship of their own. The RAF complained that the raid would draw heavily on their resources; the number of aircraft assigned by RAF Bomber Command was reduced time and again before the day of the raid. British Prime Minister Winston Churchill further complicated matters when he ordered that bombing should only take place if targets were clearly identified.
Combined Operations Headquarters worked closely with several intelligence organisations to plan the raid. The Naval Intelligence Division compiled information from a variety of sources. A detailed plan of the town of St Nazaire was provided by the Secret Intelligence Service, and information on the coastal artillery nearby was sourced from the War Office's Military Intelligence branch. Intelligence about the dock itself came from pre-war technical journals.
The RN's Operational Intelligence Centre selected the route and timing for the raid based on intelligence about the location of minefields and German recognition signals sourced from Enigma decrypts and knowledge of Luftwaffe patrols compiled by the Air Ministry's Air Intelligence Branch. When all the plans had been pulled together and the timing worked out, the raid was expected to last no longer than two hours. The commandos and crew from Campbeltown would board the motor launches at the Old Mole jetty and then return to base.
Composition of the raiding force
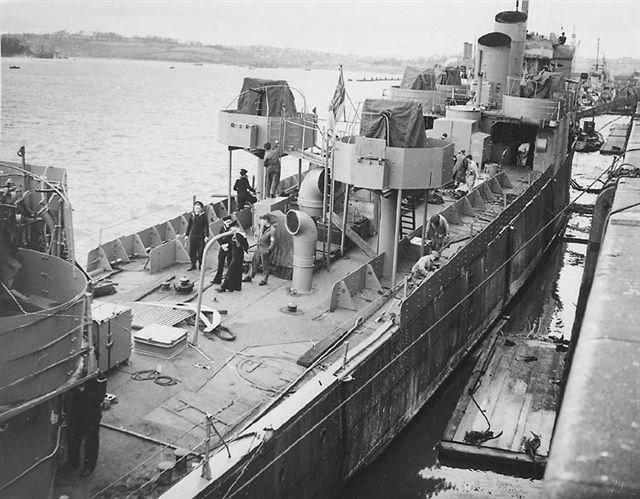
The revised Combined Operations plan required one destroyer to ram the dock gates and a number of smaller craft to transport the Commandos. The Royal Navy would therefore provide the largest contingent for the raid, under the overall command of the senior naval officer, Commander Robert Ryder. The ship selected to ram into the dock gates was HMS Campbeltown, commanded by Lieutenant Commander Stephen Halden Beattie. Campbeltown was a First World War destroyer and had previously been the USS Buchanan in the United States Navy. She had come into RN service in 1940 as one of 50 destroyers transferred to the United Kingdom under the Destroyers for Bases Agreement.
Converting Campbeltown for the raid took ten days. She had to be lightened to raise her draught to get over the sand banks in the estuary. This was achieved by completely stripping all her internal compartments. The dockyard removed her three 4 inch (100 mm) guns, torpedoes and depth charges from the deck and replaced the forward gun with a light quick–firing 12 pounder (3"). Eight 20 mm Oerlikons were installed on mountings raised above deck level. The bridge and wheelhouse were given extra armour-plate protection, and two rows of armour were fixed along the sides of the ship to protect the Commandos on the open deck.
Two of her four funnels were removed, and the forward two were cut at an angle to resemble those of a German destroyer. The bow was packed with 4.5 tons of high explosives, which were set in concrete. It was decided that the explosive charge would be timed to detonate after the raiders had left the harbour. To prevent the Germans towing her away, the crew would open the ship's seacocks before abandoning the ship. Should she become disabled or sunk before getting to the dock, four motor launches had been detailed to take off the crew and put the commandos ashore. The charge would be reset to explode after the last boat had left.
Other naval units involved were two Hunt class destroyers, HMS Tynedale (L96) and Atherstone (L05), which would accompany the force to and from the French coast and remain out at sea during the raid. A Motor Gun Boat (MGB 314) was the headquarters ship for the raid, with Commander Ryder and the commanding officer of the Commandos on board. A Motor Torpedo Boat (MTB 74), commanded by Sub-Lieutenant Michael Wynn, had two objectives: If the outer Normandie dock gates were open, she had to torpedo the inner dock gates. If the gates were closed she would instead torpedo the gates at the old entrance into the St Nazaire basin.
To assist in transporting the Commandos, 12 motor launches (ML) were assigned from the 20th and 28th Motor Launch flotillas. These boats were re-armed with two Oerlikon 20 mm guns mounted forward and aft to complement their twin Lewis guns. At the last minute another four MLs were assigned from the 7th Motor Launch flotilla (see Footnotes for flotilla details). These four boats were also armed with two torpedoes each. Instead of transporting the Commandos, these boats were to engage any German shipping found in the estuary. All the MLs had a 500-gallon auxiliary fuel tank fixed to the upper deck to increase their range. The S class submarine HMS Sturgeon would leave before the rest of the convoy and be in position to act as a navigational beacon to guide the convoy into the Loire estuary.
The man selected to lead the Commando force was Lieutenant Colonel Charles Newman; his No. 2 Commando would provide the largest Commandos contingent, 173 men, for the raid. The Special Service Brigade headquarters used the raid to provide experience for their other units and 92 men were drawn from Nos 1, 3, 4, 5, 9, and 12 Commandos.
The Commandos were divided into three groups: One and Two would travel in the MLs, while Three would be in Campbeltown. Under the command of Captain Hodgeson, Group One had the objectives of securing the Old Mole and eliminating the anti-aircraft gun positions around the southern quays. They were then to move into the old town and blow up the power station, bridges and locks for the new entrance into the basin from the Avant port. The capture of the mole was a major objective, as it was to be the embarkation point for the evacuation after the mission.
Group Two, under the command of Captain Burn, would land at the old entrance to the St Nazaire basin. Their objectives were to destroy the anti-aircraft positions in the area and the German headquarters, to blow up the locks and bridges at the old entrance into the basin and then to guard against a counter-attack from the submarine base. Group Three was under the command of Major William 'Bill' Copland, who was also the Commandos' second in command. They were to secure the immediate area around Campbeltown, destroy the dock's water-pumping and gate-opening machinery and the nearby underground fuel tanks. All three groups were subdivided into assault, demolition and protection teams. The assault teams would clear the way for the other two. The demolition teams carrying the explosive charges only had sidearms for self-defence; the protection teams, armed with Thompson submachine guns, were to defend them while they completed their tasks.
The Commandos were aided in their planning for the operation by Captain Bill Pritchard of the Royal Engineers, who had pre-war experience as an apprentice in the Great Western Railway dockyards and whose father was the dock master of Cardiff Docks. In 1940 while part of the British Expeditionary Force in France, his duties had included determining how to disable the French dockyards if they were captured. One of the dockyards he had studied was St Nazaire, and he had submitted a report detailing how to put the dock out of action.
German forces
The Germans had around 5,000 troops in the immediate area of St Nazaire. The port was defended by the 280th Naval Artillery Battalion under the command of Kapitän zur See Edo Dieckmann. The battalion was composed of 28 guns of various calibres from 75 mm to 280 mm railway guns, all positioned to guard the coastal approaches. The heavy guns were supplemented by the guns and searchlights of the 22nd Naval Flak Brigade under the command of Kapitän zur See Karl-Konrad Mecke.
The brigade was equipped with 43 anti-aircraft guns ranging in calibre from 20 to 40 mm. These guns had a dual role as both anti-aircraft and coastal defence weapons. Many were in concrete emplacements on top of the submarine pens and other dockside installations of the St Nazaire submarine base.
The harbour defence companies were responsible for local defence and for the security of the ships and submarines moored in the harbour. These companies and the harbour defence boats used to patrol the river were under the command of Harbour Commander Korvettenkapitän Kellerman. The 333rd Infantry Division was the German Army unit responsible for the defence of the coast between St Nazaire and Lorient. The division had no troops based in the town, but some were located in villages nearby and would be able to respond to any attack on the port.
The Kriegsmarine (German navy) had at least three surface ships in the Loire estuary: a destroyer, an armed trawler and a Sperrbrecher (minesweeper), the latter being the guard ship for the port. On the night of the raid there were also four harbour defence boats and ten ships from the 16th and 42nd Minesweeper flotillas berthed in the basin, while two tankers were berthed inside the Normandie dock. The 6th and 7th U-boat flotillas, commanded by Kapitänleutnant Georg-Wilhelm Schulz and Korvettenkapitän Herbert Sohler respectively, were permanently based in the port. It is not known how many submarines were present on the day of the raid. The submarine base had been inspected by the U-boat Commander in Chief, Vizeadmiral Karl Dönitz, the day before the raid. He asked what would they do if the base was subject to an attack by British Commandos. Sohler replied that "an attack on the base would be hazardous and highly improbable".
Outward journey
The three destroyers and 16 small boats left Falmouth, Cornwall, at 14:00 on 26 March 1942. They formed into a convoy of three lanes, with the destroyers in the middle. On arrival at St Nazaire the portside MLs were to head for the Old Mole to disembark their Commandos, while the starboard lane would make for the old entrance to the basin to disembark theirs. Not having the range to reach St Nazaire unaided, the MTB and MGB were taken under tow by Campbeltown and Atherstone.
On 27 March at 07:20 Tynedale reported a U-boat on the surface and opened fire. The two escort destroyers left the convoy to engage the U-boat, later identified as U-593. The U-boat promptly dived and was unsuccessfully attacked with depth charges. The two destroyers returned to the convoy at 09:00.
The convoy next encountered two French fishing trawlers. Both crews were taken off and the ships sunk for fear they might report the composition and location of the convoy. At 17:00 the convoy received a signal from Commander-in-Chief Plymouth that five German torpedo boats were in the area. Two hours later another signal informed them that another two Hunt class destroyers, HMS Cleveland and HMS Brocklesby, had been dispatched at full speed to join the convoy.
The convoy reached a position 65 nautical miles (120 km; 75 mi) off St Nazaire at 21:00 and changed course toward the estuary, leaving Atherstone and Tynedale as a sea patrol. The convoy adopted a new formation with the MGB and two torpedo MLs in the lead, followed by Campbeltown. The rest of the MLs formed two columns on either side and astern of the destroyer, with the MTB bringing up the rear. The first casualty of the raid was ML 341, which had developed engine trouble and was abandoned. At 22:00 the submarine Sturgeon directed her navigation beacon out to sea to guide the convoy in. At about the same time Campbeltown raised the German naval ensign in an attempt to deceive any German lookouts into thinking she was a German destroyer.
At 23:30 on 27 March, five RAF squadrons (comprising 35 Whitleys and 27 Wellingtons) started their bombing runs. The bombers had to stay above 6,000 feet (1,800 m) and were supposed to remain over the port for 60 minutes to divert attention toward themselves and away from the sea. They had orders to only bomb clearly identified military targets and to drop only one bomb at a time. As it turned out, poor weather over the port (10/10ths cloud) meant that only four aircraft bombed targets in St Nazaire. Six aircraft managed to bomb other nearby targets.
The unusual behaviour of the bombers concerned Kapitän zur See Mecke. At 00:00 on 28 March, he issued a warning that there might be a parachute landing in progress. At 01:00 on 28 March, he followed up by ordering all guns to cease firing and searchlights to be extinguished in case the bombers were using them to locate the port. Everyone was placed on a heightened state of alert. The harbour defence companies and ships' crews were ordered out of the air raid shelters. During all this a lookout reported seeing some activity out at sea, so Mecke began suspecting some type of landing and ordered extra attention to be paid to the approaches to the harbour.
Ramming the dry dock
At 00:30 hours on 28 March the convoy crossed over the shoals at the mouth of the Loire estuary, with Campbeltown scraping the bottom twice. Each time she was able to pull free, and the group proceeded on up toward the harbour in darkness. They had got to within about eight minutes passage from the dock gates when at 01:22 the entire convoy was illuminated by the combined searchlights of both banks of the estuary. A naval signal light demanded their identification.
The MGB-314 replied in a coded response obtained from a German trawler boarded during the Vågsøy raid. A few bursts were fired from a shore battery and both Campbeltown and MGB-314 replied: "Ship being fired upon by friendly forces". The deception gave them a little more time before every German gun in the bay opened fire. At 01:28, with the convoy 1 mile (1.6 km) from the dock gates, Beattie ordered the German flag lowered and the White Ensign raised. The intensity of the German fire seemed to increase. The guard ship opened fire and was quickly silenced when the ships in the convoy responded, shooting into her as they passed.
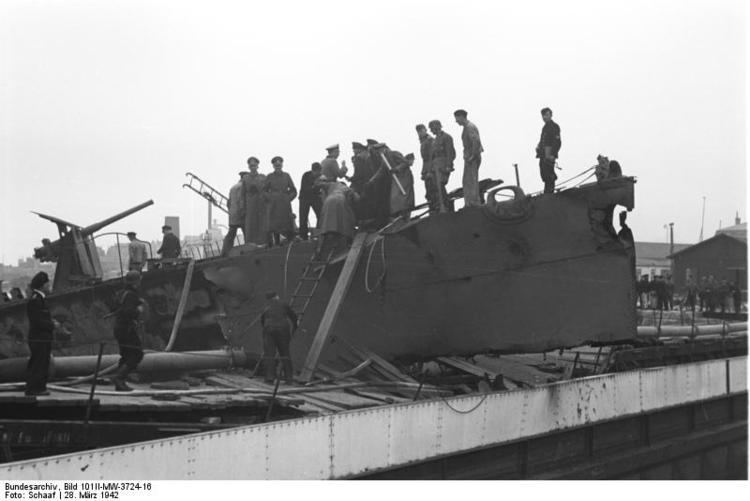
By now all the ships in the convoy were within range to engage targets ashore and were firing at the gun emplacements and searchlights. Campbeltown was hit a number of times and increased her speed to 19 kn (35 km/h). The helmsman on her bridge was killed; his replacement was wounded and replaced as well. Blinded by the searchlights, Beattie knew they were close to their objective. Still under heavy fire, the MGB turned into the estuary as Campbeltown cleared the end of the Old Mole, cut through anti-torpedo netting strung across the entrance and rammed the dock gates, striking home at 01:34, three minutes later than scheduled. The force of the impact drove the ship 33 feet (10 m) onto the gates.
Disembarkation from Campbeltown and the MLs
The Commandos on Campbeltown now disembarked: two assault teams, five demolition teams with their protectors and a mortar group. Three demolition teams were tasked with destroying the dock pumping machinery and other installations associated with the dry dock. The kilt-wearing Captain Donald Roy – 'The Laird' – and his 14-man assault troop were tasked with knocking out two pump-house roof-top gun emplacements high above the quayside and securing a bridge to provide a route for the raiding parties to exit the dock area. Roy and Sgt Don Randall used scaling ladders and grenades to accomplish the former, and a head-on rush to secure the bridge and form a bridgehead that enabled Capt. Bob Montgomery and Lt Corran Purdon and their demolition teams to exit the area.
They lost 4 men in this action. The fifth team also succeeded in completing all their objectives but almost half its men were killed. The other two Commando groups were not as successful. The MLs transporting Groups One and Two had almost all been destroyed on their approach. ML 457 was the only boat to land its Commandos on the Old Mole and only ML 177 had managed to reach the gates at the old entrance to the basin. That team succeeded in planting charges on two tugboats moored in the basin.
There were only two other MLs in the vicinity: ML 160 had continued past the dock and was engaging targets upriver, ML 269 appeared to be out of control and was running in circles. By this time the crew of Campbeltown had detonated the scuttling charges and gathered at the rear of the ship to be taken off. ML 177 came alongside the destroyer and took 30 men on board including Beattie and some of the wounded. Major Copland went through Campbeltown and evacuated the wounded towards the Old Mole, not knowing that there were no other boats there to take the Commandos off.
Lt Col Newman aboard the MGB need not have landed, but he was one of the first ashore. One of his first actions was to direct mortar fire onto a gun position on top of the submarine pens that was causing heavy casualties among the Commandos. He next directed machine-gun fire onto an armed trawler, which was forced to withdraw upriver. Newman organised a defence that succeeded in keeping the increasing numbers of German reinforcements at bay until the demolition parties had completed their tasks.
Some 100 Commandos were still ashore when Newman realised that evacuation by sea was no longer an option. He gathered the survivors and issued three orders:
Newman and Copland led the charge from the old town across a bridge raked by machine gun fire and advanced into the new town. The Commandos attempted to get through the narrow streets of the town and into the surrounding countryside, but were eventually surrounded. When their ammunition was expended their only option was to surrender. Not all the Commandos were captured; five men reached neutral Spain, from where they eventually returned to England.
Small ships
Most of the MLs had been destroyed on the run in and were burning. The first ML in the starboard column was the first boat to catch fire; her captain managed to beach her at the end of the Old Mole. Some starboard boats managed to reach their objective and disembark their Commandos. ML 443, the leading boat in the port column, got to within 10 feet (3.0 m) of the mole in the face of heavy direct fire and hand grenades before being set on fire. The crew were rescued by ML 160, one of the torpedo MLs which had been looking for targets of opportunity such as the two large tankers reported to be in the harbour. The commanders of MLs 160 and 443, Lieutenants T Boyd and T D L Platt, were awarded the Distinguished Service Order for their bravery. The rest of the port column had been destroyed or disabled before reaching the mole. MLs 192 and 262 were set on fire; there were only six survivors. ML 268 was blown up; one man survived.
Thomas O'Leary, the wireless operator for ML 446 recalled the ferocity of incoming German fire, stating
"One commando was remarking how pretty the tracer fire, red and green, was. A moment later one blew the back of his head out. I was down below with my tin hat because by now the bullets were going through (the boat) and out the other side. If I wanted to get about I had to crawl on my hands and knees and I was lucky nothing came through at my level. We couldn't get in (to the objective) and all over a sudden the wounded started coming down. By then all our guns had jammed and most of the other ships were on fire."
ML 177, the launch that had successfully taken off some of the crew from Campbeltown, was sunk on her way out of the estuary. ML 269, another torpedo-armed boat, had the unenviable task of moving up and down the river at high speed to draw German fire away from the landings. Soon after passing Campbeltown it was hit and its steering damaged. It took ten minutes to repair the steering. They turned and started in the other direction, opening fire on an armed trawler in passing. Return fire from the trawler set their engine on fire.
ML 306 also came under heavy fire when it arrived near the port. Sergeant Thomas Durrant of No. 1 Commando, manning the aft Lewis gun, engaged gun and searchlight positions on the run in. He was wounded but refused to leave the gun for treatment. The ML reached the open sea but was attacked at short range by the German torpedo boat Jaguar. Durrant returned fire, aiming for the torpedo boat's bridge. He was wounded again but remained at his gun even after the German commander asked for their surrender. Firing drum after drum of ammunition, he refused to give up until after the ML had been boarded. Durrant died of his wounds and, after the recommendation of the Jaguar's commander, was awarded a posthumous Victoria Cross.
After the Commando headquarters group had landed, Commander Ryder went to check for himself that Campbeltown was firmly stuck in the dock. Some of her surviving crewmen were being taken on board the MGB. Ryder returned to the boat and ordered the MTB to carry out its alternative task and torpedo the lock gates at the old entrance to the basin. After a successful torpedo attack, Ryder ordered the MTB to leave. On their way out of the estuary they stopped to collect survivors from a sinking ML and were hit and set on fire. Back at the docks the MGB had positioned itself in mid-river to engage enemy gun emplacements. The forward 2 pounder was manned by Able Seaman William Alfred Savage. Commander Ryder reported that
"The rate of supporting fire had evidently been felt, and the Commandos in the area of the Tirpitz dock had undoubtedly overcome the resistance in that area. There was an appreciable slackening in the enemy's fire."
Ryder could see no ships other than seven or eight burning MLs. He then realised that the landing places at the Old Mole and the entrance to the basin had both been recaptured by the Germans. There was nothing more they could do for the Commandos, so they headed out to sea. On their way they were continuously illuminated by German searchlights and were hit at least six times by the German guns. Passing ML 270, they ordered her to follow and made smoke to hide both boats.
When they reached the open sea the smaller calibre guns were out of range and stopped firing but the heavier artillery continued to engage them. The boats were about 4 miles (6.4 km) off-shore when the last German salvo straddled them and killed Savage, who was still at his gun. He was awarded a posthumous Victoria Cross for his exploits. His citation recognised both Savage and the bravery of "the many unnamed crews of the Motor Gun Boat, Motor Torpedo Boat and Motor Launches who continued to carry out their duties in exposed positions, in the face of close range enemy fire."
Return journey
At 06:30 the five German torpedo boats that the convoy had evaded the previous day were sighted by HMS Atherstone and Tynedale. The two destroyers turned toward them and opened fire at a range of 7 miles (11 km). After ten minutes the German boats turned away, making smoke. The destroyers sighted the MGB and two accompanying MLs soon after and transferred their casualties to the Atherstone. Not expecting any more boats to arrive, they headed for home. Just after 09:00 the Hunt-class escort destroyers HMS Brocklesby and HMS Cleveland arrived, sent by Commander-in-Chief Plymouth. Shortly after this the ships were spotted by a Heinkel 115 floatplane of the Luftwaffe.
The next German aircraft on the scene, a Junkers 88, was engaged by a RAF Bristol Beaufighter which had appeared in the area earlier. Both machines crashed into the sea. Other German planes arrived but were driven off by Beaufighters and Hudsons from Coastal Command. The Atlantic weather conditions deteriorated. Amid concerns about the growing German threat and the realisation that the damaged small ships would not be able to keep up, Commander Sayer ordered the crews off the smaller boats and had them sunk.
Three of the small vessels managed to return to England: MLs 160, 307 and 443. They had reached the rendezvous and waited until 10:00 for the destroyers to appear. Having already been attacked once, they moved further out into the Atlantic to try and avoid the German Air Force, but a Junkers 88 appeared overhead at 07:30 and approached them at low level for a closer look. The ships opened fire and hit the Junkers in the cockpit. The plane went into the sea. The next aircraft to appear was a Blohm and Voss seaplane which attempted to bomb the ships, but left after being damaged by machine-gun fire. The surviving MLs eventually reached England unaided the following day.
Campbeltown explodes
The explosive charges in HMS Campbeltown detonated at noon on 28 March 1942, and the dry dock was destroyed. Reports vary on the fate of the two tankers that were in the dock; they were either swept away by the wall of water and sunk, or swept to the far end of the dock, but not sunk. A party of 40 senior German officers and civilians who were on a tour of Campbeltown were killed. In total, the explosion killed about 360 men. The wreck of Campbeltown could still be seen inside the dry dock months later when RAF photo reconnaissance planes were sent to photograph the port.
According to Captain Robert Montgomery (Royal Engineers, attached to No.2 Commando), Campbeltown was meant to have detonated at 4:30am, the delay caused, he believes, by some of the acid in the pencil detonators being distilled away. As the morning progressed, more and more captured comrades joined him in the German HQ.
The day after the explosion, Organisation Todt workers were assigned to clean up the debris and wreckage. On 30 March at 16:30 the torpedoes from MTB 74, which were on a delayed fuse setting, exploded at the old entrance into the basin. This raised alarms among the Germans. The Organisation Todt workers ran away from the dock area. German guards, mistaking their khaki uniforms for British uniforms, opened fire, killing some of them. The Germans also thought that some Commandos were still hiding in the town, and made a street by street search, during which some townspeople were also killed.
Aftermath
The explosion put the dry dock out of commission for the remainder of the war. The St Nazaire raid had been a success, but at a cost. Of the 622 men of the Royal Navy and Commandos who took part in the raid, only 228 men returned to England. Five commandos escaped via neutral Spain and Gibraltar with the help of French citizens, and took a ship to England from Gibraltar. 169 men were killed (105 RN and 64 Commandos) and another 215 became prisoners of war (106 RN and 109 Commandos). They were first taken to La Baule and then sent to Stalag 133 at Rennes. The fallen British raiders were buried at the La Baule-Escoublac cemetery with military honours. The cemetery is 13 kilometres west of St Nazaire.
To recognise their achievement, 89 decorations were awarded for the raid. This total includes the five Victoria Crosses awarded to Lieutenant Commander Beattie, Lieutenant Colonel Newman and Commander Ryder, and posthumous awards to Sergeant Durrant and Able Seaman Savage. Four Distinguished Service Orders were awarded to Major William Copland, Captain Donald Roy, Lieutenant T Boyd and Lieutenant T D L Platt. Other decorations awarded were four Conspicuous Gallantry Medals, five Distinguished Conduct Medals, 17 Distinguished Service Crosses, 11 Military Crosses, 24 Distinguished Service Medals and 15 Military Medals. Four men were awarded the Croix de guerre by France, and another 51 were mentioned in despatches.
Adolf Hitler was furious that the British had been able to sail a flotilla of ships up the Loire unhindered. His immediate reaction was to dismiss Generaloberst Carl Hilpert, chief-of-staff to the Commander in Chief West. The raid refocused German attention on the Atlantic Wall, and special attention was given to ports to prevent any repeat of the raid. By June 1942 the Germans began using concrete to fortify gun emplacements and bunkers in quantities previously only used in U-boat pens. Hitler laid out new plans in a meeting with Armaments Minister Albert Speer in August 1942, calling for the construction of 15,000 bunkers by May 1943 to defend the Atlantic coast from Norway to Spain.
The battleship Tirpitz never entered the Atlantic. She remained in Norwegian fjords to threaten Allied shipping until she was destroyed by the RAF on 12 November 1944.
Legacy
St Nazaire was one of the 38 battle honours presented to the Commandos after the war. The raid has since been called The Greatest Raid of All. The survivors formed their own association, the St Nazaire Society, which is a registered charity in the United Kingdom.
A memorial to the raid erected in Falmouth bears the following inscription:
A new HMS Campbeltown, a Type 22 Frigate, was launched on 7 October 1987. She carried the ship's bell from the first Campbeltown which was rescued during the raid and had been presented to the town of Campbelltown, Pennsylvania at the end of the Second World War. In 1988 the people of Campbelltown voted to lend the bell to the new ship for as long as she remained in Royal Navy service. The bell was returned to the town on 21 June 2011 when HMS Campbeltown was decommissioned.
On 4 September 2002, a tree and seat at the National Memorial Arboretum were dedicated to the men of the raid. The seat bears the inscription:
In memory of the Royal Navy Sailors and Army Commandos killed in the raid on St Nazaire on 28 March 1942