
Date 24 May 1941 | ||
 | ||
1 battleship1 heavy cruiser 1 battleship1 battlecruiser2 heavy cruisersDid not participate in combat6 destroyers (on approach detached evening before battle) Similar World War II, Last battle of the battleship, Operation Rheinübung, Battle of the River Plate, Battle of the Atlantic | ||
The prinz eugen film the battle of the denmark strait
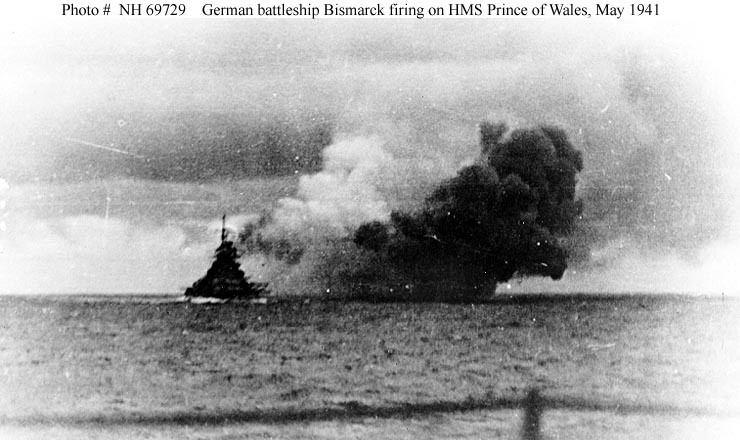
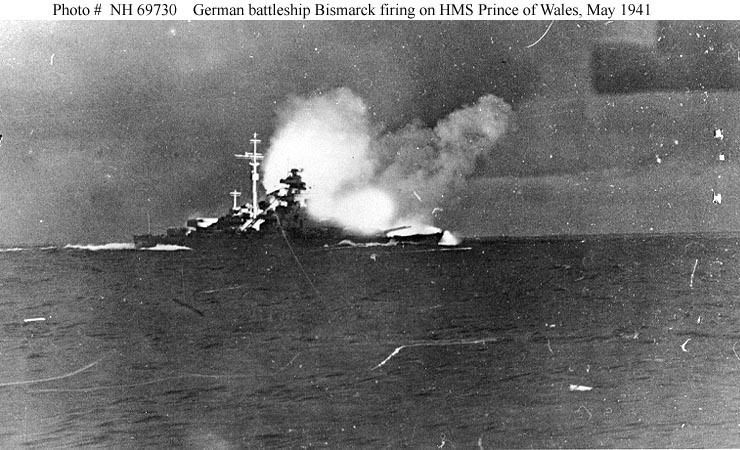
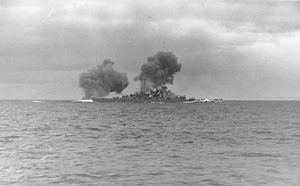
The Battle of the Denmark Strait was a Second World War naval battle between ships of the Royal Navy and the German Kriegsmarine, fought on 24 May 1941. The British battleship HMS Prince of Wales and the battlecruiser HMS Hood fought the German battleship Bismarck and the heavy cruiser Prinz Eugen, both of which were attempting to break out into the North Atlantic to attack Allied merchant shipping (Operation Rheinübung).
Contents
- The prinz eugen film the battle of the denmark strait
- Casual saturday atlantic fleet battle of the denmark strait
- Background
- Plan gone awry
- Opening moves
- Sinking of Hood
- Prince of Wales alone
- Breaking off the action
- Aftermath
- German
- British
- Parallels to Jutland
- Order of Battle
- Axis
- Allied
- References
Less than 10 minutes after the British opened fire, a shell from Bismarck struck Hood near her aft ammunition magazines. Soon afterward, Hood exploded, and sank within three minutes with the loss of all but three of her crew. Prince of Wales continued to exchange fire with Bismarck but suffered serious malfunctions in her main armament as the British battleship had not fully worked up after only being completed in late March 1941 and soon broke off the engagement. The battle was considered a major tactical victory for the Germans, but its impact was short-lived; the damage done to Bismarck's forward fuel tanks forced the abandonment of her Atlantic breakout mission and necessitated an attempt to escape to safe dry dock facilities in occupied France, producing an operational victory for the British. Incensed by the loss of Hood, a large British force pursued and sank Bismarck three days later.
Casual saturday atlantic fleet battle of the denmark strait
Background

The two German ships were expected to sail westward and break through the Greenland-Iceland-UK (GIUK) gap. While passing neutral Sweden in the Baltic Sea, the ships were spotted and reported by the Swedish cruiser Gotland and patrol planes; these reports were intercepted by the British embassy, allowing Royal Navy ships to watch their probable route. Due to cloud and rain, aircraft scheduled to assist in the search could not do so when the German ships attempted their breakout.
On the evening of 23 May, despite the advantage of inclement weather to cloak the German's presence, the two ships were spotted steaming at 27 kn (31 mph; 50 km/h), by the British heavy cruisers HMS Norfolk and Suffolk. These cruisers—each carrying eight 8-inch guns—were patrolling the Denmark Strait under the command of Rear-Admiral Frederic Wake-Walker. With the help of Suffolk's newly installed radar the cruisers shadowed the German ships, reporting on their movements throughout the night.

The next morning, at the exit to the Strait between Iceland and Greenland a force of eight British ships was in place, to intercept the Germans. The British fleet included the battleship Prince of Wales, the battlecruiser HMS Hood and a screen of six destroyers, under the command of Vice-Admiral Lancelot Holland in Hood.
Prince of Wales was a newly commissioned King George V-class battleship, similar to Bismarck in size and power. Prince of Wales had not yet been properly "shaken down", and her crew was inexperienced. She still had mechanical problems, especially with her main armament. The ship had sailed with shipyard workers still aboard working on her.
For 20 years after her commissioning in 1920, Hood was the largest and heaviest warship in the world. Combining eight massive BL 15 inch Mk I naval guns with a top speed greater than any battleship on the sea, Hood was the pride of Great Britain's navy, and embodied the world dominance of British naval power. Despite this, Hood had one conspicuous flaw as compared to the super-dreadnought battleships she served alongside: as a battlecruiser, much of her bulk was dedicated to extra engine power instead of comprehensive armour coverage.This was in accordance with the prevailing theory originally propounded by First Sea Lord Jackie Fisher that "speed is armour". While her 12-inch belt armour was considered sufficient against most capital ships she was likely to encounter, her 3 inches of deck armour was only rated against shell splinters, leaving her badly unprotected against plunging fire at long range. At the time of her commissioning in World War I, naval gunnery was severely inaccurate at the ranges necessary to produce plunging fire, and Hood's greater speed and maneuverability were rightly seen as an acceptable trade-off. However, as the accuracy of naval gunfire increased in the inter-war period, Hood was eventually scheduled to receive an upgrade in 1939 that would have doubled her deck armour to 6 inches, but the outbreak of World War II meant the upgrade never took place. She thus sortied to war at a marked disadvantage against the new capital ships of the Axis.
Aware of Hood's inadequate protective armour, distant to the southeast of where the battle took place, Vice-Admiral Holland's superior (Admiral Sir John Tovey) deliberated on ordering Vice-Admiral Holland to have Prince of Wales sail ahead of Hood. With the ships in this position, Admiral Tovey concluded the better-protected Prince of Wales could draw the German battleships' large-shell gunfire. Ultimately, Admiral Tovey did not give the order, later saying "I did not feel such interference with such a senior officer justified."
Plan gone awry
Vice-Admiral Holland's battle plan was to have Hood and Prince of Wales engage Bismarck while Suffolk and Norfolk engaged Prinz Eugen (which, Holland assumed, still steamed behind Bismarck and not ahead of her). He signalled this to Captain John C. Leach of Prince of Wales but did not radio Rear Admiral Wake-Walker, who as Commander of the 1st Cruiser Squadron directed Suffolk and Norfolk, for fear of disclosing his location. Instead, he observed radio silence. Holland hoped to meet the enemy at approximately 02:00. Sunset in this latitude was at 01:51 (ship's clocks were four hours ahead of local time). Bismarck and Prinz Eugen would be silhouetted against the sun's afterglow while Hood and Prince of Wales could approach rapidly, unseen in the darkness, to a range close enough not to endanger Hood with plunging fire from Bismarck. The Germans would not expect an attack from this quarter, giving the British the advantage of surprise.
The plan's success depended on Suffolk's continually unbroken contact with the German ships. However, Suffolk lost contact from 00:28. For 90 minutes, Holland neither sighted the German ships nor received any further news from Norfolk or Suffolk. Reluctantly, Holland ordered Hood and Prince of Wales to turn south-southwest but he detached his destroyers which continued searching to the north.
Before contact was re-established, the two squadrons missed each other narrowly. Had the German ships not altered course to the west at 01:41 to follow the line of the Greenland icepack, the British would have intercepted them much earlier than they did. The British destroyers were just 10 mi (8.7 nmi; 16 km) to the southeast when the Germans made this course change. If the visibility had not been reduced to 3–5 mi (2.6–4.3 nmi; 4.8–8.0 km), the German vessels would probably have been spotted (since generally on a calm, clear day ship lookouts can observe large objects and ships about 12 miles (19 km) distant on the horizon. And if the ship's lookouts are in a crow's nest, the observable distance is even further).
Just before 03:00, Suffolk regained contact with Bismarck. Hood and Prince of Wales were 35 mi (30 nmi; 56 km) away, slightly ahead of the Germans. Holland signaled to steer toward the Germans and increased speed to 28 kn (32 mph; 52 km/h). Suffolk's loss of contact had placed the British at a disadvantage. Instead of the swiftly closing head-on approach Holland had envisioned, he would have to converge at a wider angle, much more slowly. This would leave Hood vulnerable to Bismarck's plunging shells for a much longer period. The situation worsened further when, at 03:20, Suffolk reported that the Germans had made a further course alteration to the west, placing the German and British squadrons almost abeam of each other.
At 05:35, lookouts on Prince of Wales spotted the German ships 17 mi (15 nmi; 27 km) away. The Germans, already alerted to the British presence through their hydrophonic equipment, picked up the smoke and masts of the British ships 10 minutes later. At this point, Holland had the option of joining Suffolk in shadowing Bismarck and waiting for Tovey to arrive with King George V and other ships to attack or to order his squadron into action. He chose the latter at 05:37. The rough seas in the Strait kept the destroyers' role to a minimum and the cruisers Norfolk and Suffolk would be too far behind the German force to reach the battle.
Opening moves
Hood opened fire at 05:52 at a distance of approximately 26,500 yd (24,200 m). Holland had ordered firing on the leading ship, Prinz Eugen, believing from her position that she was Bismarck. Holland soon amended his order and directed both ships to engage the rear ship, Bismarck. Prince of Wales had already correctly identified and targeted Bismarck, whereas Hood is believed to have continued to fire at Prinz Eugen for some time.
Holland, himself a gunnery expert, was well aware of the danger posed by Hood's weak horizontal protection. Therefore, he wanted to reduce the range as quickly as possible. At a shorter range, the trajectory of Bismarck's shells would be flatter and they would be more likely to hit the sides of the ship rather than the decking, or to glance off the top deck. However, he closed the range at an angle that placed the German ships too far forward of the beam. This meant he could use only 10 of his capital ships' 18 heavy guns while presenting the Germans more at which to aim than necessary. Those 10 guns became nine when a defect in one of Prince of Wales' forward guns rendered it inoperative after the first salvo. Both Suffolk and Norfolk attempted to engage Bismarck during the action, but both were out of range and neither cruiser had a sufficient speed advantage over Bismarck to rapidly close the range during the brief engagement.
The Germans also had the weather gauge, meaning that the British ships were steaming into the wind, spray drenching the lenses of Prince of Wales "A" turret's 42 ft (13 m) Barr and Stroud coincidence rangefinder and both British ships' "B" turret 30 ft (9.1 m) rangefinders. This necessitated using the shorter based (15 ft (4.6 m)) ones in the director towers instead. In addition, Admiral Holland had Prince of Wales stay close to Hood, conforming to Hood's movements instead of varying course and speed. This made it easier for the Germans to find the range to both British ships, although it would have aided Holland's gunners if they had both fired upon Bismarck as originally planned, since they could then precisely time each other's salvos to avoid mistaking one ship's fire for the other. They could also use Concentration Fire, where both ships' main armament salvos would be controlled by one ship's fire control computer—probably Prince of Wales' modern Admiralty Fire Control Table.
Prince of Wales struck her target first. She would ultimately hit Bismarck three times. One shell struck the commander's boat and put the seaplane catapult amidships out of action (the latter damage not being discovered until much later, during an attempt to fly off the ship's War Diary on the eve of her final battle). The second shell passed through the bow from one side to the other without exploding. The third struck the hull underwater and burst inside the ship, flooding a generator room and damaging the bulkhead to an adjoining boiler room, partially flooding it. These last two hits caused damage to Bismarck's machinery and medium flooding. This hit also severed a steam line and wounded five of Bismarck's crew by scalding. More importantly, the damage to the bow cut access to 1,000 long tons (1,000 t) of fuel oil in the forward fuel tanks. It also caused Bismarck to leave a visible oil slick and reduced her speed by 2 kn (2.3 mph; 3.7 km/h). Bismarck was soon listing 9° to port and lost 2 m (6.6 ft) of freeboard at her bow.
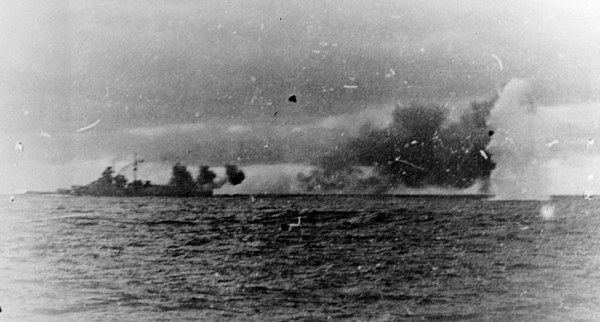
The Germans held their fire until 05:55, when both German ships targeted Hood. Admiral Lütjens, the German fleet chief and task force commander, did not immediately give the order to commence firing. Not until he had made multiple inquiries did Bismarck's first gunnery officer Korvettenkapitän Adalbert Schneider, "Frage Feuererlaubnis"? (Permission to open fire?); the commander of Bismarck, Kapitän zur See Ernst Lindemann, impatiently responded: "Ich lasse mir doch nicht mein Schiff unter dem Arsch wegschießen. Feuererlaubnis!" (I'm not letting my ship get shot out from under my arse. Open fire!) A shell hit Hood's boat deck, starting a sizable fire in the ready-use 4 in (100 mm) ammunition stored there, but this fire did not spread to other areas of the ship or cause the later explosion. Although unconfirmed, it is possible that Hood was struck again at the base of her bridge and in her foretop radar director.
There has been some contention over which German vessel struck Hood at this time. Prinz Eugen, under the command of Kapitän zur See Helmuth Brinkmann, was targeting Prince of Wales by this stage, following an order from the fleet commander. However, Prinz Eugen's Gunnery Officer, Paul Schmalenbach is quoted as confirming that Prinz Eugen's target was Hood.
Sinking of Hood
At 06:00, Holland ordered his force to turn once again to port to ensure that the aft main guns on both Hood and Prince of Wales could bear on the German ships. During the execution of that turn, a salvo from Bismarck, fired at a range of about 9 mi (7.8 nmi; 14 km), was seen by men aboard Prince of Wales to straddle Hood abreast her mainmast. It is likely that one 38 cm (15 in) shell struck somewhere between Hood's mainmast and "X" turret aft of the mast.
This was immediately followed by a huge pillar of flame that shot upward 'like a giant blowtorch,' in the vicinity of the mainmast. There followed an explosion that destroyed a large portion of the ship from amidships clear to the rear of "Y" turret, blowing both after turrets into the sea. The ship broke in two; the stern falling away and sinking. Ted Briggs, one of the survivors, claimed Hood heeled to 30 degrees at which point 'we knew she just wasn't coming back.' The bow was raised clear of water, pointed upward and pivoting about, and followed the stern in sinking shortly thereafter. "A" turret did manage to fire one last salvo while in this upright position, possibly from the doomed gun crew, just before the bow section sank.
Splinters rained down on Prince of Wales .5 mi (0.43 nmi; 0.80 km) away. Hood sank in about three minutes, taking 1,415 men, including Vice-Admiral Holland, with her. Only three of her crew (Ted Briggs, Bob Tilburn and Bill Dundas), survived to be rescued two hours later by the destroyer HMS Electra.
The British Admiralty later concluded that the most likely explanation for the loss of Hood was a penetration of her magazines by a single 38 cm (15 in) shell from Bismarck, causing the subsequent catastrophic explosion. Recent research by submersible craft suggests that the initial explosion was in the aft 4 in (100 mm) magazine and that it spread to the 15 in (380 mm) magazines via the ammunition trunks.
It has been suggested from examination of the wreckage, found in 2001, that the magazine explosion in the 4 in (100 mm) armament near the mainmast caused the vertical blast of flame seen there, and this in turn ignited the magazines of the aft 15 in (380 mm) guns that caused the explosion that wrecked the stern. This explosion might have travelled through the starboard fuel tanks, igniting the fuel oil there, setting off the forward magazines and completing the destruction of the ship.
The wreck of Hood revealed the bow section bereft of any structure. A huge section of her side is missing, from the 'A' barbette to the foredeck. The midship section had its plates curled outward. Moreover, the main parts of the forward structure, including the 600 long tons (610 t) conning tower, were found about 1.1 km (0.59 nmi; 0.68 mi) away from the main wreckage. This has sparked theories that the 15 in (380 mm) forward magazines exploded as a result of the force, flames and pressure, caused by the detonation of the aft magazines. However, a team of marine forensic scientists has found that implosion damage to the forward hull due to the rapid sinking of the Hood, is the most likely cause of the state of the forward hull, and they do not support any theory that the forward magazines exploded.
Prince of Wales alone
Prince of Wales found herself steering towards the sinking Hood. Her commanding officer, Captain Leach, ordered an emergency avoidance turn away from Hood's wreckage. This violent change of course disrupted her aim and put her in a position that made it easier for the Germans to target her. She resumed her previous course, but was now under the concentrated fire of both German ships.
Prince of Wales was struck four times by Bismarck and three times by Prinz Eugen. One shell passed through her upper superstructure, killing or wounding several crewmen in the Compass Platform and Air Defence Platform. Pieces of another shell struck her radar office aft, killing the crewmen within. A 20.3 cm (8.0 in) shell from Prinz Eugen found its way to the propelling charge/round manipulation chamber below the aft 5.25 in (133 mm) gun turrets, and a 38 cm (15 in) shell from Bismarck hit underwater below the armour belt, penetrating about 13 ft (4.0 m) into the ship's hull, about 25 ft (7.6 m) below the waterline, but was stopped by the anti-torpedo bulkhead. Fortunately for Prince of Wales, neither shell exploded, but she still suffered minor flooding and the loss of some fuel oil. Contrary to some mistaken opinion, the 38 cm (15 in) shell that struck Prince of Wales below the waterline did not endanger her magazines, as it came to rest abreast an auxiliary machinery room.
By this time, serious gunnery malfunctions had caused intermittent problems with the main armament, leading to a 26% reduction in output. According to Captain Leach, he decided that continuing the action would risk losing Prince of Wales without inflicting further damage on the enemy. He therefore ordered the ship to make smoke and withdraw, 'pending a more favourable opportunity'. Prince of Wales turned away just after 06:04, firing from her rear turret under local control until the turret suffered a jammed shell ring, cutting off the ammunition supply and making the guns inoperable. Despite efforts by crew members and civilian technicians to repair the shell ring, all four guns were not back in service until 08:25, although two of the four guns were serviceable by 07:20. This temporarily left only five 14 in (360 mm) guns operational, but nine of the ten were operational in five hours. The final salvos fired were ragged and are believed to have fallen short. The ship retired from the battle around 06:10. Thirteen of her crew had been killed, nine were wounded. The timing of Prince of Wales' withdrawal was fortunate for her, as she had come into torpedo range of Prinz Eugen and turned away as the German cruiser was about to fire.
Breaking off the action
On Bismarck, there was tremendous elation at the sinking of Hood. There was also a keen expectation that they would close on Prince of Wales and possibly finish her off. Bismarck's captain, Ernst Lindemann, requested that Admiral Lütjens allow Bismarck to do just that. Even if British Admiral John Tovey's squadron had left Scapa Flow the previous day, he would still be more than 300 nmi (350 mi; 560 km) away from Bismarck — even if Bismarck diverted to sink Prince of Wales (a chase Lindemann calculated would take only two or three hours). Lütjens refused to allow Lindemann to give chase, giving no explanation. Lindemann repeated his request, this time more assertively. Lütjens held firm to orders from the German Naval Commander, Groß Admiral Erich Raeder, to avoid unnecessary combat with the Royal Navy, especially when it could lead to further damage that could hasten delivering Bismarck toward the waiting hands of the British. He broke off combat instead of pursuing Prince of Wales and ordered a course of 270°, due west. Bismarck had fired 93 of her 353 base-fused Armour Piercing (AP) shells during the engagement.
This clash between the two senior German officers reflected their disparate and distinct command functions. As commander of Bismarck, Lindemann operated first and foremost as a tactician. As such, he had no doubt that his ship's immediate objective was to destroy Prince of Wales, and he had pressed his case as far and hard as he should. Lütjens, as fleet chief and task force commander, operated at the strategic and operational levels. To some degree, his orders were clear – attacking convoys was his priority, not risking "a major engagement for limited, and perhaps uncertain, goals". Nevertheless, Raeder had also ordered Lütjens to be bold and imaginative, to accept battle if unavoidable and conduct it vigorously to the finish.
The reality was that Lütjens' orders did not cover a spectacular success like the one just achieved. His priority therefore was to stick to his instructions - to concentrate on sinking merchant shipping and avoid encounters with enemy warships whenever possible. Moreover, before leaving Germany, Lütjens had told Admirals Conrad Patzig and Wilhelm Marschall, that he would adhere to Raeder's directives. This meant he did not intend to become the third fleet chief to be relieved for contradicting Raeder's orders; Marschall, one of his two predecessors, had been relieved of command for not following his orders to the letter despite the fact that Marschall's analysis of the changes in the tactical situation since the orders were issued resulted in the sinking of the British aircraft carrier HMS Glorious and its two escorting destroyers. Nor was he predisposed to discuss his command decisions with a subordinate officer.
Even if he had known it was the untried Prince of Wales he was fighting and not King George V, Lütjens would probably have stuck to his decision. Following her would have meant exposing the squadron to further gunfire as well as to torpedo attacks from Norfolk and Suffolk. He would have risked his ships and crews on an expressly forbidden opportunity.
Between 06:19 and 06:25, Suffolk fired six salvoes in the direction of Bismarck, having mistaken a radar contact with an aircraft for Bismarck. Suffolk was actually out of gun range of both Bismarck and Prinz Eugen at the time.
Aftermath
Vice-Admiral Holland's death led to responsibility for Prince of Wales falling to Rear-Admiral Wake-Walker in Norfolk. With this command came the responsibility of coping with Bismarck until enough British warships could concentrate and destroy her. His choice was either to renew the action with the Bismarck, or ensure that she be intercepted and brought to action by other heavy units. Wake-Walker chose the latter course, continuing to shadow the German ships. Further offensive action, he concluded, would cause more damage to Prince of Wales than to Bismarck and endanger his cruisers, plus he knew Admiral Tovey was on his way. He ordered Prince of Wales to follow Norfolk at her best speed, so that Norfolk and Suffolk could fall back on her if attacked. At 07:57 Suffolk reported that the Bismarck had reduced speed and appeared damaged.
Since Bismarck's receiving the first hit in the forecastle, all six of the ship's 26-man damage control teams had worked ceaselessly to repair the damage. When it was reported that the tips of the starboard propeller could be seen above water, Lindemann had ordered counterflooding two compartments aft to restore the ship's trim. He then sent divers into the forecastle to connect the forward fuel tanks, containing a much-needed 1,000 long tons (1,000 t) of fuel, first to the tanks near the forward boiler then to the rear fuel tank by way of a provisional line running over the upper deck. Both these manoeuvres failed. Lindemann then requested permission to slow Bismarck and heel the ship first to one side then the other to weld patches from the inside to the holes in the forward hull. Lütjens refused, again without comment. Eventually, the admiral had to agree to slow the ship to 22 kn (25 mph; 41 km/h) to allow hammocks and collision matting to be stuffed in the holes of the No. 2 boiler room and the auxiliary boiler room to stop the growing ingress of seawater. This attempt also failed. Boiler Room No. 2 was shut down, with a loss of speed to 28 kn (32 mph; 52 km/h).
As well as taking on seawater, Bismarck was leaking fuel oil. Lütjens ordered Prinz Eugen to drop back and see how much of a trail she was leaving astern. The carpet of oil was broad enough to cover both sides of the ship's wake, was all colours of the rainbow and gave off a strong smell – all of which helped disclose Bismarck's location.
The damage to Bismarck's forward fuel tanks, combined with a missed opportunity to refuel at Bergen earlier in the voyage, left less than 3,000 long tons (3,000 t) of fuel remaining, not enough to operate effectively against the Atlantic convoys. The element of surprise – which was considered essential for the operation's success – had most definitely been lost; the German ships continued to be shadowed by Rear-Admiral Wake-Walker's squadron. Lütjens concluded that he needed to abort Bismarck's mission and head toward a convenient dockyard for repairs.
The question was which dockyard to head for. The nearest friendly ports were Bergen and Trondheim in Norway, a little over 1,000 mi (870 nmi; 1,600 km) away. Steaming in that direction meant a return passage north or south of Iceland, with the enemy's air forces now fully alerted to their presence and the possibility of other heavy units between them and Scapa Flow. Lütjens knew his intelligence was unreliable. Hood had been reported by Group North to be off West Africa and there had been no reports of a King George V-class battleship in the vicinity.
Disregarding Lindemann's recommendation to return to Bergen, Lütjens ordered Bismarck to head for the French port of Saint-Nazaire. Although the French coast was 600 mi (520 nmi; 970 km) further away than Bergen, Saint-Nazaire held the potential of longer nights and wider seas in which to shake off Bismarck's shadowers, plus the possibility of luring them across a line of U-boats. It would leave Bismarck poised on the edge of the British trade routes once the damage were repaired; it also meant the potential support of the battleships Scharnhorst and Gneisenau. Both ships had been stationed at Brest in France, since the end of Operation Berlin earlier that year but had been kept in port for repairs and overhaul. While Brest was closer than Saint-Nazaire, it was within range of Royal Air Force bombers.
Lütjens detached the undamaged Prinz Eugen to continue raiding on her own. The cruiser went further south into the Atlantic, where she refuelled from a tanker at sea. She suffered engine trouble, abandoned her commerce raiding mission without having sunk any merchant ships, and made it to Brest.
German
News of Lütjens' decision was received with shock in Berlin, Wilhelmshaven and Paris. A blizzard of urgent telephone calls raced across German-occupied Europe. While the Berlin Admiralty was satisfied with Lütjens' success, it was tempered by news of Bismarck's damage and the decision to head for France. Grand Admiral Raeder was not clear whether Lütjens intended to steam for St. Nazaire immediately or after shaking off his pursuers and oiling in mid-Atlantic. Raeder immediately conferred with his chief of staff, Admiral Otto Schniewind, who in turn telephoned Admiral Rolf Carls, who commanded Group North in Wilhelmshaven. Carls had already drafted a message recalling Lütjens to Germany, but had not yet sent it. Schniewind pointed out that at noon Lütjens had crossed the demarcation line between the Northern Hebrides and Southern Greenland, thus passing from Group North's operational control to Group West; therefore, the decision to recall Lütjens was no longer Carls' to make. A subsequent call to Group West's commander, Admiral Alfred Saalwächter, revealed that he did not plan to recall Lütjens and that he felt such a decision should be discussed between Schniewind and Raeder.
Raeder was against issuing a recall himself, telling Schniewind they did not know enough about the situation at hand and that the person who would best know would be Lütjens. He then telephoned Adolf Hitler, who was at the Obersalzberg in the Bavarian Alps. Hitler received the news of Hood's sinking stoically, exhibiting neither joy nor any other triumphant behavior. After hearing Raeder's report, he turned to those who were with him and expressed his personal thoughts:
If now these British cruisers are maintaining contact and Lütjens has sunk the Hood and nearly crippled the other, which was brand new and having trouble with her guns during the action, why didn't he sink her too? Why hasn't he tried to get out of there or why hasn't he turned around?
News of Hood's destruction was seized upon more enthusiastically by Dr. Joseph Goebbels' Propaganda Ministry. That evening it was broadcast to the nation, accompanied by "We march against England" and other martial airs. The German public, already enjoying the news of Luftwaffe victories over the Royal Navy off Crete, received the news of Hood's sinking euphorically.
British
The British public were shocked that their most emblematic warship and more than 1,400 of her crew had been destroyed so suddenly. The Admiralty mobilised every available warship in the Atlantic to hunt down and destroy Bismarck. The Royal Navy forces pursued and brought Bismarck to battle; the German battleship was sunk on the morning of 27 May.
Moves were subsequently made to court-martial Wake-Walker and Captain John Leach of Prince of Wales. The view was taken that they were wrong not to have continued the battle with Bismarck after Hood had been sunk. John Tovey, Commander-in-Chief of the Home Fleet, was appalled at this criticism. A row ensued between Tovey and his superior, Admiral Sir Dudley Pound. Tovey stated that the two officers had acted correctly, ensuring that the German ships were tracked and not endangering their ships needlessly. Furthermore, Prince of Wales's main guns had repeatedly malfunctioned and she could not have matched Bismarck. Tovey threatened to resign his position and appear at any court-martial as 'defendant's friend' and defence witness. No more was heard of the proposal.
A British board of enquiry quickly investigated the cause of Hood's explosion and produced a report. After criticism that the initial enquiry did not record all the available evidence, a second board of enquiry more extensively investigated Hood's loss, and examined the vulnerabilities of other large British warships still in service in light of the probable causes of the explosion. It, like the first enquiry, concluded that a 15 in (380 mm) shell from Bismarck caused the explosion of Hood's aft ammunition magazines. This led to refitting some older British warships with increased protection for their ammunition magazines and some other related improvements.
Many naval historians and writers have analyzed the Bismarck engagement and weighed the participants' decisions. One of the most debated is Admiral Lütjens' decision to proceed into the Atlantic rather than continue the battle.
Parallels to Jutland
A number of parallels could be drawn from Vice-Admiral Holland's actions in this battle and those of Admiral David Beatty in the opening stages of the Battle of Jutland. From his actions, it seems clear that Holland felt he had to engage Bismarck immediately, rather than support Wake-Walker in shadowing until Force 'H' could arrive. Beatty, likewise, felt he needed to engage German Admiral Franz Hipper's battlecruisers with his own forces instead of drawing the Germans toward Admiral John Jellicoe and the British Grand Fleet.
Holland, like Beatty, possessed superiority in the number of heavy ships he possessed, yet he was encumbered by inferiority in fighting effectiveness of those units. Moreover, Holland's deployment of his units compared to Beatty's deployment at Jutland. Beatty and Holland both attacked while German units were well before the beam. As a result, the midships and after turrets of Beatty's ships could barely fire on the enemy; Holland's ships could not use their after turrets until the final turn to port just before Hood was sunk. Beatty placed his lighter-armoured battlecruisers at the head of his line, leaving the more powerful and better-armoured Queen Elizabeths in the rear. Likewise, Holland placed the old and vulnerable Hood ahead of the better armoured (albeit new and untested) Prince of Wales. Both admirals exercised tight tactical control over their units from their flagships. This prevented Captain Leach from manoeuvring Prince of Wales independently and possibly taking a different line of approach that might have confused the Germans.
Order of Battle
Note: The British escorting destroyers were ordered to the battle coordinates as part of the overall forces sent to intercept the German ships they were detached the evening before the battle