
12 divisions 10 divisions Result British victory | Date 4 October 1917 | |
 | ||
20,000Australian 6,423New Zealand 1,853 35,000 1–10 October, including 5,000 prisoners, 4 October Similar World War I, Battle of Passchendaele, Battle of Poelcappelle, Battle of Polygon Wood, Battle of the Menin Road Rid | ||
Battle of broodseinde history film
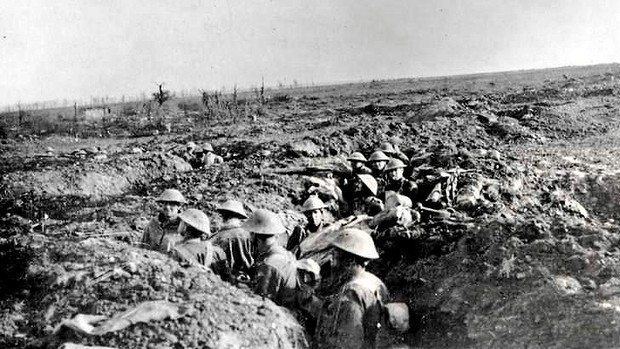
The Battle of Broodseinde was fought on 4 October 1917 near Ypres in Flanders, at the east end of the Gheluvelt plateau, by the British Second and Fifth armies and the German 4th Army. The battle was the most successful Allied attack of the Battle of Passchendaele. Using "bite-and-hold" tactics, with objectives limited to what could be held against German counter-attacks, the British devastated the German defence, which prompted a crisis among the German commanders and caused a severe loss of morale in the German 4th Army. Preparations were made by the Germans for local withdrawals and planning began for a greater withdrawal, which would entail the loss for the Germans of the Belgian coast, one of the strategic aims of the British offensive.
Contents
- Battle of broodseinde history film
- Tactical developments
- British offensive preparations
- Plan of attack
- German defensive preparations
- Second Army
- Fifth Army
- Air operations
- German 4th Army
- Analysis
- Casualties
- Subsequent operations
- Victoria Cross
- References
After the period of unsettled but drier weather in September, heavy rain began again on 4 October and affected the remainder of the campaign, working more to the advantage of the German defenders, who were being pushed back on to far less damaged ground. The British had to move their artillery forward into the area devastated by shellfire and soaked by the return of heavy rain, restricting the routes on which guns and ammunition could be moved, which presented German artillery with easier targets. In the next British attack on 9 October, after several days of rain, the German defence achieved a costly success, holding the approaches to Passchendaele village, which was the most tactically vital ground.
Tactical developments
The Battle of Broodseinde was the third of the British elaborated form of "bite and hold" attacks in the Passchendaele campaign, (Third Battle of Ypres) conducted by the Second Army (General Herbert Plumer) after the reorganisation caused by the costly but successful defence of the Gheluvelt Plateau by the German 4th Army. The unseasonal heavy rains in August had hampered British attempts to advance more than German attempts to maintain their positions. The plateau ran along the southern edge of the Ypres Salient and formed an obstacle to further eastward attacks, obstructing the Allied advance out of the salient. The battle followed the Battle of Menin Road on 20 September and the Battle of Polygon Wood on 26 September, which had captured much the plateau and inflicted many casualties on the German defenders. There had been at least 24 German counter-attacks since the Battle of Menin Road and more after the Battle of Polygon Wood, particularly on 30 September and 1 October, when larger German organised counter-attacks (Gegenangriffe) were made and had been costly failures.
On 28 September, Sir Douglas Haig had met Plumer and the Fifth Army commander General Hubert Gough to explain his intentions, in view of the victories of 20 and 26 September, the fine weather, disarray among the German defenders and the limited prospect of German reinforcements arriving from the Russian front. Haig judged that the next attack, due on 6 October, would conclude the period of strictly limited advances. The following step would be a deeper advance, with provision made for exploitation. Haig wanted XV Corps on the Belgian coast and the amphibious force of Operation Hush readied, in case of a general withdrawal by the Germans. Reserve formations of infantry, artillery, cavalry and tanks were to be made ready behind the Fifth and Second armies, to exploit a successful attack. Gough and Plumer replied over the next couple of days, that they felt that the proposals were premature and that exploitation would not be feasible until Passchendaele ridge had been captured as far as Westroosebeke. Capturing the ridge would probably take two more steps at three-day intervals, followed by another four days to repair roads over the captured ground. Haig explained that although exploitation of the attack due on 10 October was not certain, he desired the arrangements to be made since they could be used at a later date.
British offensive preparations
The British tactical refinements had sought to undermine the German defence-in-depth, by limiting objectives to a shallower penetration and then fighting the principal battle against Eingreif divisions as they counter-attacked, rather than against the local defenders. By further reorganising the infantry reserves, Plumer had ensured that the depth of the attacking divisions corresponded closer to the depth of the local German counter-attack reserves and their Eingreif divisions, providing more support for the advance and consolidation against German counter-attacks. Divisions attacked on narrower fronts and troops advanced no more than 1,500 yards (1,400 m) into the German defence zone, before consolidating their position. When the Germans counter-attacked, they encountered a reciprocal defence-in-depth, protected by a mass of artillery like the British green and black lines on 31 July and suffered many casualties to little effect. The tempo of the British operations added to the difficulty the Germans had in replacing tired divisions through the transport bottlenecks behind the German front.
The Battle of the Menin Road Ridge on 20 September, was the first attack with the more limited territorial objectives developed since 31 July, to benefit from the artillery reinforcements brought into the Second Army area and a pause of three weeks for preparation, during which the clouds dispersed and the sun began to dry the ground. The shorter intervals between attacks since then had several effects, allowing less time for either side to prepare and the Germans had to take more risks on the rest of the Western Front, to replace tired and depleted divisions in Flanders. German troops and ammunition trains overloaded the rail network in west Flanders, while more German artillery escaped British counter-battery fire and less time was available for wire cutting and pillbox destruction, although the Germans generally left these to give battle in the open. The British artillery preparation before Polygon Wood on 26 September, began 24 hours before the infantry attack. No formal artillery preparation was conducted before 4 October, except for the normal heavy artillery counter-battery fire and destructive fire on German strong-points.
To mislead the Germans as to the date and time of the infantry attack, when a hurricane bombardment was to be fired at zero hour, "practice" barrages were begun on 27 September and increased to two barrages a day from 1 October. Despite the ruse of using practice barrages, "a very reliable agent" informed the Germans that an attack was coming from as early as 1 October. The battle was almost called off when heavy rain began again on 2 October, turning parts of the ground into a morass. British military intelligence predicted the German defensive changes after the defeats of 20 and 26 September, in an intelligence summary of 1 October which led to the British being ready for Unternehmen Hohensturm, a big German counter-attack to recapture the area around Zonnebeke on 4 October.
Plan of attack
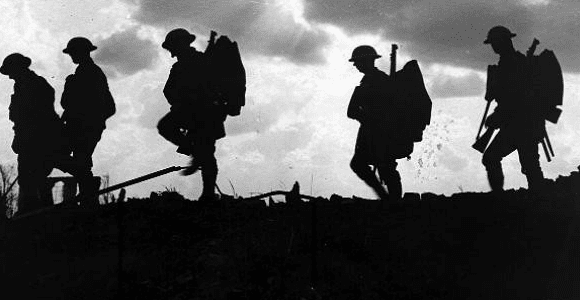
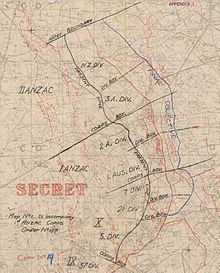
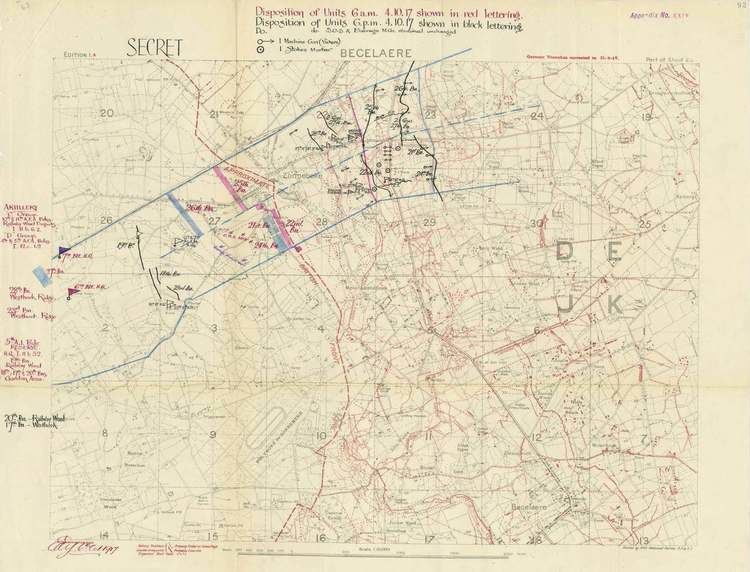
The attack aimed to complete the capture of the Gheluvelt Plateau by the occupation of Broodseinde Ridge and Gravenstafel Spur. This would protect the southern flank of the British line and permit attacks on Passchendaele Ridge to the north-east. The attack was planned for 6 October, to give the II Anzac Corps time to prepare. Haig was anxious about the possibility of deteriorating weather and on 26 September, was able to order the date to be advanced by two days, because of the quick relief by the II Anzac Corps of the V Corps north of the Ypres–Roulers railway. Twelve divisions were involved in the attack on a 14,000-yard (13,000 m) front. The original plan was to have the I Anzac Corps relieved after the Battle of Polygon Wood but the corps had fewer casualties and was fresher than expected and it remained in the front line.
The IX Corps was to attack with the 37th Division in the area beyond Tower Hamlets, south of the Ypres–Menin road, the X Corps was to attack with the Fifth Division in the Reutelbeek valley, the 21st Division and Seventh Division on a 1,400-yard (1,300 m) front further north up to Polygon Wood to take Reutel and the ground overlooking the village. The two right flanking corps had 972 field guns and howitzers supported by 417 heavy and medium pieces. In the I Anzac Corps area, the 1st Australian Division objectives required an advance of 1,200–1,800 yards (1,100–1,600 m), the 2nd Australian Division 1,800–1,900 yards (1,600–1,700 m) on 1,000-yard (910 m) fronts. In the II Anzac Corps area, the 3rd Australian Division objectives were 1,900–2,100 yards (1,700–1,900 m) deep, also on a 1,000-yard (910 m) frontage and the New Zealand Division objectives were 1,000 yards (910 m) deep on a 2,000-yard (1,800 m) front. The first objective (red line) for the Anzac divisions was set just short of the crest of Broodseinde Ridge and the final objective (blue line) another 200–400 yards (180–370 m) beyond. The flanking corps conformed to this depth of advance and also attacked with one battalion for the first objective per brigade and two for the final objective, except in the II Anzac Corps, where two intermediate objectives were set for the 3rd Australian Division because of the state of the ground, with a battalion of each brigade for each objective.
The artillery plan had the first belt of creeping barrage beginning 150 yards (140 m) beyond the jumping-off tapes. After three minutes the barrage was to creep forward by 100-yard (91 m) lifts in four minutes for 200 yards (180 m), when the machine-gun barrage would begin, then every six minutes to the protective line, 200 yards (180 m) beyond first objective. During the pause the barrage was to move 1,000 yards (910 m) further to hit German counter-attacks and then suddenly return. At zero + 130 minutes, it was to advance in 100-yard (91 m) lifts every eight minutes to the final objective. After another pause the barrage was to creep forward at hourly intervals for 1,500 yards (1,400 m) into the German defences. The defensive barrage by the first two belts from the field artillery was to stop at 11:20 a.m. except for SOS fire and the two back belts of heavy and medium artillery at 1:44 p.m.
German defensive preparations
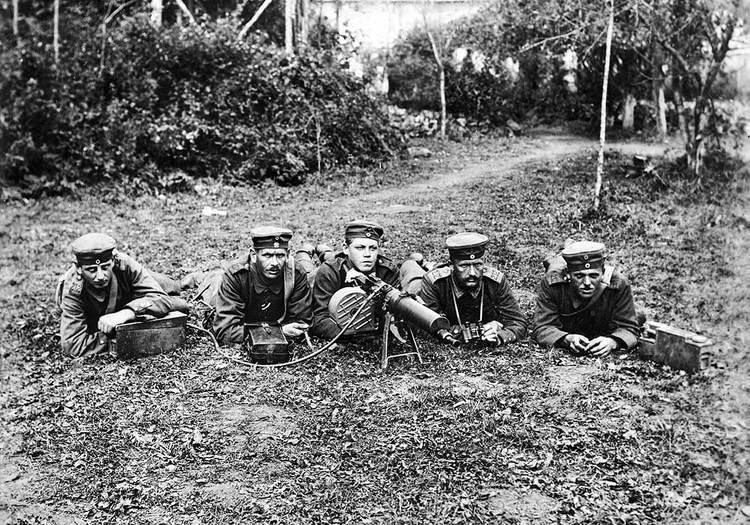
From mid-1917, the area east of Ypres was defended by six German defensive positions: the front line, Albrecht Stellung (second line), Wilhelm Stellung (third line), Flandern I Stellung (fourth line), Flandern II Stellung (fifth line) and Flandern III Stellung (under construction). In between the German defence positions lay the Belgian villages of Zonnebeke and Passchendaele. The German fortifications had been breached in several places since the start of the British assault on 31 July 1917. Ludendorff met the local commanders at Roulers on 29 September where the "complete breakdown" of the German defensive system was described to him; Ludendorff ordered a strengthening of forward garrisons by the ground-holding divisions. All available machine-guns including those of the support and reserve battalions of the front line regiments, were sent into the forward zone to form a cordon of four to eight guns every 250 yards (230 m).
Ground holding divisions were reinforced by the Stoss regiment of each of the Eingreif divisions, which were moved up behind each front division into the artillery protective line, which backed on to the forward battle zone, to launch earlier counter-attacks while the British were consolidating. The bulk of the Eingreif divisions were to be held back and used for a methodical counter-stroke on the next day or the one after and for spoiling attacks between British offensives. These changes were incorporated in a 4th Army operation order of 30 September. Operations to inflict greater losses on British infantry under the instructions of 22 September were to continue, with more bombardment by field artillery and by using at least half of the heavy artillery's ammunition for observed fire on infantry positions in captured pill-boxes, command posts, machine-gun nests, tracks and field railways. Gas bombardment was to be increased on forward infantry positions and artillery emplacements whenever the winds allowed. Every effort was to be made to induce the British to reinforce their forward positions, where the German artillery could engage them.
Between 26 September and 3 October, the Germans attacked and counter-attacked at least 24 times. On 1 October, two regiments from the 4th Reserve and the 8th divisions and the 4th Army Sturmbattalion under the command of General von Gabain (17th Division), attacked Polygon Wood. The attack began at 5:30 a.m. in the area taken over from the Australians by X Corps. The 21st and 7th Divisions and the neighbouring Australian battalion to the north, forced most of the German infantry under cover in shell-holes in no-man's-land by massed small-arms fire. The German attack advanced a maximum of 140 yards (130 m) at Cameron Covert, for which the 210 Reserve Infantry Regiment lost 356 casualties. An attempt to renew the advance after more artillery-fire failed. Unternehmen Hohensturm, a bigger German organised counter-attack, intended to recapture the area around Zonnebeke which had been planned for 3 October, was postponed for a day.
Second Army
In IX Corps the 37th Division attacked with two brigades, the 19th Division on the right co-operating with an artillery and machine-gun barrage and a smoke screen. The right brigade pivoted on the southern flank amid much German small-arms fire but captured the first objective on the Tower Hamlets (Bassevillebeek) spur. German counter-attacks and fire from Joist Trench and Berry Cottage then pushed the right flank units back to their start line. The left brigade was fired on from a pillbox and Lewis Farm, which had been missed by the bombardment and which hindered an attack on dug-outs along the north end of Gheluvelt wood. The brigade dug-in in short of the final objective, Tower Trench was captured but then abandoned, also due to the fire from Lewis Farm.
In X Corps, the 5th Division attacked with two brigades. By coincidence the German 19th Reserve Division was about to attack and was caught in the British bombardment. The right brigade was delayed by fire from the 37th Division area, believed to be from Lewis Farm and a defensive front was established facing the pillbox. The centre of the brigade were able to keep pace with the barrage and consolidated the objective by 12:30 p.m. The battalion on the left attacked between the Scherriabeek and Reutelbeek towards Polderhoek Chateau, advancing 700 yards (640 m), with the assistance of a tank before being halted and having to dig in. To the north, the left flank brigade was fired on from Cameron Covert and scattered pillboxes as it advanced. After a long delay Cameron Copse was captured with the help of three tanks moving down the Reutel road. The final objective at Juniper Hill was reached but was then abandoned, due to being exposed to machine-gun and artillery fire. The attackers sidestepped to the north of the Reutel road and linked with troops from the 21st Division. German troops counter-attacked eight times and regained Polderhoek Spur, leaving the new front line along the west of Cameron Covert and just short of Château Wood.
Two brigades of the 21st Division attacked at 6:00 a.m. onto ground held by the German 19th Reserve Division, backed by part of the 17th Division, the Eingreif division between the Menin Road and Polygon Wood. The going varied from marsh to hard ground, which could support the four attached tanks and caused shells to ricochet. The right brigade advanced under heavy machine-gun fire and took Joist Farm before being obstructed by marshy ground and pillboxes to the right. British bombing sections attacked the pillboxes and cut off Juniper Trench to reach the objective. Fire from a blockhouse at the east end of Reutel caused a delay until it was knocked out by a tank. A counter-attack from the south-east was dispersed around noon by artillery and small-arms fire. The left brigade crossed the Polygonebeek and captured a portion of Juniper Trench and a pillbox. At Judge Trench the brigade consolidated; a further advance came under fire from Judge Copse but was able to dig in and hold the ground. By 9:00 a.m. most of the division's objectives had been captured, giving observation to the south-east down the Reutel valley. Massed small-arms fire from the Polderhoek spur caused many casualties in the 64th Brigade on the right, which withdrew slightly to sheltered ground, without sacrificing the commanding position which protected the right flank of the Anzac corps further north.
The right brigade of the 7th Division advanced against light resistance to the first objective (red line) but came under fire from machine-guns in the 21st Division area. As the neighbouring division came up the 91st Brigade was able to resume its advance towards In Der Ster Cabaret until fire from Joiner's Rest held them up. Reinforcements allowed the final objective (blue line) to be taken. A defensive flank was formed along Jolting Houses road and Jetty Trench, meeting the 21st Division to the west of Reutel. The left brigade had an easy advance to the first objective. As the attack continued some troops crossed into the area of the 1st Australian Division, causing a gap but the German defenders were not able to exploit this and the final objective was reached. Occupation of the In Der Ster plateau gave the two divisions observation over the lower part of the valley, enfilading ground on which any counter-attack from the south against the 1st Australian Division must move.
The main attack was conducted by the two Anzac corps. When the I Anzac Corps was ready to attack, a German artillery bombardment fell on it at 5:30 a.m. causing many casualties. As the Australian divisions advanced at 6:00 a.m., they met the German 212th Infantry Regiment from the 45th Reserve Division and the 4th Guard Division in no-man's-land. The 1st Australian Division, advancing with two brigades, routed the Germans and continued the advance beyond Flandern I Stellung. The right brigade advanced beyond the first objective and had to fall back behind the British protective barrage to consolidate. The left brigade picked its way through marshy ground and tree stumps in Romulus and Remus Woods, north of Molenaarelsthoek and then outflanked a group of blockhouses, some troops crossing into the 2nd Australian Division area.
The first objective was taken at 7:15 a.m., German field guns opened fire from the Becelaere–Broodseinde–Passchendaele road and were attacked and captured. Fresh battalions resumed the advance and were fired on from Retaliation Farm and a crater being used as a German headquarters, about a third of the way up the road from Molenaarelsthoek to Beclaere, until they were cleared. At 8:10 a.m. the advance resumed to the final objective (blue line) which was consolidated and outposts established in front of it, despite long-range fire from the Keiberg spur and a small rise north east of Broodseinde village. Attempts were made by parties of German infantry to counter-attack at noon around Dame House, from Celtic Wood at 1:00 p.m. and at Flint Farm at 2:30 p.m. and two attempts to mass around Flandern II Stellung at the Keiberg spur, to the south of Passchendaele village, which were stopped by artillery fire.
The 2nd Australian Division moved up to the front line during the night, amidst rain which began around midnight. Along with the 1st Australian Division it was caught in the German preparatory bombardment for Unternehmen Hohensturm (Operation High Storm) but this stopped when the British hurricane bombardment began at 6:00 a.m. as the Australian advance began. The 6th and 7th Brigades had to pass either side of Zonnebeke lake and saw German troops opposite them rise from shell-holes and begin to advance. The Australian troops began to fire on the move and destroyed the first German wave, at which those to the rear retreated back into the British creeping barrage, while others retired in stages through Zonnebeke. Germans hidden in the ruins were rushed by the following Australian battalion, before they could shoot many of the Australians who had passed beyond. The Australians had overrun German troops from the 45th Reserve and the 4th Guard divisions, having forestalled the German infantry attack and then took several field guns along the way. The battalions pressed on beyond the first objective and reached the final objective east of Broodseinde village. The left brigade met snipers in Zonnebeke and then more fire from a large number of machine-guns in Daisy Wood. The brigade chose an old British trench to consolidate, about 200 yards (180 m) short of the final objective.
In the II Anzac Corps area, the 3rd Australian Division had to assemble west of Hill 40 on the north side of the Ypres–Roulers railway, which had not been captured by the 3rd Division (V Corps) on 26 September. Delays in assembling were caused by German flares which illuminated the approaches to the hill. The division was to assemble its attacking battalions in widely spaced lines due to the state of the ground, intending that the troops behind the initial waves were to escape a German barrage by being far enough behind the British front line. These areas were found to be under fire when the troops arrived, so they were squeezed up like those in the other divisions. The attack began at 6:00 a.m. with two brigades. The right brigade advanced quickly over the near crest, then paused on the first objective before advancing in section columns to the red line on the right, the left coming up after a delay caused by the Alma blockhouse and some pillboxes nearby.
The leading battalion of the 10th Brigade on the left had edged so far forward that when the advance began, it was 30 yards (27 m) from the pillboxes at Levi Cottages at the top of the rise, beyond which was a dip then the slope of Gravenstafel ridge. The pillboxes were quickly taken, followed by Alma and Judah House in the dip after a short delay. After a twelve-minute pause at this (first intermediate) objective, to give the New Zealanders on the left time to cross the boggy ground in their area, the two following battalions leap-frogged through, that of the right brigade taking many German prisoners from dug-outs along the railway embankment and reaching the red line quickly. After a delay caused by the British bombardment dwelling for nearly half an hour, the left brigade advanced up Gravenstafel spur and then pressed on to silence several machine-guns in pillboxes on Abraham Heights. By 7:20 a.m. all of the 3rd Australian Division was on the red line while "swarms" of German prisoners were taken by the brigade mopping-up behind the advanced troops.
At 8:10 a.m. the advance resumed and after a pause to capture Seine pillbox, the right brigade crossed Flandern I Stellung, which lay diagonally across its path and reached the final objective. The 10th Brigade on the left was held up by fire from machine-gun nests in the New Zealand Division area, until they were taken by a party from the supporting battalion. The advance resumed under heavy fire from positions in Flandern I Stellung where the barrage had passed over. Troops on the right established several machine-gun posts and enfiladed the Germans further north while troops crossed into the New Zealand area and outflanked the German positions from the north. The final objective (blue line) was reached by 9:12 a.m. and the ground consolidated.
The New Zealand Division on a 2,000-yard (1,800 m) front, continued the attack with two brigades. The German bombardment which began at 5:30 a.m. fell between the foremost New Zealand troops and their supporting battalions. The division had 180 18-pounders and 60 4.5-inch howitzers for its creeping barrage in front of the four deeper barrages fired by 60 machine-guns and the II Anzac Corps medium and heavy artillery. When the infantry advance began, the German infantry who had assembled for their attack and been devastated by the British artillery barrage, were met after 200 yards (180 m). The German survivors were dispersed, many being killed in bayonet-fighting or taken prisoner, before the New Zealand infantry found that they could cross the morass around the Hanebeek more easily than expected.
The 4th Brigade on the right took Duchy Farm and Riverside easily, paused to capture Otto Farm and then reached the first objective (red line) and dug in. Fresh battalions resumed the advance, captured two pillboxes in Berlin Wood and two unexpected pillboxes, then captured Berlin Farm. The 1st Brigade attack on the left, veered north beyond the Hanebeek and was fired on from Aviatik Farm and Dear House, which were taken by a trench mortar and grenade attack. Fire from the Winzig, Albatross Farm and Winchester blockhouses, in the 48th Division area further north (and from the Bellevue spur up the Stroombeek valley), delayed the advance until they were captured. More pillboxes at Boetleer were taken by the left flanking battalion of the 4th Brigade and the red line (first objective) was reached. A position near Korek was attacked, despite being beyond the first objective and under British artillery fire. The advance to the final objective, between Flandern I Stellung where it met the Ypres–Roulers railway, north to Kronprinz Farm on the Stroombeek began and a German battalion headquarters was captured in the Waterloo pillboxes. Calgary Grange and Kronprinz farm held out for a while longer but the final objective, after an advance of 1,000 yards (910 m) was reached and consolidated.
Fifth Army
In the XVIII Corps area, the 48th Division attacked with one brigade at 6:00 a.m. Vale house and Winzig on the right fell quickly, then machine-gun fire slowed the advance and some New Zealand troops strayed across the divisional boundary, causing confusion around Albatross Farm and Wellington Farm. Once Wellington and Winchester Farms had been captured, the advance resumed to the Stroombeek. As night fell the division relieved the New Zealanders in the divisional area and took more ground. In the centre the brigade captured German posts on the west bank of the Stroombeek and were then held up by fire from the area of York Farm. Eventually the advance was halted 300 yards (270 m) short of Vacher Farm. A renewal of the attack with reinforcements was not able to overcome German machine-gun fire. On the left the attack was hampered by heavy machine-gun fire immediately. Tweed House was captured and contact made with troops further north from the 11th Division. Beck House was reached but further south the attackers were forced back. A resumption of the attack at 5:00 p.m. was cancelled due to rain and poor light.
The 11th Division attacked at 6:00 a.m. with two brigades and ten tanks of 'D' battalion, 1st tank Brigade. On the right the advance took Malta House and reached an intermediate line where a small counter-attack was stopped. Fire from the church and the Brewery pillbox in Poelcappelle caused a delay but Gloster Farm was captured with the aid of two tanks and the red line (first objective) consolidated. Troops from the inner flanks of both brigades and several tanks entered Poelcappelle, then captured pillboxes beyond the east end. The left brigade had advanced easily to the intermediate line, then overcome small parties of German infantry concealed in shell-holes. A shelter was captured near the church in Poelcappelle amid sniper fire. Ferdan House was captured and the final objective consolidated. A defensive flank was thrown back to maintain touch with the 4th Division to the north, whose advance had been pushed back 400 yards (370 m) by German counter-attacks. A counter-attack in the 11th Division area at 1:00 p.m. was defeated and reinforcements allowed the new line to be established between the Steenbeek and the Langemarck–Winnipeg road.
XIV Corps guarded the northern flank of the attack. 4th Division attacked with two brigades at 6:00 a.m. The right brigade took Kangaroo Trench easily but were held up as they reached the first objective by German troops and fire from Lemnos House. Troops on the extreme right combined with 11th Division infantry to capture a pillbox on the Poelcappelle road. As they reached the next objective Ferdan House was outflanked, then the green line was consolidated amidst fire from 19 Metre Hill. The left brigade lost direction as it crossed the marshy ground about the Lauterbeek and was fired on from the flank, as the advance reached a road beyond 19 Metre Hill. After an hour's pause the advance resumed but machine-gun fire stopped the attack and the ground captured was consolidated. A German counter-attack at 3:00 p.m. made good progress until reinforcements drove it back. A gap on the boundary with the 29th Division to the north was filled as dark fell and another German counter-attack was spotted as the German infantry assembled and dispersed by artillery fire. A line Ferdan House–Kangaroo Huts–west of Tragique Farm–19 Metre Hill was consolidated.
The 29th Division was to attack astride the Ypres–Staden railway and form a defensive flank overlooking the Broembeek, with troops from two brigades. The right brigade took Chinese House and 't Goed ter Vesten Farm, as it formed a flank along the junction with the 4th Division further south. As a German counter-attack forced back elements of the 4th Division the 29th Division troops stopped them with flanking machine-gun fire and drove them back, allowing the 4th Division to regain the lost ground. North of the railway several pillboxes were captured by the left brigade and observation posts established.
Air operations
Wind, rain and low cloud stopped long-range air operations and severely restricted the British air effort over the battlefield. British air observers sent 49 zone calls and observed artillery fire on 26 targets. Five battlefield reconnaissances, ten contact patrols and two counter-attack patrols of those attempted succeeded, particularly those of 4 Squadron and 21 Squadron, which observed the flares of the attacking troops at the first and final objectives, on much of the front attacked and provided the infantry with a measure of air support despite the weather.
German 4th Army
Unternehmen Hohensturm, (Operation High Storm) a counter-attack planned for 4 October, was intended to recapture as much of the ridge on Groote Molen (Tokio) spur as possible. The German troops had assembled for the organised counter-attack, (Gegenangriff) when the British bombardment swamped them. Reserve Infantry Regiment 212 of the 45th Reserve Division supported by the 4th Guard Division, was caught in the open along with regiments from the 4th Bavarian Division; the Bavarians tried to counter-attack the Australians, who had overrun the German attack. After 29 September, the bulk of the Eingreif divisions were held back, battalions and a few regiments from the 8th and 22nd divisions at In der Ster, the 45th Reserve and 4th Bavarian divisions opposite Broodseinde Ridge and the 16th Division south of Poelcappelle. The Eingreif units were committed as reinforcements for the remnants of the front-holding divisions and suffered many losses from British artillery and machine-guns. The most successful counter-attack was made by an improvised force from the front-holding 19th Reserve Division and parts of the 17th Division, the local Eingreif division, which advanced up Reutelbeek valley, took Reutel and Cameron Covert and reinforced Polderhoek Château, before being stopped by British artillery and machine-gun fire. Sparse and poorly aimed shell-fire, ineffective counter-attacks and disorganisation demonstrated the severity of the German defeat.
Analysis
As news arrived of the great success of the attack, Brigadier-General Charteris, head of GHQ Intelligence, went from Haig's advanced headquarters to the Second Army Headquarters to discuss a possible exploitation. Plumer declined the suggestion, as eight fresh German divisions were behind the battlefield with another six beyond them. Plumer preferred to wait until the expected German counter-attacks had been defeated, as Haig had directed. German artillery fire was heavy and the defences of the Flandern II and Flandern III Stellungen could be garrisoned by German divisions behind the attack front. An attack on these fortifications would need artillery support, which would be limited, given that the British field artillery was behind a severely battered strip of muddy ground 2 miles (3.2 km) deep, firing close to the limit of their range.
Later in the day, Plumer had second thoughts and ordered I Anzac Corps to push on to the Keiberg spur, with support from II Anzac Corps. Lieutenant-General Godley the II Anzac Corps commander, wanted to advance north-east towards Passchendaele village but Lieutenant-General Birdwood of I Anzac Corps, wanted to wait until artillery had been brought up and supply routes improved. The X Corps commander, Lieutenant-General Morland proposed an attack northwards, from In de Ster into the southern flank of the Germans opposite I Anzac Corps, which was opposed by Major-General Shoubridge the 7th Division commander, due to uncertainty and the many casualties in the 21st Division on his right flank. At 2:00 p.m. Plumer decided that exploitation was not possible. At 10:30 a.m., Gough told the Fifth Army corps commanders to push on and to attack again at 5:00 p.m. but when reports arrived of a repulse of the 4th Division at 19 Metre Hill, at the junction of XVIII and XIV Corps, the attack was cancelled.
The capture of the ridges was a great success, Plumer called the attack "... the greatest victory since the Marne" and the German Official History referred to "... the black day of October 4". There had been an average advance of 1,000 yards (910 m) and the 3rd Australian Division moved forward up to 1,900 yards (1,700 m). The X Corps divisions had managed to take most of their objectives about 700 yards (640 m) forward, gaining observation over the Reutelbeek valley but had relinquished ground in some exposed areas. The British artillery fired a standing barrage for two and a half hours, while the infantry dug in undisturbed and German counter-attacks were dispersed with artillery fire. Wet ground had caused some units to lag behind the creeping barrage, as well as reducing the effect of shells, many landing in mud and being smothered, although this affected German artillery equally. The British had great difficulty moving artillery and ammunition from the west end of the Gheluvelt Plateau to the eastern edge, facing Passchendaele. Field guns closest to Passchendaele were 5,000 yards (4,600 m) from Broodseinde; for the battle of Messines, 6,200 yards (5,700 m) for the 18-pdrs and 7,000 yards (6,400 m) for the 4.5-inch howitzers was the safe maximum.
Casualties
A German officer wrote that the ordeal in the swampy area in the dark and the fog, was indescribable. In 1942 the German Official History Der Weltkrieg recorded 35,000 casualties for the period 1–10 October. The 45th Reserve Division had 2,883 casualties, whilst the 4th Guard Division suffered 2,786 casualties. 4,759 German prisoners were taken, c. 10,000 since 20 September. Second Army casualties for the week ending 4 October were 12,256, II Anzac Corps lost 3,500 casualties (including 1,853 New Zealanders). The 21st Division had 2,616 casualties, the highest loss of a Second Army division. Fifth Army losses for the week to 5 October were 3,305 men. Calculations of German losses by the Official Historian have been severely criticised ever since.
Subsequent operations
On 5 October, the 21st Division captured a blockhouse and next day a reconnaissance by the 2nd Australian Division revealed Daisy Wood to be strongly held. On 7 October, parties from the 49th Division (II Anzac Corps) raided Celtic Wood and the 48th Division (XVIII Corps) was repulsed at Burns House and Vacher Farm. Celtic Wood was raided by a battalion of the 1st Australian Division on 9 October. There was anxiety among the higher British commanders about wet weather affecting operations again, just as the Germans appeared to be close to collapse. The increased tempo of attack allowed by the systematic planning and decentralisation of responsibility from army to corps and divisions and the reduction of much of the planning to a routine, led to the time between attacks being further reduced. Faster attack preparations reduced the time available for artillery to prepare assaults, which combined with the return of heavy rain after 4 October, substantially to reduce British artillery support during the battles of Poelcapelle on 9 October and the First Battle of Passchendaele on 12 October. As optimism at the possibility of advancing over the Passchendaele watershed increased the weather broke.
Victoria Cross
Nine Victoria Crosses awarded during the Battle of Broodseinde, 4 October.