
Active 19171939–46 | Country Australia | |
 | ||
Part of | ||
The 6th Division was an infantry division of the Australian Army. It was raised briefly in 1917 during World War I, but was broken up to provide reinforcements before seeing action. It was not re-raised until the outbreak of World War II, when it was formed as a unit of the Second Australian Imperial Force (2nd AIF). Throughout 1940–41 it served in the North African Campaign, the Greek campaign, on Crete and in Syria, fighting against the Germans, Italians and Vichy French. In 1942, the division left the Middle East and returned to Australia to meet the threat of Japan's entry into the war. Part of the division garrisoned Ceylon for a short period of time, before the division was committed to the New Guinea campaign. In New Guinea, its component brigades had a major role in the successful counter-offensive along the Kokoda Track, at Buna–Gona and around Salamaua–Lae in 1942–43. Throughout late 1943–44, the division was re-organised in Australia before being committed as a complete formation to one of the last Australian operations of the war around Aitape–Wewak in 1944–45.
Contents
Formation
The 6th Division was first formed in 1917 in Britain during World War I as part of an effort to expand the First Australian Imperial Force. Its existence was short-lived, though, and as a result of manpower shortages that occurred because of a failure to make good the heavy losses that the AIF had suffered on the Western Front in 1917, it was decided to disband the division and its subordinate units in September 1917 and use their personnel to reinforce other units. As a result, the division was broken-up as replacements several months later, before it saw action.
The division was not re-raised during the interwar years and subsequently remained off the Australian Army's order of battle until World War II broke out. Due to the provisions of the Defence Act, which precluded the five existing Militia divisions from serving overseas, the government decided to raise an all-volunteer force known as the 2nd AIF. The 6th Division was the first division formed within the 2nd AIF, being raised on 28 September 1939. Initially under the command of Lieutenant General Thomas Blamey, upon formation the division consisted of the 16th, 17th and 18th Brigades, each established with four infantry battalions. Later, though, it was reorganised as a result of the 18th Brigade being sent to the United Kingdom in June 1940 and the decision to adopt the British establishment of three infantry battalions to a brigade. The 19th Brigade was subsequently raised as the division's third infantry brigade, being formed by taking one battalion from each of the other three brigades when they were reduced from four to three. Of the division's infantry battalions, all except one – the 2/11th – were raised in either New South Wales or Victoria.
In early 1940, the majority of the 6th Division was sent to Palestine, to complete their training before joining the British Expeditionary Force (BEF) in France. Together with the 7th Division they formed the Australian I Corps. However, France fell to German forces in July 1940, before I Corps arrived. While the rest of the division was training in the Middle East, the division's third artillery regiment, the 2/3rd Field Regiment and the 2/1st Anti-tank Regiment were sent to the United Kingdom to help bolster the garrison there in light of an expected invasion following the Fall of France. After being partially broken up to provide personnel to serve as infantry in the 25th Brigade, once the threat of invasion was over these two regiments were sent to the Middle East to rejoin the division, arriving there in December 1940.
North Africa
The 6th Division first saw action in early 1941, against Italian forces in North Africa, in the advance to Benghazi as part of Operation Compass. By this time, Major General Iven Mackay had taken over command of the division. In June 1940, Italy had declared war on the Allies and began to build up forces in Libya. In September 1940, the Italian Tenth Army invaded Egypt, a British colony, threatening Allied control of the Middle East and most particularly, the Suez Canal and international supply routes. British forces under General Sir Archibald Wavell expelled the Italians from Sidi Barrani and pursued them back towards the Libyan border. In December 1940, the 6th Division was moved forward from training camps around Alexandria to relieve British troops around Bardia and at the end of December they were ordered to prepare to attack.
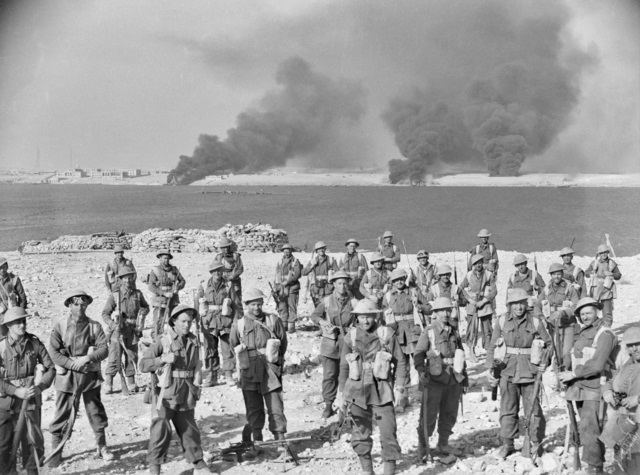
On 3 January 1941, at Bardia, a small coastal town just inside the Libyan border, the first major Australian action of World War II took place. Amidst a heavy artillery barrage and supported by British Matilda tanks and Bren carriers of the divisional cavalry, the 6th Division penetrated the defences of the Italian stronghold. Despite some heavy resistance the town fell to the Australians just two days later. The Australians captured a large amount of Italian war material as well as thousands of Italian prisoners of war (POWs), many of whom were shipped to prison camps in Australia. The fighting continued until 5 January when the Italian position had been cut almost into two. The Allies took nearly 40,000 Italian prisoners and considerable amounts of enemy weapons, supplies and equipment. The battle for Bardia cost 130 Australian lives with 326 men wounded.
On 22 January 1941, the Italian held port of Tobruk fell to the AIF and 25,000 Italians became prisoners. During January and February 1941, the 6th Division, together with British units, pushed the Italian army back across Libya, including actions at Derna, Barce and Benghazi. The Italian Tenth Army was destroyed. Although Wavell initially planned to leave the 6th Division in Cyrenaica for defence, the 7th Division was still insufficiently trained and equipped. As such in early April 1941, the 6th Division was withdrawn from North Africa to defend Greece and replaced by the 9th Division, which took part in the epic Siege of Tobruk between April and November 1941 against Italian and German forces. Throughout the campaign, the division lost 241 killed, 790 wounded and 21 captured.
Greece, Crete and Syria
Hitler was concerned that if Greece—which since 28 October 1940 was fighting against the Italians in Albania—became a British ally then the Ploesti oilfields in Romania, on which Germany relied for her fuel, might be open to air attack from Greece. As the Germans were planning an invasion of Russia for June 1941, they could not allow such a threat to their essential oil supplies, and so they began planning an invasion of Greece. In March 1941, Prime Minister Robert Menzies, of Australia, with the concurrence of his Cabinet, agreed to the sending of Australian troops to Greece to defend against a German attack. Both Menzies and the I Corps commander, Blamey, felt that the operation was risky and might end in disaster, but Menzies stated that Greece should be supported against German aggression and that the defence of Greece was a "great risk in a good cause".
The 6th Division arrived in Greece in late March and early April 1941, where they joined with a New Zealand and British force. On 6 April the Germans began their invasion of Greece, sending a total of 27 divisions. After arriving in Greece, the Australians were transported north towards the Yugoslav border, where they took up defensive positions around the Florina Valley. During the fighting around Vevi that followed, troops from the 2/4th and 2/8th Infantry Battalions and the 2/3rd Field Regiment, from Brigadier George Vasey's 19th Brigade, fought against the Leibstandarte SS Adolf Hitler brigade. Despite their efforts, the Allied force, together with Greek units, was unable to halt the rapid German advance down central Greece towards Athens. The Allies were outflanked by the Germans, and by 27 April they were driven off the Greek mainland, with a final act of defiance being made around Porto Rafti. The division's casualties in Greece amounted to 320 killed, 494 wounded and 2,030 captured.
After the withdrawal from Greece, while some elements of the division were evacuated back to Alexandria, the majority of the 6th Division was sent to Crete where they were cobbled together to form a hasty garrison. The 19th Brigade had been landed intact with all of its infantry battalions, while only elements of the 16th and 17th Brigades had been landed and these two were combined together to form composite battalions. In addition to the infantry, two of the division's field artillery units, the 2/2nd and 2/3rd Field Regiments had also been landed. They had both lost all of their equipment in Greece and as a result the 2/2nd were thrown into the line as infantry, while the 2/3rd were hastily re-equipped with 14 captured French and Italian artillery pieces. On 20 May, the Germans launched an airborne assault on the island and over the course of a week-and-a-half heavy fighting ensued around Maleme airfield, Heraklion, Canea, and Retimo during which heavy casualties were inflicted upon the Germans before, having exhausted their ammunition and lacking air support, the garrison was evacuated back to Egypt close to the end of the month. As in Greece, a large number of men were unable to be evacuated and as a result many 6th Division personnel, including the majority of the 2/1st, 2/7th and 2/11th Battalions, were taken prisoner. A great deal of equipment was also lost. During the fighting, the 2/7th Infantry Battalion, fighting alongside the New Zealand 28th (Maori) Battalion, undertook a bayonet charge at a position known as 42nd Street that was later described as "one of the epics of the war", which resulted in about 300 Germans being killed. The fighting on Crete added a further 274 killed, 507 wounded and 3,102 captured to the division's casualty list.
While the majority of the division was in Crete, the 6th Division Cavalry Regiment, which had not been sent to Greece, was detached to the British 7th Armoured Brigade and subsequently took part in Operation Brevity in the Western Desert in May. Following the evacuation of Crete, while the 6th Division began rebuilding in Palestine, the cavalry was allocated to take part in the bloody but successful attack on Vichy French forces in the Syria-Lebanon campaign. Two depleted infantry battalions from the 17th Brigade – the 2/3rd and 2/5th – were also committed and subsequently took part in the drive on Damascus in mid-June. They were later joined by the 2/2nd Pioneer Battalion and together they fought through the campaign until the French capitulated in mid-July. In the process they suffered 168 casualties; total 6th Division casualties for the Syrian campaign amounted to 39 killed and 129 wounded.
After the conclusion of the fighting in Syria, the rest of the 6th Division joined the 17th Brigade and undertook garrison duties there. In December 1941, the division received news that the Japanese had attacked on Pearl Harbor and invaded Malaya. Nevertheless, the division remained in Syria over Christmas, during which time they endured a bitterly cold winter that saw heavy snow falls. Finally, in January 1942, the decision was made to withdraw them back to Australia to meet threat posed by Japanese advances in the Pacific. The 19th Brigade departed first and subsequently arrived at Fremantle on 10 March. Meanwhile, the 16th and 17th Brigades were diverted to defend Ceylon (now Sri Lanka) from the Japanese. They remained there from mid-March through to early July 1942.
Return to Australia
While the 16th and 17th Brigades were in Ceylon, the 19th Brigade had proceeded from Fremantle to Adelaide in mid-March. They remained there until April when a short period of leave was granted. Once the men had reported back, the brigade was split up, with the 2/11th Infantry Battalion being sent to Western Australia to undertake garrison duty while the brigade's other infantry battalions and the divisional cavalry regiment were sent to the Northern Territory to bolster its defences in the wake of Japanese successes; the 19th Brigade would subsequently not see any combat for another three-and-a-half years. While there, the 2/11th's place within the 19th Brigade was taken by a Militia unit, the 23rd/21st Battalion. At the same time, many of the division's experienced officers and non commissioned officers were transferred out to Militia units in order to prepare them for operations against the Japanese. The 6th Division headquarters was subsequently used to form Headquarters, Northern Territory Force in April, and does not appear to have officially been reformed in its own right until August or September. In June, one the division's artillery regiments, the 2/3rd was transferred to the 5th Division. Having spent nearly six months in Ceylon, the 16th and 17th Brigades arrived back in Australia in August and they subsequently returned to their states of origin. After a brief period of leave, welcome home parades were held in Sydney for the 16th and in Melbourne for the 17th. Less than a week later, the 6th Division received orders to deploy overseas again, this time to meet the Japanese southward thrust through New Guinea. After this, the division would spend the remainder of the war fighting elements of the Japanese XVII Army in New Guinea and until the final year of the war, it would do so in individual brigade-level components, rather than as a unified command.
Kokoda to Buna–Gona
In mid-September 1942, the 16th Brigade, under the command of Brigadier John Lloyd, and other elements of the division were sent to New Guinea to reinforce and relieve the Militia 30th Brigade and the 7th Division units that had been fighting a desperate holding action on the Kokoda Track since July. The campaign to that point had consisted of a series of battles fought along the track after the Japanese had landed around Buna and pushed south towards Port Moresby, but were checked at Ioribaiwa. The divisional headquarters opened at Port Moresby on 19 September and the 16th Brigade arrived three days later; the 17th Brigade was sent to Milne Bay, to relieve the 18th Brigade following the successful defensive action they had fought earlier in the month. As the Japanese, having reached the extent of their supply lines, began to withdraw from Ioribaiwa, the Australians went on the offensive, pursuing them back north towards Buna.
On 17 October, the 16th Brigade was detached to the 7th Division's command and moved up the track. It subsequently took over the advance from the exhausted troops of the 25th Brigade three days later. The Japanese had established themselves in strong positions on the high ground north of Eora Creek. For the next week-and-a-half, the brigade fought desperately against the terrain, driving rain, and cold, inhospitable conditions to outflank these positions. Making heavy work of it against strong resistance, the Australians slowly made headway, but the Japanese remained in possession of the citadel. Finally, on 28 October when the 2/3rd Infantry Battalion took the Japanese right flank, killing 50 and forcing the remaining defenders into a headlong retreat. In securing the crossing, the brigade had suffered almost 300 casualties. Suffering from disease and with rations running low, the brigade continued along the eastern fork of the track. Amidst almost no opposition, they took Missima and passed through Kobara before setting out for Wairopi by 4 November.
Heavy resistance was encountered that day as the 2/2nd Infantry Battalion advanced towards the high ground around Oivi. They were held up for a number of days until outflanking moves by the 2/1st Infantry Battalion, temporarily detached to the 25th Brigade, pushed the Japanese back and enabled the brigade to continue its advance. Gorari was taken and by mid-November the brigade, having suffered 471 battle casualties since the being committed to the fighting around Kokoda, finally reached Wairopi, where the swollen Kumusi River was forded.
After crossing the Kumusi, the 16th Brigade was ordered to move towards Sanananda Point to support the joint Australian–US effort to attack the Japanese beachheads around the Buna–Gona area. The ration situation had grown worse by this time, and progress was slow as the march proved too difficult for many of the soldiers in their weakened physical states. Nevertheless, by 18 November, the 2/2nd Infantry Battalion had led the brigade into Popondetta, after which the 2/3rd moved into the vanguard. For the next two days they experienced almost no opposition until 21 November when Japanese artillery began to target the 2/1st. Launching a quick attack with three companies, the 2/1st outflanked the Japanese gun pit with two companies while the third provided support-by-fire. In the rout that followed over 80 Japanese were killed. By nightfall, the 2/1st, which had dug-in and subsequently fought off a number of Japanese counterattacks, was relieved from the forward position just a few kilometres from the coast. The brigade had been severely depleted in reaching the position and at that point had only 1,040 fit men, so they were ordered to hold their position along the front to provide cover to troops of the US 126th Infantry Regiment, which was slowly moving towards the Soputa–Sanananda–Cape Killerton track junction. On 23 November, the 16th Brigade finally received artillery support, after a battery from the 2/1st Field Regiment was flown into the hastily established airfield at Popondetta and began firing upon Sananada. The inexperienced American regiment made very slow progress and as a result, the 16th Brigade held their position until 6 December, when they were progressively relieved by troops from the 30th Brigade, having suffered over 85 per cent casualties. The 2/3rd Infantry Battalion was the last out, being withdrawn on the night of 19/20 December.
Meanwhile, a small element of the division remained in action until Sanananda fell in late January 1943. The 2/1st Field Regiment's detachment at Popondetta was expanded to a full troop of four guns, while another troop was sent to support the US forces around Buna and a third force was sent to Oro Bay. In addition to these artillery assets, in October a small group of five Bren carriers from the 17th Brigade's carrier platoon had been sent from Milne Bay to support the General Robert Eichelberger's 32nd Division. With crews drawn mainly from the 2/7th Infantry Battalion and one from the 2/5th, they were thrown into action around Buna on 5 December to support a major assault and, despite making some headway against the heavily entrenched Japanese, were wiped out with heavy casualties. During the 6th Division's involvement in the campaign, it lost 207 killed and 397 wounded.
Wau–Salamaua
As the 16th Brigade's involvement in its first New Guinea campaign was being fought to a successful conclusion around the beachheads between Buna and Gona, the 17th Brigade was preparing for its first encounter with the Japanese. Shortly after the Japanese landings around Salamaua and Lae in March 1942 a small band of commandos known as "Kanga Force" had established themselves around Wau and in May commenced a seven-month guerilla campaign in the area. In early January 1943, the Japanese heavily reinforced the Salamaua–Lae area, moving 4,000 troops from both Guadalcanal and Papua where they had suffered setbacks, in the hope of destroying Kanga Force, capturing the Wau, which lay in the strategically important Bulolo Valley, which offered the Allies an airstrip that could serve as a "potential springboard" that could be used to move large concentrations of troops over the Owen Stanley Range to attack the Japanese bases at Salamaua and Lae.
Throughout the fighting around Kokoda and Buna–Gona, the 17th Brigade, under the command of Brigadier Murray Moten, had been kept back at Milne Bay by Australian commanders with the intention of keeping them fresh to reinforce the garrison at Wau. While at Milne Bay, the brigade had been significantly reduced by sickness, specifically malaria; however, in response to the arrival of Japanese reinforcements at Lae, the 17th Brigade was relieved at Milne Bay by the 29th Brigade and, after being shipped to Port Moresby, on 14 January, one company of the 2/6th Infantry Battalion, representing the brigade's advanced elements, was flown into Wau on six US C-47 Dakotas. Upon arrival, the company – 'B' Company – began moving towards Mubo, where they were to link up with the commandos there and establish themselves to defend the Bulolo Valley. Amidst difficult flying conditions and limited resources, the arrival of the rest of the battalion took place over the following four days, while the rest of the brigade was also delayed. On 20 January the Japanese began moving small groups towards Mubo with the intention of taking Wau, and in response the 2/5th Infantry Battalion was dispatched on 24 January, arriving over the course of the next three days.
On the morning of 28 January, at Wandumi, the main Japanese thrust fell upon the 70-man strong 'A' Company, 2/6th Infantry Battalion. Throughout the day the company fought desperately to hold the Japanese while reinforcements from the 2/5th were brought up from Wau; in the mid-afternoon, as it looked like they would be overrun, a desperate bayonet charge temporarily bought the Australians some relief and they eventually withdrew about a mile to the south-west, back towards the Bulolo River where they formed a night defensive position, having successfully delayed the Japanese advance and inflicted over 75 killed upon them. Throughout the following day, as poor weather hampered efforts to fly in the 2/7th Infantry Battalion, a large group of about 500 Japanese bypassed 'A' Company's position and continued on towards Wau. In response two companies of the 2/5th were moved to the airstrip, reaching there early on 29 January just before Japanese mortars began firing on it. By mid-morning, however, the weather cleared and Allied aircraft soon began arriving at the airfield, disgorging men from the 2/7th who were quickly thrown into the line. That night several counterattacks were fought off and the following day, as a section of guns from the 2/1st Field Regiment arrived, the 17th Brigade went on the offensive. A company of machine guns from the 7th Machine Gun Battalion was also flown in. By 5 February the Japanese began withdrawing from the area. Significant fighting occurred on 9 February, and over the course of the next three weeks further clashes took place as the Australians followed up the retreating Japanese. The last actions came around Buibaining and Waipali and by 26 February the withdrawal was complete with the Japanese establishing themselves around Guadagasal and Mubo.
Following this, the 17th Brigade advanced towards Guadagasal, but after supply problems ground this to a halt, throughout March and April a series of patrols were sent out towards Mubo. By late April the brigade was detached to the 3rd Division, a primarily Militia formation, which took up the task of defending Wau. Throughout this time, engineers from the 6th Division, including the 2/1st Field Company, would to improve supply lines throughout the area, cutting a road to Wau. The 2/2nd Field Ambulance also provided support to the brigade's operations, establishing medical services close to the Australian forward areas.
Between 22 April and 29 May 1943, the 2/7th Infantry Battalion, at the end of a long and tenuous supply line, unsuccessfully attacked the southern extremity of Japanese lines, the Mubo area, at features known to the Allies as "The Pimple" and "Green Hill", north of Lababia Ridge. In early May, over the course of two days, the 2/7th repelled eight strong Japanese counterattacks, before being relieved. At the same time, the Allies began planning wider operations to capture Lae. As a part of this, Salamaua was also to be taken. Initially, the 3rd Division was to secure Nassau Bay and the 17th Brigade was to capture Mubo and push north towards Mount Tambu to secure Komiatum.
Moving over steep, muddy ridges amidst dense, fetid jungle terrain the 2/7th found the going tough and by late May the 2/6th took over the drive towards Nassau Bay. Feeling their way from Lababia Ridge they located a traversable path through the jungle towards the coast but on 20 June, 'D' Company came under heavy attack from two Japanese battalions from the 66th Regiment, amounting to 1,500 men, and for three days intense fighting followed before the Japanese were successfully beaten back. The Australians relied on well-established and linked defensive positions, featuring extensive, cleared free-fire zones. The battle was later described as one of the Australian Army's "classic engagements" of World War II.
By the end of the month the 2/6th had reached Nassau Bay where it secured landing beaches for an amphibious landing by US troops from the 162nd Regimental Combat Team. Once established, the 2/6th then led the way back west towards Bitoi Ridge, ranging ahead of the Americans as the Allies began to encircle Mubo. In early July, the 2/7th attacked Observation Hill and as the Japanese began to withdraw from Mubo, the 2/5th was sent north to act in support of the newly arrived Militia 15th Brigade, which was moving on Bobdubi Ridge. In mid-July, amidst heavy close-quarters fighting, the 2/5th Infantry Battalion captured the southern parts of Mount Tambu.
Throughout late July a situation of stalemate developed on Mount Tambu, which held up the Australian advance. As a result, Moten decided to bypass it in early August, sending the 2/6th Battalion north-west towards Komiatum. A path was eventually found and after securing Laver's Knoll, the Australians began working around behind Mount Tambu, towards the northern end of Bobdubi Ridge. The 2/7th was heavily involved with the 15th Brigade at this time, fighting to take a position known as "The Coconuts". Finally, as the noose around Mount Tambu tightened, the Japanese abandoned it on 19 August.
The 17th Brigade's advance continued for the next two days until, when the brigade had reached the final ridge before Salamaua, the 29th Brigade arrived to take over. The 2/7th Infantry Battalion, however, still detached to the 15th Brigade, continued on with them and as a result remained in the thick of it until the end when Salamaua fell on 20 September. Meanwhile, the rest of the 17th Brigade was on its way back to Australia and by mid-September, it arrived on the Atherton Tablelands in Queensland where it was once again was placed under the 6th Division's command. The Wau–Salamaua campaign cost the 6th Division 240 killed and 520 wounded.
A long period of waiting and training followed. Throughout 1943–44, the division was re-organised under the jungle divisional establishment. This saw a reduction in the division's artillery, vehicles, equipment and manning, with divisional strength falling from around 18,000 men to about 16,000. The division also lost many of its experienced personnel during this time as they were promoted and moved on to other formations; although it also received reinforcements from the disbanded 30th Brigade. The division's next deployment would not come until November 1944 when they were committed to the Aitape–Wewak campaign. Once again they would be unified as a full division, with several units that had previously been detached, including the 2/3rd Field Regiment and the 19th Brigade, rejoining the division.
Aitape–Wewak campaign
The Japanese had occupied the Aitape–Wewak area in northern New Guinea in 1942 and had held it until April 1944 when the Americans had undertaken an amphibious landing around Aitape. Later in the year, responsibility for clearing the remaining Japanese troops from the area was passed to the Australians as the US sought to reallocate its troops towards retaking the Philippines. From early October, the 6th Division began to take over from US troops, with the first unit to arrive being the 2/6th Cavalry Commando Regiment, which had been formed in early 1943 when the division's cavalry regiment had been converted into a headquarters formation for three commando squadrons: the 2/7th, 2/9th and 2/10th. The 2/3rd Machine Gun Battalion was also assigned as a corps unit for the campaign. As a result of shortages in available shipping, the rest of the division arrived slowly over the course of a couple of months. Starting in December, the division commenced a limited offensive, advancing towards the main Japanese base at Wewak along the coast and through the Torricelli Mountains to Maprik, which the Japanese had been using for sustainment, having established a number of gardens there.
With the 19th Brigade and the 2/7th Commando Squadron leading off along the coast route in December and the 17th Brigade with the 2/10th moving into the Torricellis, a series of small-scale actions followed. In mid-January the 19th Brigade was relieved by the 16th and the 2/9th Commando Squadron, which continued the drive along the coast, while in the Torricellis, the 17th Brigade's infantry battalions took turns leading the way with the commandos. The closed terrain hindered the movement of supplies from the rear areas and consequently the Australians made slow progress. The dense jungle also limited the size of the forces that could be deployed, with the largest formations being sent out by the division being limited to company size at this time. Isolated pockets of Japanese offered significant resistance in places, which had to be overcome with artillery, air and tank support, while daily patrols risked ambush and attacks from snipers. The elements also posed a significant threat to the Australians, with many men drowning when they attempted to cross the flood-swollen rivers. Nevertheless, Maprik was taken on 23 April, as was Wewak, which fell on 10 May. Operations in the area continued through to the end of the war as the Australians exploited south from Maprik towards Nungagua, and east towards Kiarivu; after taking Wewak, the coastal route was expanded east towards the Brandi Plantation, while patrols ranged inland towards Sauri and Mount Shiburangu.
During the campaign, two members of the division performed actions for which they were later awarded the Victoria Cross, the Commonwealth's highest gallantry decoration. The first of these was awarded posthumously to Lieutenant Albert Chowne of the 2/2nd Infantry Battalion for his courage and leadership while commanding a platoon on 25 March around Dagua. The second went to Private Edward Kenna, of the 2/4th Infantry Battalion, for destroying several Japanese bunkers that were holding up his company's advance around the Wirui Mission. The campaign was also significant for the distance that the division travelled. After landing, they traversed over 70 kilometres (43 mi) inland and 110 kilometres (68 mi) along the coast. In doing so the 6th Division captured 7,700 square kilometres (3,000 sq mi). Over 9,000 Japanese were killed and 264 captured. Against this the division suffered its highest casualties of the war, losing 442 killed, 1,141 wounded and over 16,000 men being hospitalised with sickness.
Disbandment
On 13 September, the division took the formal surrender of the XVII Army's commander, Lieutenant General Hatazō Adachi, at Cape Wom airstrip. After this, the division remained in New Guinea as its constituent units were slowly demobilised. As transport shortages delayed the process, the division was employed on garrison duties and aiding war crimes investigations. Finally, by November 1945, most of the 6th Division's units had returned to Australia and the division was formally disbanded; the majority of the division's infantry battalions were disbanded shortly afterwards in the early months of 1946. During its six-year existence, a total of about 40,000 men served in the division's ranks. Of these, 1,763 were killed in action or died, a further 3,978 were wounded and a total of 5,153 men became prisoners of war.
Structure
The 6th Division's structure changed considerably during its existence with units being detached or attached to meet operational needs. This was particularly so during early 1942 and late 1943. Below is a divisional order of battle that is indicative of its generic make up. In addition to those listed, during 1942–43, the 14th, 21st, 25th and 30th Brigades were also attached, albeit temporarily for varying periods.
Commanders
The following officers served as divisional commander: