
Country United Kingdom | Type Corps | |
 | ||
Engagements World War IINorth African CampaignItalian CampaignBattle of NormandyOperation Market GardenOperation Veritable Notable commanders | ||
XXX Corps (30 Corps) was a corps of the British Army during the Second World War. The corps saw extensive service in North Africa at El Alamein in late 1942 and in Tunisia and Sicily in 1943. It returned to the United Kingdom and later fought again in Normandy, Holland and Germany from June 1944 until May 1945.
Contents
- North Africa Campaign
- El Alamein
- Tunisia
- Sicily
- Order of Battle
- Normandy
- Operation Market Garden
- Ardennes
- The Rhineland Campaign
- General Officers Commanding
- References
North Africa Campaign
XXX Corps played a major role in the Western Desert Campaign, where it was initially formed for the British armoured units in North Africa in preparation for Operation Crusader, the last British attempt to relieve the siege of Tobruk. It took severe casualties, mainly because of obsolete British tank tactics, (especially charging anti-tank guns) but finally forced Erwin Rommel's Afrika Korps to withdraw to El Agheila in Central Libya.
In 1942, Rommel had counter-attacked and driven the British back to Gazala, a few miles west of Tobruk. The plan of British Eighth Army Commander Neil Ritchie was to have XIII Corps hold the line, while XXX Corps would stop any attempt to outflank the position south of Bir Hachiem, held by the 1st Free French Brigade. They managed to slow Rommel's armour down and forced Rommel's tanks into "The Cauldron", the gap left in the British Lines by the destruction of the 150th Infantry Brigade, part of the 50th (Northumbrian) Infantry Division. British counterattacks attempted to crush it but failed. Eventually, the Free French at Bir Hachiem were forced to withdraw and Rommel was able to break out of the Cauldron. XXX Corps was forced to retreat to Mersa Matruh, held by the newly formed British X Corps. The Germans quickly broke through, surrounded X Corps (which fortunately for the British, managed to break out) and pushed XXX Corps back to El Alamein.
El Alamein
The depleted XXX Corps pulled back to El Alamein, the last defensible position short of the River Nile. It was the only place in the desert in which the normal rule of desert operations – "There is always an open flank" did not apply, due to the soft ground of the Qattara Depression. XXX Corps was assigned to hold the northern part of the line, though at this point it was reinforced by units from XIII Corps including the 1st South African Infantry Division and 9th Australian Division due to suffering considerable casualties and loss of equipment. Rommel's Afrika Korps, exhausted and depleted, could not break through the shattered XXX Corps. Its other major formation was the 23rd Armoured Brigade Group.
Upset over the defeats in North Africa, Prime Minister Winston Churchill decided to sack General Auchinleck, Commander-in-Chief of British Forces in the Middle East and Commander of the Eighth Army. He was replaced as C-in-C Middle East Command by Harold Alexander and as General Officer Commanding Eighth Army by Lieutenant-General William "Strafer" Gott, commander of XIII Corps. Gott died when the aircraft carrying him was shot down and his place was taken by Lieutenant-General Sir Bernard Law Montgomery.
A month after the First Battle of El Alamein, Rommel again decided to attempt a breakthrough, this time at the southern end of the line towards the Alam Halfa ridge. This attack put a lot of pressure on XIII Corps but XXX Corps was involved because of several German diversionary raids.
After the victory at Alam Halfa, Montgomery prepared to go on the offensive. He brought more troops, including the 51st (Highland) Infantry Division and experienced 4th Indian Infantry Division, to reinforce XXX Corps and also assigned the 2nd New Zealand Division from XIII Corps along with its 9th Armoured Brigade. XXX Corps was then involved in extensive retraining, as it was to make a major push and create a corridor for the tanks of X Corps to break through.
On the night of 24 October, Montgomery was ready with his attack. After a huge artillery bombardment, unseen since the Great War, XXX Corps attacked. The corps had very heavy casualties but the experienced Australians, New Zealanders, Highlanders and South Africans continued to push the attack and soon several gaps were created in minefields. Finally, XXX Corps attacks were stopped by German resistance. Early in the morning of 2 November, Montgomery launched Operation Supercharge, a big attack by X Corps and XXX Corps (which was reinforced by the 50th (Northumbrian) Infantry Division from XIII Corps). By 4 November X Corps had broken through and the second Battle of el Alamein was won.
After El Alamein, XXX Corps pushed forward steadily and made sure they didn't run out of supplies. They finally stopped at the Mareth Line in Tunisia in late February. To Montgomery's dismay, the excellent 9th Australian Division was withdrawn and sent to the Pacific on the insistence of the Australian Government and the 1st South African Division was left in Egypt.
Tunisia
On 19 March, XXX Corps launched an attack on the Mareth Line as part of Operation Pugilist, with the 50th (Northumbrian) and 51st (Highland) infantry divisions in the lead. They managed to create a gap but it was quickly contained by Rommel's 15th Panzer Division. During Operation Supercharge II a force commanded by Lieutenant-General Brian Horrocks composed of the New Zealand Corps and 1st Armoured Division from X Corps exploited a flanking position established by the New Zealanders during Pugilist and broke the German flank defences on the night of the 26th/27th, forcing the outflanked German forces to withdraw northwards to Wadi Akrit.
In mid-April, XXX Corps attempted to attack the position head on but made little progress against determined German and Italian resistance. By that time the British First Army had broken through the German line on their left in central Tunisia and the Axis forces were forced to surrender.
Sicily
On 10 July 1943, XXX Corps was part of the invasion of the Italian island of Sicily. The corps (under Lieutenant General Oliver Leese) was to compose the left flank of the British Eighth Army. It was reinforced with the 1st Canadian Infantry Division, the 1st Canadian Armoured Brigade, and the 231st Infantry Brigade of units from Malta. The 2nd New Zealand and the 4th Indian Division were not available for Sicily because they had both incurred heavy losses.
XXX Corps landed near Pachino and made early gains against the Italian 206th Coastal Division and the Napoli Division. By 18 July, it was halfway to Messina. Progress slowed considerably after that because Sicily's mountainous terrain favoured well-equipped defenders (like the German forces in Group Schmalz) and they managed to move very little. The Axis began withdrawing troops from Sicily and the Germans put up a brave fighting withdrawal. By 17 August, the last German troops had crossed the straits of Messina and the Allies were in control of Sicily. XXX Corps was then pulled out of the line and sent to the United Kingdom to re-fit and re-train for Operation Overlord.
Order of Battle
General Officer Commanding Lt-Gen Gerard Bucknall (to 3 August 1944)
Lt-Gen Brian Horrocks (from 4 August 1944)
Normandy
In Normandy XXX Corps, now commanded by Lieutenant-General Gerard Bucknall, again included the 50th Division which landed on Gold Beach. It quickly overwhelmed the German defenders of the 716th Infantry Division and had linked up with the I Corps by the end of D-Day. Following D-Day the corps launched Operation Perch. It made slow gains facing stiff resistance but by 10 June had linked up with US forces advancing from Omaha Beach. On 12 June, an opportunity arose. The Germans had a gap in their front lines near the Town of Caumont-l'Éventé. The 7th Armoured Division was sent to exploit the gap and head towards Villers-Bocage in an attempt to outflank the German Panzer-Lehr-Division and force them to withdraw, resulting in the Battle of Villers-Bocage. This attack was thwarted by elements of the Panzer Lehr Division and the 101st SS Heavy Panzer Battalion. Bucknall was heavily criticised for his decisions during the operation and battle.
XXX Corps was then involved in a battle of attrition with only minor gains being made. Up to 24 July, the front line remained relatively unchanged. The next day however, the Americans launched Operation Cobra, an attack on German positions on the western end of the Contentin Peninsula. They made considerable progress and the British Second Army launched Operation Bluecoat to support the attack and to exploit the momentum. VIII Corps, on the right flank made considerable progress but XXX Corps was sluggish. Annoyed, Montgomery sacked Bucknall and replaced him with Lieutenant-General Brian Horrocks, a distinguished veteran of North Africa. After the sacking of Bucknall, the performance of XXX Corps improved considerably and it managed to keep up with the other British Corps during the Battle for the Falaise Gap. After the German collapse, XXX Corps quickly advanced north-east and liberated Brussels and Antwerp in Belgium. There the advance was halted because of a shortage of fuel. Elements of the Guards Armoured Division and the 2nd Household Cavalry Regiment managed to secure a bridge across the Maas-Schelde canal into the Netherlands. This bridge was nicknamed Joe's Bridge in honour of Lieutenant Colonel Joe Vandeleur of the 2nd Battalion, Irish Guards who captured the bridge.
Operation Market Garden
After the success in France and Belgium, General Montgomery commanding the 21st Army Group turned his attention to outflanking the Siegfried Line and invading the Ruhr in a pincer movement. The northern part of the pincer would be near Arnhem at the Dutch/German border. Allied troops would concentrate at this point to form the northern part of the pincer. XXX Corps, consisting of approximately 50,000 men, would advance along the main axis of the British Second Army's line of the offensive, and reach Arnhem within 48 hours, and continue onto the Dutch/German border. XXX Corps, the ground operation, was to be the GARDEN part of the operation to project past Arnhem. This required crossing a number of choke points over water obstacles, the last of them a road bridge at Arnhem. When the pincer closed, this would allow ground troops to trap the German 15th Army, splitting it from the 1st Parachute Army on the way around the northern flank of the Siegfried Line.
The MARKET part of the operation was to seize the bridge up to Arnhem Montgomery requested from General Dwight D. Eisenhower, the Supreme Allied Commander on the Western Front, to deploy the First Allied Airborne Army. The U.S. 101st Airborne Division, under Major General Maxwell D. Taylor, was dropped at Eindhoven, to secure the Son and Wilhelmina Canal bridges, the U.S. 82nd Airborne Division, under Brigadier General James M. Gavin, dropped at Nijmegen, to secure the Grave and Nijmegen bridges, while the British 1st Airborne Division, under Major-General Roy Urquhart, dropped at Arnhem, to secure the bridgehead over the Neder Rijn. Attached to the 1st Airborne Division was the Polish 1st Parachute Brigade, under Major General Stanisław Kopański.
Operation Market Garden commenced at 14:00H on Sunday 17 September 1944, with the artillery preparation by 350 guns at 14:35. It was to be the most ambitious ground offensive operation by the British Army in the war so far. However, it was also beset by problems. The ground was assessed to be too soft to accommodate the Sherman tanks of the leading Irish Guards Battle Group, forcing the entire Guards Armoured Division to stay on the single highway. As the XXX Corps advanced north-east, it became obvious that the single highway was prone to traffic jams and was extremely vulnerable to enemy counter-attacks.
The lead elements of XXX Corps, Major-General Allan Adair's Guards Armoured Division were ambushed by German anti-tank defences, causing delays to the advance while the infantry dealt with the enemy. As a result, they were far short of the 82nd Airborne Division's objectives, having not even reached the 101st Airborne Division by the end of the first day. On the second day of GARDEN, the Guards Armoured Division continued northwards to Eindhoven, where they met elements of the 2nd Battalion, 506th Parachute Infantry Regiment of the 101st Airborne Division. They soon discovered that Taylor's 101st had failed to secure the bridge at Son intact, creating more delays before XXX Corps engineers arrived to build a Bailey bridge.
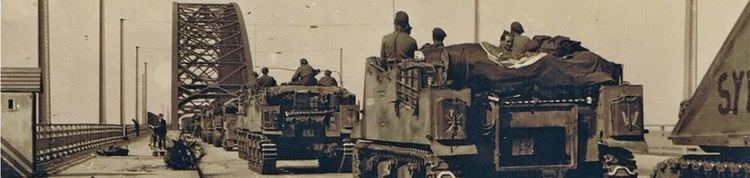
On the morning of the 19th the Guards Armoured Division advanced without facing much resistance reaching the Nijmegen Bridge on the same day, where they found that the U.S. 82nd Airborne Division had failed to capture the road bridge at Nijmegen with troops only at the southern end of the bridge. XXX Corps brought up boats used by bridge engineers, allowing two companies of Major Julian Cook's 3rd Battalion, 504th Parachute Infantry Regiment to cross the river to assault the bridge from the northern end. XXX Corps captured the Nijmegen bridge running their tanks over. The Guards Armoured Division advanced and quickly established positions on the northern bank to secure the bridge.
Further south, in the 101st Airborne Division's sector, many units from the XXX Corps had to be detached to fight off repeated attempts by the German 106th Panzerbrigade to cut the highway. The 231st Infantry Brigade (from the 50th Division) and the 4th Armoured Brigade spent most of the time during Operation Market Garden reacting to these probes by German Panther tanks and panzergrenadiers. This created major traffic jams and delayed reinforcements reaching Adair's Guards Armoured Division–particularly the 43rd (Wessex) Infantry Division, under Major-General Gwilym Ivor Thomas, and the 69th and 151st Brigades of the 50th Division, which further slowed down the XXX Corps advance.
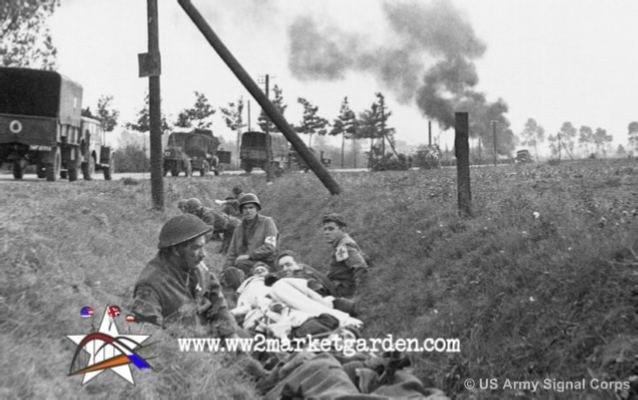
By the 21 September the Guards Armoured Division troops were exhausted, and Horrocks also took ill, with XXX Corps periodically being commanded by its Brigadier General Staff (BGS) Brigadier Harold Pyman, for which he would be made Chief of Staff of Second Army after the operation. They had fought continuously for five days, much of it against fierce German resistance, and were unable to continue the offensive any longer. The 43rd Division was brought up to continue the offensive, who managed to defeat elements of the 10th SS Panzer Division that penetrated to Nijmegen area, and advanced to the Neder Rijn and the area called "the Island". There the 4th Battalion, Dorset Regiment successfully crossed the Rhine as a diversion, so that the remnants of the British 1st Airborne Division could withdraw more safely, but many men of the 4th Dorsets were themselves left behind on the north bank of the Rhine when the division withdrew.
The failure of Gavin's 82nd Airborne Division to seize the Nijmegen bridge caused a long delay for the XXX Corps to arrive at the Arnhem bridge as planned. This caused the British 1st Airborne Division, which was surrounded at Arnhem and suffered very heavy losses, to retreat from the Arnhem bridge after the delay enabled the Germans to reinforce with armoured divisions. Most of the British 1st Airborne Division either died fighting, surrendered, or withdrew to the Polish 1st Parachute Brigade positions, and effectively ended the offensive.
In the following weeks, XXX Corps spent most of its time guarding the corridor that it had managed to create during the advance. Eventually, this corridor would be expanded and would provide a secure base for further operations.
Ardennes
During the Battle of the Bulge, units of XXX Corps moved to secure the bridges over the Meuse. On 27 December the Corps pushed the 2nd Panzer Division out of Celles. On 31 December they captured Rochefort at the western end of the salient.
The Rhineland Campaign
XXX Corps was heavily involved in the fighting that preceded the Rhine crossings. Under command of the 1st Canadian Army, and with additional divisions, it was responsible for the successful, if difficult, advance through the Reichswald Forest that was the first phase of Operation Veritable in February 1945. The subsequent phases were redesignated as Operation Blockbuster. The terrain now allowed a two corps front, with XXX Corps taking the western side until meeting at Geldern with elements of the 9th US Army on 3 March.
General Officers Commanding
Commanders included: