
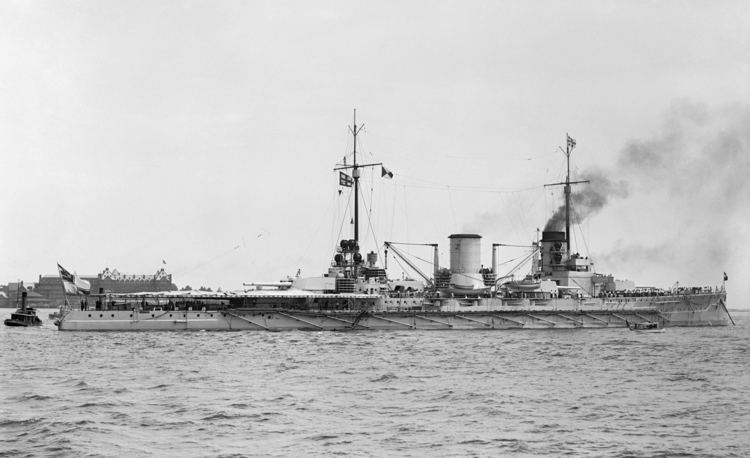
Name Moltke Laid down 7 December 1908 Construction started 7 December 1908 Length 187 m Builder Blohm + Voss | Ordered 17 September 1908 Commissioned 30 August 1911 Launched 7 April 1910 Beam 30 m | |
 | ||
Fate Scuttled 21 June 1919 at Scapa Flow, raised in 1927 and scrapped 1927-1929 | ||
Sms moltke top 7 facts
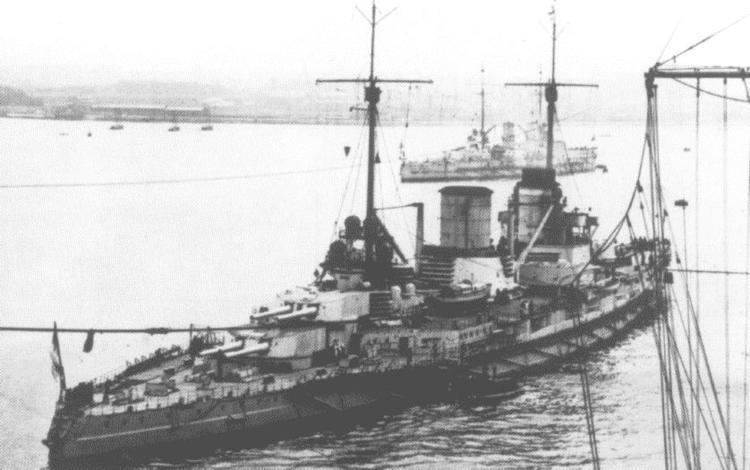
SMS Moltke was the lead ship of the Moltke-class battlecruisers of the German Imperial Navy, named after the 19th-century German Field Marshal Helmuth von Moltke. Commissioned on 30 September 1911, the ship was the second battlecruiser commissioned into the Imperial Navy.
Contents
- Sms moltke top 7 facts
- Development
- Pre war
- World War I
- Battle of Heligoland Bight
- Bombardment of Yarmouth
- Bombardment of Scarborough Hartlepool and Whitby
- Battle of Dogger Bank
- Battle of the Gulf of Riga
- Bombardment of Yarmouth and Lowestoft
- Battle of Jutland
- Later operations
- Fate
- References
Moltke, along with her sister ship Goeben, was an enlarged version of the previous German battlecruiser design, Von der Tann, with increased armor protection and two more main guns in an additional turret. Compared to her British rivals—the Indefatigable class—Moltke and her sister Goeben were significantly larger and better armored.
The ship participated in most of the major fleet actions conducted by the German Navy during the First World War, including the Battles of Dogger Bank and Jutland in the North Sea, and the Battle of the Gulf of Riga and Operation Albion in the Baltic. Moltke was damaged several times during the war: the ship was hit by heavy caliber gunfire at Jutland, and torpedoed twice by British submarines while on fleet advances.
Following the end of the war in 1918, Moltke, along with most of the High Seas Fleet, was interned at Scapa Flow pending a decision by the Allies as to the fate of the fleet. The ship met her end when she was scuttled, along with the rest of the High Seas Fleet in 1919 to prevent them from falling into British hands. The wreck of Moltke was raised in 1927 and scrapped at Rosyth from 1927 to 1929.
Development
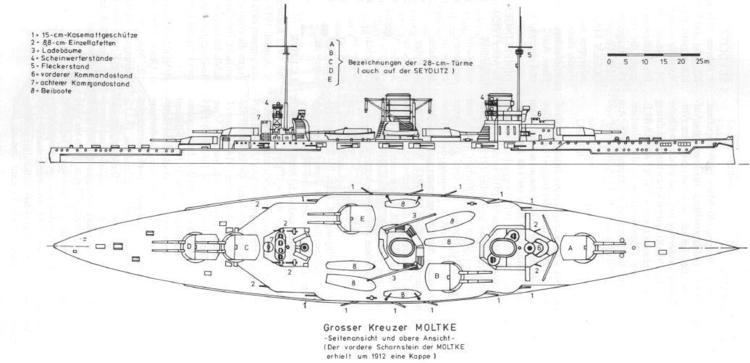
In a conference in May 1907, the Germany Navy Office decided to follow up the unique Von der Tann battlecruiser with an enlarged design. The sum of 44 million marks was allocated for the 1908 fiscal year, which created the possibility of increasing the main guns to 30.5 cm (12 in) in diameter, instead of the 28 cm (11 in) weapons on the preceding design. However, Admiral Alfred von Tirpitz, along with the Construction Department, argued that increasing the number of guns from 8 to 10 would be preferable instead of increasing the size of the previous battery. The General Navy Department held that for the new design to fight in the battle line, 30.5 cm (12 in) guns were necessary. Ultimately, Tirpitz and the Construction Department won the debate, and Moltke was equipped with ten 28 cm (11 in) guns. The guns were mounted in five twin gun turrets, three of which were on the centerline—one was forward and two were in a superfiring pair aft. The other two turrets were staggered wing turrets amidships. The Construction Department also mandated that armor protection was to be at least as good as that of Von der Tann. The ship was also to have a top speed of at least 24.5 knots (45.4 km/h; 28.2 mph).
During the design process, the ship's weight continued to grow due to the increase in the size of the citadel, armor thickness, the additions to the ammunition stores, and the rearrangement of the boiler system. The naval arms race between Germany and Britain put a great deal of stress on the Navy design staff, and prompted the decision to build two ships of the new design. They were assigned under the contract names of "Cruiser G" and "Cruiser H." Blohm & Voss received both contracts in 1908; "Cruiser G" was assigned to the 1908–1909 building year, while "Cruiser H" was assigned to 1909–1910. The contract for "Cruiser G" was awarded on 17 September 1908, under building number 200. The keel was laid on 7 December 1908, and the ship was launched on 7 April 1910. "Cruiser G" was commissioned on 30 September 1911, as SMS Moltke.
Pre-war
At the launching of the ship on 7 April 1910, Helmuth von Moltke the Younger christened her after his uncle, Helmuth von Moltke the Elder, the Chief of Staff of the Prussian Army in the mid 19th century. On 11 September 1911, a crew composed of dockyard workers transferred the ship from Hamburg to Kiel through the Skagerrak. On 30 September, the ship was commissioned, under the command of Kapitän zur See von Mann, and replaced Roon in the Reconnaissance Unit. Sea trials continued until 1 April 1912.
Moltke was the only German capital ship to ever visit the United States. On 11 May 1912 she left Kiel, accompanied by the light cruisers Stettin and Bremen, and arrived off Hampton Roads, Virginia, on 30 May 1912. After touring the East Coast for two weeks, she returned to Kiel on 24 June.
In July 1912, Moltke escorted Kaiser Wilhelm II's yacht to Russia. Upon returning, Moltke's commander was replaced by KzS Magnus von Levetzow, and the ship became the Reconnaissance Force flagship until 23 June 1914, when the commander's flag was transferred to the new battlecruiser Seydlitz. There was some consideration given to deploying Moltke to the Far East in order to replace the armored cruiser Scharnhorst, but the plan was abandoned when it became apparent that Goeben needed replacement in the Mediterranean. Moltke was then scheduled to transfer to replace her sister ship, but this plan was interrupted by the outbreak of World War I.
World War I
As was the case with almost all German capital ships during World War I, Moltke's action was somewhat limited. However, she did participate in most of the major fleet actions conducted by the High Seas Fleet. At the start of the war, the ship was assigned to the I Scouting Group of the High Seas Fleet, under the command of Rear Admiral Franz Hipper.
Battle of Heligoland Bight
Shortly after the outbreak of World War I, on 28 August 1914, Moltke participated in the Battle of Heligoland Bight. During the morning, British cruisers from the Harwich Force attacked the German destroyers patrolling the Heligoland Bight. Six German light cruisers—Cöln, Strassburg, Stettin, Frauenlob, Stralsund, and Ariadne—responded to the attack and inflicted serious damage to the British raiders. However, the arrival at approximately 13:37 of the British 1st Battlecruiser Squadron, under the command of Vice Admiral David Beatty, quickly put the German ships at a disadvantage.
Along with the rest of the I Scouting Group battlecruisers, Moltke was stationed in the Wilhelmshaven Roads on the morning of the battle. By 08:50, Rear Admiral Hipper had requested permission from Admiral Friedrich von Ingenohl, the commander in chief of the High Seas Fleet, to send Moltke and Von der Tann to relieve the beleaguered German cruisers. Moltke was ready to sail by 12:10, but the low tide prevented the ships from being able to pass over the sand bar at the mouth of the Jade Estuary safely. At 14:10, Moltke and Von der Tann were able to cross the Jade bar; Hipper ordered the German cruisers to fall back to his ships, while Hipper himself was about an hour behind in the battlecruiser Seydlitz. At 14:25, the remaining light cruisers—Strassburg, Stettin, Frauenlob, Stralsund, and Ariadne—rendezvoused with the battlecruisers. Seydlitz arrived on the scene by 15:10, while Ariadne succumbed to battle damage and sank. Hipper ventured forth cautiously to search for the two missing light cruisers, Mainz and Cöln, which had already sunk. By 16:00, the German flotilla turned around to return to the Jade Estuary, arriving at approximately 20:23.
Bombardment of Yarmouth
On 2 November 1914, Moltke, Rear Admiral Hipper's flagship Seydlitz, Von der Tann, and Blücher, along with four light cruisers, left the Jade Estuary and steamed towards the English coast. The flotilla arrived off Great Yarmouth at daybreak the following morning and bombarded the port, while the light cruiser Stralsund laid a minefield. The British submarine D5 responded to the bombardment, but struck one of the mines laid by Stralsund and sank. Shortly thereafter, Hipper ordered his ships to turn back to German waters. However, while Hipper's ships were returning to German waters, a heavy fog covered the Heligoland Bight, so the ships were ordered to halt until visibility improved so they could safely navigate the defensive minefields. The armored cruiser Yorck left the Jade without permission, and while en route to Wilhelmshaven made a navigational error that led the ship into one of the German minefields. Yorck struck two mines and quickly sank; the coastal defense ship Hagen was able to save 127 men of the crew.
Bombardment of Scarborough, Hartlepool, and Whitby
It was decided by Admiral von Ingenohl that another raid on the English coast was to be carried out, in the hopes of luring a portion of the Grand Fleet into combat, where it could be destroyed. At 03:20 on 15 December, Moltke, Seydlitz, Von der Tann, Derfflinger, and Blücher, along with the light cruisers Kolberg, Strassburg, Stralsund, and Graudenz, and two squadrons of torpedo boats left the Jade. The ships sailed north past the island of Heligoland, until they reached the Horns Reef lighthouse, at which point the ships turned west towards Scarborough. Twelve hours after Hipper left the Jade, the High Seas Fleet, consisting of 14 dreadnoughts and 8 pre-dreadnoughts and a screening force of 2 armored cruisers, 7 light cruisers, and 54 torpedo boats, departed to provide distant cover.
On 26 August 1914, the German light cruiser Magdeburg had run aground in the Gulf of Finland; the wreck was captured by the Russian navy, which found code books used by the German navy, along with navigational charts for the North Sea. These documents were then passed on to the Royal Navy. Room 40 began decrypting German signals, and on 14 December, intercepted messages relating to the plan to bombard Scarborough. However, the exact details of the plan were unknown, and it was assumed that the High Seas Fleet would remain safely in port, as in the previous bombardment. Vice Admiral Beatty's four battlecruisers, supported by the 3rd Cruiser Squadron and the 1st Light Cruiser Squadron, along with the 2nd Battle Squadron's six dreadnoughts, were to ambush Hipper's battlecruisers.
During the night of 15 December, the main body of the High Seas Fleet encountered British destroyers. Fearing the prospect of a nighttime torpedo attack, Admiral Ingenohl ordered the ships to retreat. Hipper was unaware of Ingenohl's reversal, and so he continued with the bombardment. Upon reaching the British coast, Hipper's battlecruisers split into two groups. Seydlitz, Moltke, and Blücher went north to shell Hartlepool, while Von der Tann and Derfflinger went south to shell Scarborough and Whitby. During the bombardment of Hartlepool, Moltke was struck by a 6 in (15.2 cm) shell from a coastal battery, which caused minor damage between decks, but no casualties. Blücher was hit six times and Seydlitz three times by the coastal battery. By 09:45 on the 16th, the two groups had reassembled, and they began to retreat eastward.
By this time, Beatty's battlecruisers were in position to block Hipper's chosen egress route, while other forces were en route to complete the encirclement. At 12:25, the light cruisers of the II Scouting Group began to pass through the British forces searching for Hipper. One of the cruisers in the 2nd Light Cruiser Squadron spotted Stralsund and signaled a report to Beatty. At 12:30, Beatty turned his battlecruisers towards the German ships. Beatty presumed that the German cruisers were the advance screen for Hipper's ships, however those were some 50 km (31 mi) ahead. The 2nd Light Cruiser Squadron, which had been screening for Beatty's ships, detached to pursue the German cruisers, but a misinterpreted signal from the British battlecruisers sent them back to their screening positions. This confusion allowed the German light cruisers to escape and alerted Hipper to the location of the British battlecruisers. The German battlecruisers wheeled to the northeast of the British forces and made good their escape.
Both the British and the Germans were disappointed that they failed to effectively engage their opponents. Admiral Ingenohl's reputation suffered greatly as a result of his timidity. The captain of Moltke was furious; he stated that Ingenohl had turned back "because he was afraid of eleven British destroyers which could have been eliminated ... under the present leadership we will accomplish nothing." The official German history criticized Ingenohl for failing to use his light forces to determine the size of the British fleet, stating: "he decided on a measure which not only seriously jeopardized his advance forces off the English coast but also deprived the German Fleet of a signal and certain victory."
Battle of Dogger Bank
In early January 1915, it became known that British ships were conducting reconnaissance in the Dogger Bank area. Ingenohl was initially reluctant to destroy these forces, because the I Scouting Group was temporarily weakened while Von der Tann was in drydock for periodic maintenance. However, Konteradmiral Richard Eckermann, the Chief of Staff of the High Seas Fleet, insisted on the operation, and so Ingenohl relented and ordered Hipper to take his battlecruisers to the Dogger Bank.
On 23 January, Hipper sortied, with his flag in Seydlitz, followed by Moltke, Derfflinger, and Blücher, along with the light cruisers Graudenz, Rostock, Stralsund, and Kolberg and 19 torpedo boats from V Flotilla and II and XVIII Half-Flotillas. Graudenz and Stralsund were assigned to the forward screen, while Kolberg and Rostock were assigned to the starboard and port, respectively. Each light cruiser had a half-flotilla of torpedo boats attached.
Again, interception and decryption of German wireless signals played an important role. Although they were unaware of the exact plans, the cryptographers of Room 40 were able to deduce that Hipper would be conducting an operation in the Dogger Bank area. To counter it, Beatty's 1st Battlecruiser Squadron, Rear Admiral Archibald Moore's 2nd Battlecruiser Squadron and Commodore William Goodenough's 2nd Light Cruiser Squadron were to rendezvous with Commodore Reginald Tyrwhitt's Harwich Force at 8:00 on 24 January, approximately 30 mi (48 km) north of the Dogger Bank.
At 08:14, Kolberg spotted the light cruiser Aurora and several destroyers from the Harwich Force.Aurora challenged Kolberg with a search light, at which point Kolberg attacked Aurora and scored two hits. Aurora returned fire and scored two hits on Kolberg in retaliation. Hipper immediately turned his battlecruisers towards the gunfire, when, almost simultaneously, Stralsund spotted a large amount of smoke to the northwest of her position. This was identified as a number of large British warships steaming towards Hipper's ships.
Hipper turned south to flee, but was limited to 23 knots (43 km/h; 26 mph), which was the maximum speed of the older armored cruiser Blücher. The pursuing British battlecruisers were steaming at 27 knots (50 km/h; 31 mph), and quickly caught up to the German ships. At 09:52, Lion opened fire on Blücher from a range of approximately 20,000 yards (18,300 m); shortly thereafter, Queen Mary and Tiger began firing as well. At 10:09, the British guns made their first hit on Blücher. Two minutes later, the German ships began returning fire, primarily concentrating on Lion, from a range of 18,000 yards (15,460 m). At 10:28, Lion was struck on the waterline, which tore a hole in the side of the ship and flooded a coal bunker. At 10:30, New Zealand, the fourth ship in Beatty's line, came within range of Blücher and opened fire. By 10:35, the range had closed to 17,500 yards (16,000 m), at which point the entire German line was within the effective range of the British ships. Beatty ordered his battlecruisers to engage their German counterparts. However, confusion aboard Tiger led the captain to believe he was to fire on Seydlitz, which left Moltke able to fire without distraction.
At 10:40, one of Lion's 13.5 in (34 cm) shells struck Seydlitz causing nearly catastrophic damage that knocked out both of the rear turrets and killed 159 men. Disaster was averted when the executive officer ordered the flooding of both magazines to avoid a flash fire that would have destroyed the ship. By this time, the German battlecruisers had zeroed in on Lion and began scoring repeated hits. At 11:01, an 11 in (28 cm) shell from Seydlitz struck Lion and knocked out two of her dynamos. At 11:18, Lion was hit by two 12 in (30 cm) shells from Derfflinger, one of which struck the waterline and penetrated the belt, allowing seawater to enter the port feed tank. This shell eventually crippled Lion by forcing the ship to turn off its engines because of seawater contamination.
By this time, Blücher was severely damaged after having been pounded by heavy shells. However, the chase ended when there were several reports of U-boats ahead of the British ships; Beatty quickly ordered evasive maneuvers, which allowed the German ships to increase the distance from their pursuers. At this time, Lion's last operational dynamo failed, which dropped her speed to 15 knots. Beatty, in the stricken Lion, ordered the remaining battlecruisers to "Engage the enemy's rear," but signal confusion caused the ships to solely target Blücher, allowing Moltke, Seydlitz, and Derfflinger to escape. By the time Beatty regained control over his ships, after having boarded Princess Royal, the German ships had too far a lead for the British to catch them; at 13:50, he broke off the chase.
Battle of the Gulf of Riga
On 3 August 1915, Moltke was transferred to the Baltic with I Reconnaissance Group (AG) to participate in the foray into the Riga Gulf. The intention was to destroy the Russian naval forces in the area, including the pre-dreadnought Slava, and to use the minelayer Deutschland to block the entrance to Moon Sound with naval mines. The German forces, under the command of Vice Admiral Hipper, included the four Nassau and four Helgoland-class battleships, the battlecruisers Moltke, Von der Tann, and Seydlitz, and a number of smaller craft.
On 8 August, the first attempt to clear the gulf was made; the old battleships Braunschweig and Elsass kept Slava at bay while minesweepers cleared a path through the inner belt of mines. During this period, the rest of the German fleet remained in the Baltic and provided protection against other units of the Russian fleet. However, the approach of nightfall meant that Deutschland would be unable to mine the entrance to Moon Sound in time, and so the operation was broken off.
On 16 August, a second attempt was made to enter the gulf. The dreadnoughts Nassau and Posen, four light cruisers, and 31 torpedo boats breached the defenses to the gulf. Nassau and Posen engaged in an artillery duel with Slava, resulting in three hits on the Russian ship that prompted her withdrawal. After three days, the Russian minefields had been cleared, and the flotilla entered the gulf on 19 August, but reports of Allied submarines in the area prompted a German withdrawal from the gulf the following day.
Throughout the operation, Moltke remained in the Baltic and provided cover for the assault into the Gulf of Riga. On the morning of the 19th, Moltke was torpedoed by the British E-class submarine E1. The torpedo was not spotted until it was approximately 200 yards (183 m) away; without time to maneuver, the ship was struck in the bow torpedo room. The explosion damaged several torpedoes in the ship, but they did not detonate themselves. Eight men were killed, and 435 tonnes (480 short tons) of water entered the ship. The ship was repaired at Blohm & Voss in Hamburg, between 23 August and 20 September.
Bombardment of Yarmouth and Lowestoft
Moltke also took part in the bombardment of Yarmouth and Lowestoft on 24–25 April. Hipper was away on sick leave, so the German ships were under the command of Konteradmiral Friedrich Boedicker. The German battlecruisers Derfflinger, Lützow, Moltke, Seydlitz and Von der Tann left the Jade Estuary at 10:55 on 24 April, and were supported by a screening force of six light cruisers and two torpedo boat flotillas. The heavy units of the High Seas Fleet sailed at 13:40, with the objective to provide distant support for Boedicker's ships. The British Admiralty was made aware of the German sortie through the interception of German wireless signals, and deployed the Grand Fleet at 15:50.
By 14:00, Boedicker's ships had reached a position off Norderney, at which point he turned his ships northward to avoid the Dutch observers on the island of Terschelling. At 15:38, Seydlitz struck a naval mine, which tore a 50-foot (15 m) hole in her hull, just abaft of the starboard broadside torpedo tube, allowing 1,400 short tons (1,250 long tons) of water to enter the ship. Seydlitz turned back, with the screen of light cruisers, at a speed of 15 knots (28 km/h; 17 mph). The four remaining battlecruisers turned south immediately in the direction of Norderney to avoid further mine damage. By 16:00, Seydlitz was clear of imminent danger, so the ship stopped to allow Boedicker to disembark. The torpedo boat V28 brought Boedicker to Lützow.
At 04:50 on 25 April, the German battlecruisers were approaching Lowestoft when the light cruisers Rostock and Elbing, which had been covering the southern flank, spotted the light cruisers and destroyers of Commodore Tyrwhitt's Harwich Force. Boedicker refused to be distracted by the British ships, and instead trained his ships' guns on Lowestoft. The German battlecruisers destroyed two 6 in (15 cm) shore batteries and inflicted other damage to the town. In the process, a single 6 in shell from one of the shore batteries struck Moltke, but the ship sustained no significant damage.
At 05:20, the German raiders turned north, towards Yarmouth, which they reached by 05:42. The visibility was so poor that the German ships fired one salvo each, with the exception of Derfflinger, which fired fourteen rounds from her main battery. The German ships turned back south, and at 05:47 encountered for the second time the Harwich Force, which had by then been engaged by the six light cruisers of the screening force. Boedicker's ships opened fire from a range of 13,000 yards (12,000 m). Tyrwhitt immediately turned his ships around and fled south, but not before the cruiser Conquest sustained severe damage. Due to reports of British submarines and torpedo attacks, Boedicker broke off the chase and turned back east towards the High Seas Fleet. At this point, Scheer, who had been warned of the Grand Fleet's sortie from Scapa Flow, turned back towards Germany.
Battle of Jutland
Moltke, and the rest of Hipper's battlecruisers in the I Scouting Group, lay anchored in the outer Jade Roads on the night of 30 May 1916. The following morning, at 02:00 CET, the ships slowly steamed out towards the Skagerrak at a speed of 16 knots (30 km/h; 18 mph). Moltke was the fourth ship in the line of five, ahead of Von der Tann, and to the rear of Seydlitz. The II Scouting Group, consisting of the light cruisers Frankfurt, Rear Admiral Boedicker's flagship, Wiesbaden, Pillau, and Elbing, and 30 torpedo boats of the II, VI, and IX Flotillas, accompanied Hipper's battlecruisers.
An hour and a half later, the High Seas Fleet under the command of Admiral Scheer left the Jade; the force was composed of 16 dreadnoughts. The High Seas Fleet was accompanied by the IV Scouting Group, composed of the light cruisers Stettin, München, Hamburg, Frauenlob, and Stuttgart, and 31 torpedo boats of the I, III, V, and VII Flotillas, led by the light cruiser Rostock. The six pre-dreadnoughts of the II Battle Squadron had departed from the Elbe roads at 02:45, and rendezvoused with the battle fleet at 5:00.
Shortly before 16:00, Hipper's force encountered Vice Admiral Beatty's battlecruiser squadron. The German ships were the first to open fire, at a range of approximately 15,000 yards (14,000 m). When the British ships began returning fire, confusion amongst the British battlecruisers resulted in Moltke being engaged by both New Zealand and Tiger. The British rangefinders had misread the range to their German targets, and so the first salvos fired by the British ships fell a mile past the German battlecruisers. At 16:52, Moltke hit Tiger with two main gun shells, but neither of these hits caused any significant damage. Moltke then fired a further four shells, two of which hit simultaneously on the midships and after turrets, knocking both out for a significant period of the battle.
Approximately 15 minutes later, the British battlecruiser Indefatigable was suddenly destroyed by Von der Tann. Shortly thereafter, Moltke fired four torpedoes at Queen Mary at a range between 11,500–10,400 yards (10,500–9,500 m). This caused the British line to fall into disarray, as the torpedoes were thought to have been fired by U-boats. At this point, Hipper's battlecruisers had come into range of the V Battle Squadron, composed of the new Queen Elizabeth-class battleships, which mounted powerful 15 in (38 cm) guns. At 17:06, Barham opened fire on Von der Tann. She was joined a few minutes later by Valiant, Malaya, and Warspite; the ships concentrated their fire on Von der Tann and Moltke. At 17:16, one of the 15 in shells from the fast battleships struck Moltke, where it pierced a coal bunker, tore into a casemate deck, and ignited ammunition stored therein. The explosion burned the ammunition hoist down to the magazine.
Von der Tann and Moltke changed their speed and direction, which threw off the aim of the V Battle Squadron and earned the battered ships a short respite. While Moltke and Von der Tann were drawing the fire of the V Battle Squadron battleships, Seydlitz and Derfflinger were able to concentrate their fire on the British battlecruisers; between 17:25 and 17:30, at least five shells from Seydlitz and Derfflinger struck Queen Mary, causing a catastrophic explosion that destroyed the ship. Moltke's commander, Kapitän zur See von Karpf, remarked that "The enemy's salvos lie well and close; their salvos are fired in rapid succession, the fire discipline is excellent!"
By 19:30, the High Seas Fleet, which was by that point pursuing the British battlecruisers, had not yet encountered the Grand Fleet. Scheer had been considering retiring his forces before darkness exposed his ships to torpedo boat attack. However, he had not yet made a decision when his leading battleships encountered the main body of the Grand Fleet. This development made it impossible for Scheer to retreat, for doing so would have sacrificed the slower pre-dreadnought battleships of the II Battle Squadron, while using his dreadnoughts and battlecruisers to cover their retreat would have subjected his strongest ships to overwhelming British fire. Instead, Scheer ordered his ships to turn 16 points to starboard, which would bring the pre-dreadnoughts to the relative safety of the disengaged side of the German battle line.
Moltke and the other battlecruisers followed the move, which put them astern of König. Hipper's badly battered ships gained a temporary moment of respite, and uncertainty over the exact location and course of Scheer's ships led Admiral Jellicoe to turn his ships eastward, towards what he thought was the likely path of the German retreat. The German fleet was instead sailing west, but Scheer ordered a second 16-point turn, which reversed course and pointed his ships at the center of the British fleet. The German fleet came under intense fire from the British line, and Scheer sent Moltke, Von der Tann, Seydlitz, and Derfflinger at high speed towards the British fleet, in an attempt to disrupt their formation and gain time for his main force to retreat. By 20:17, the German battlecruisers had closed to within 7,700 yards (7,040 m) of Colossus, at which point Scheer directed the ships to engage the lead ship of the British line. However, three minutes later, the German battlecruisers turned in retreat, covered by a torpedo boat attack.
A pause in the battle at dusk allowed Moltke and the other German battlecruisers to cut away wreckage that interfered with the main guns, extinguish fires, repair the fire control and signal equipment, and ready the searchlights for nighttime action. During this period, the German fleet reorganized into a well-ordered formation in reverse order, when the German light forces encountered the British screen shortly after 21:00. The renewed gunfire gained Beatty's attention, so he turned his battlecruisers westward. At 21:09, he sighted the German battlecruisers, and drew to within 8,500 yards (7,800 m) before opening fire at 20:20. The attack from the British battlecruisers completely surprised Hipper, who had been in the process of boarding Moltke from the torpedo boat G39. The German ships returned fire with every gun available, and at 21:32 hit both Lion and Princess Royal in the darkness. The maneuvering of the German battlecruisers forced the leading I Battle Squadron to turn westward to avoid collision. This brought the pre-dreadnoughts of the II Battle Squadron directly behind the battlecruisers, and prevented the British ships from pursuing the German battlecruisers when they turned southward. The British battlecruisers opened fire on the old battleships; the German ships turned southwest to bring all of their guns to bear against the British ships.
By 22:15, Hipper was finally able to transfer to Moltke, and then ordered his ships to steam at 20 knots (37 km/h; 23 mph) towards the head of the German line. However, only Moltke and Seydlitz were in condition to comply; Derfflinger and Von der Tann could make at most 18 knots, and so these ships lagged behind. Moltke and Seydlitz were in the process of steaming to the front of the line when the ships passed close to Stettin, which forced the ship to drastically slow down to avoid collision. This forced Frauenlob, Stuttgart, and München to turn to port, which led them into contact with the 2nd Light Cruiser Squadron; at a range of 800 yards (730 m), the cruisers on both sides pummeled each other. Rear Admiral Ludwig von Reuter decided to attempt to lure the British cruisers towards Moltke and Seydlitz. However, nearly simultaneously, the heavily damaged British cruisers broke off the attack. As the light cruisers were disengaging, a torpedo fired by Southampton struck Frauenlob, and the ship exploded. The German formation fell into disarray, and in the confusion, Seydlitz lost sight of Moltke. Seydlitz was no longer able to keep up with Moltke's 22 knots (41 km/h; 25 mph), and so detached herself to proceed to the Horns Reef lighthouse independently.
By 23:30 on her own, Moltke encountered four British dreadnoughts, from the rear division of the 2nd Battle Squadron. Moltke's commander Kapitän von Karpf ordered the ship to swing away, hoping he had not been detected. The British ships in fact had seen Moltke, but had decided to not open fire in order to not reveal their location to the entire German fleet. At 23:55, and again at 00:20, Kapitän von Karpf tried to find a path through the British fleet, but both times was unable to do so. It was not until 01:00, after having steamed far ahead of the Grand Fleet, that Moltke was able to make good her escape.
Close to the end of the battle, at 03:55, Hipper transmitted a report to Admiral Scheer informing him of the tremendous damage his ships had suffered. By that time, Derfflinger and Von der Tann each had only two guns in operation, Moltke was flooded with 1,000 tons of water, and Seydlitz was severely damaged. Hipper reported: "I Scouting Group was therefore no longer of any value for a serious engagement, and was consequently directed to return to harbour by the Commander-in-Chief, while he himself determined to await developments off Horns Reef with the battlefleet."
During the course of the battle, Moltke had hit Tiger 13 times, and was hit herself 4 times, all by 15 in (38 cm) shells. The starboard No. 5 15 cm gun was struck by one of the 15 in shells and put out of action for the remainder of the battle. The ship suffered 16 dead and 20 wounded, the majority of which were due to the hit on the 15 cm gun. Flooding and counter-flooding efforts caused 1,000 tons of water to enter the ship.
Later operations
During the fleet advance on 18–19 August, the I Scouting Group was to bombard the coastal town of Sunderland in an attempt to draw out and destroy Beatty's battlecruisers. As Moltke was one of only two remaining German battlecruisers still in fighting condition in the Group (Von der Tann being the other), three dreadnoughts were assigned to the Group for the operation: Markgraf, Grosser Kurfürst, and the newly commissioned Bayern. Admiral Scheer and the rest of the High Seas Fleet, with 15 dreadnoughts of its own, would trail behind and provide cover. The British were aware of the German plans and sortied the Grand Fleet to meet them. By 14:35, Scheer had been warned of the Grand Fleet's approach and, unwilling to engage the whole of the Grand Fleet just 11 weeks after the decidedly close call at Jutland, turned his forces around and retreated to German ports.
In September 1917, KzS von Karpf left Moltke; KzS Gygas assumed command of the ship. Between September and October 1917, the ship took part in Operation Albion supporting the German invasion of the Russian islands of Ösel, Dagö, and Moon (in present-day Estonia). Following the successful operation in the Baltic, Moltke was detached to support the II Reconnaissance Group (II AG), but did not actively participate in the Second Battle of Heligoland Bight.
Late 1917 saw the High Seas Fleet beginning to conduct anti-convoy raids in the North Sea between Britain and Norway. In October and December 1917, two British convoys to Norway were intercepted and destroyed by German cruisers and destroyers, prompting Beatty, now the Commander in Chief of the Grand Fleet, to detach several battleships and battlecruisers to protect convoys. This presented to Admiral Scheer the opportunity for which he had been waiting the entire war: the chance to isolate and eliminate a portion of the Grand Fleet.
At 05:00 on 23 April 1918, the High Seas Fleet left harbor with the intention of intercepting one of the heavily escorted convoys. Wireless radio traffic was kept to a minimum to prevent the British from learning of the operation. At 05:10 on 24 April, Moltke suffered machinery failure: the starboard propeller had fallen off the shaft, and before the turbine could be stopped, a gear wheel was destroyed. The destroyed wheel flung pieces of steel into an auxiliary condenser, which flooded the engine room and stopped the operation of the center and starboard engines. Saltwater entered the boilers, reducing the ship's speed to a mere four knots; by 08:45, the captain of Moltke reported to Scheer that his ship was "out of control", and that the ship would need to be towed. At 09:38, the cruiser Strassburg attempted to take the ship under tow, but was unable to do so. At 10:13, the dreadnought Oldenburg was detached from the battle fleet to tow Moltke back to port. At 14:10, the convoy had still not yet been located, and so Scheer turned the High Seas Fleet back towards German waters. By 17:10, Moltke's engines had been repaired, and the ship was able to steam at a speed of 17 knots. At 19:37, the British submarine E42 spotted the ship and fired a torpedo into Moltke. The ship took in 1,800 tons of water, but was able to reach harbor under her own power. Repairs were carried out in Wilhelmshaven in the Imperial Dockyard, between 30 April and 9 September 1918.
Following repairs, Moltke took part in training operations in the Baltic from 19 September to 3 October. Starting on 1 November, the ship served as the I Scouting Group flagship for Rear Admiral von Reuter, after the battlecruiser Hindenburg had gone into dry dock for repairs.
Fate
Moltke was to have taken part in what would have amounted to the "death ride" of the High Seas Fleet shortly before the end of World War I. The bulk of the High Seas Fleet was to have sortied from their base in Wilhelmshaven to engage the British Grand Fleet; Scheer—by now the Großadmiral of the fleet—intended to inflict as much damage as possible on the British navy, in order to retain a better bargaining position for Germany, whatever the cost to the fleet. However, while the fleet was consolidating in Wilhelmshaven, war-weary sailors began deserting en masse. As Von der Tann and Derfflinger passed through the locks that separated Wilhelmshaven's inner harbour and roadstead, some 300 men from both ships climbed over the side and disappeared ashore.
On 24 October 1918, the order was given to sail from Wilhelmshaven. Starting on the night of 29 October, sailors on several battleships mutinied; three ships from the III Squadron refused to weigh anchor, and acts of sabotage were committed on board the battleships Thüringen and Helgoland. The order to sail was rescinded in the face of this open revolt. In early November 1918, the German Revolution began; it led to the Armistice that ended the war and it toppled the monarchy.
Moltke was surrendered with the rest of the High Seas Fleet on 24 November 1918 and interned at Scapa Flow, under the command of Kapitänleutnant Wollante. Believing that the Treaty of Versailles had been signed and his fleet was about to be seized by the British, Rear Admiral von Reuter ordered the scuttling of the High Seas Fleet on 21 June 1919, while the British Grand Fleet was away on exercises. The ship sank in two hours and fifteen minutes. Moltke was raised in 1927 and scrapped at Rosyth in 1929.