
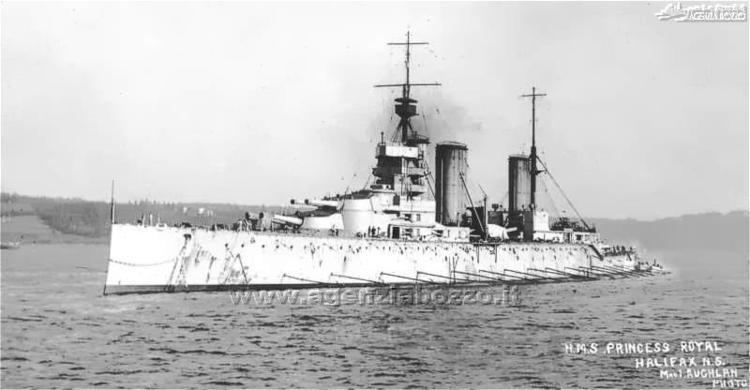
Name Princess Royal Laid down 2 May 1910 Launched 29 April 1911 Beam 27 m | Namesake The Princess Royal Construction started 2 May 1910 Length 213 m | |
 | ||
Ordered 1909–10 Contingent Programme Cost £2,076,222 (including armament) Builders Vickers, Barrow-in-Furness | ||
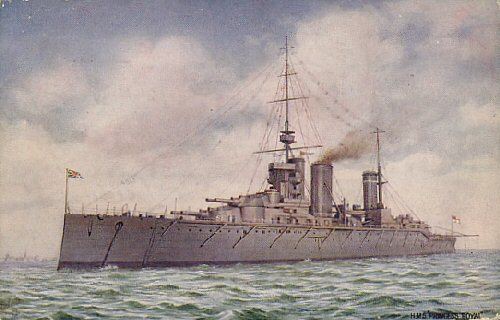
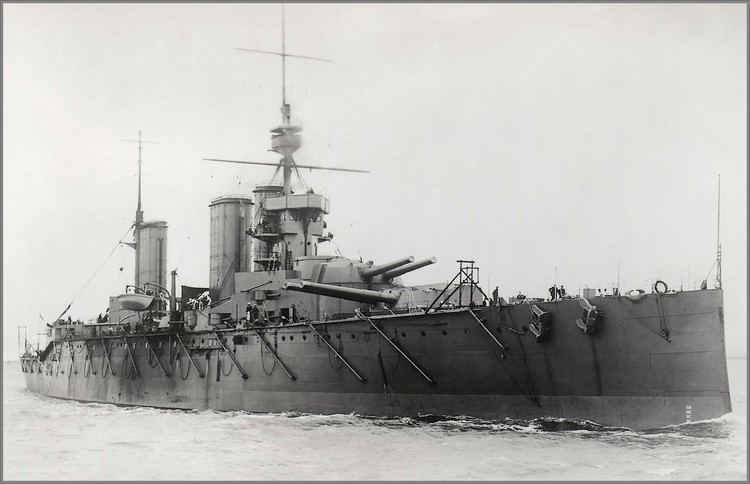
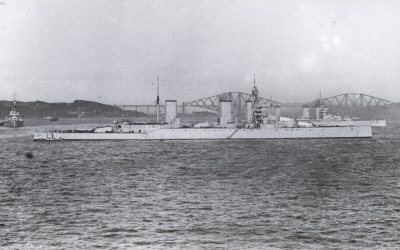
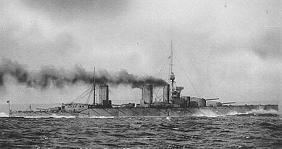
HMS Princess Royal was the second of two Lion-class battlecruisers built for the Royal Navy before World War I. Designed in response to the Moltke-class battlecruisers of the Imperial German Navy, the ships significantly improved on the speed, armament, and armour of the preceding Indefatigable class. The ship was named for The Princess Royal, a title occasionally granted to the Monarch's eldest daughter.
Contents
- Design
- General characteristics
- Propulsion
- Armament
- Armour
- Pre war career
- Battle of Heligoland Bight
- Battle of Dogger Bank
- Battle of Jutland
- Post Jutland career
- References
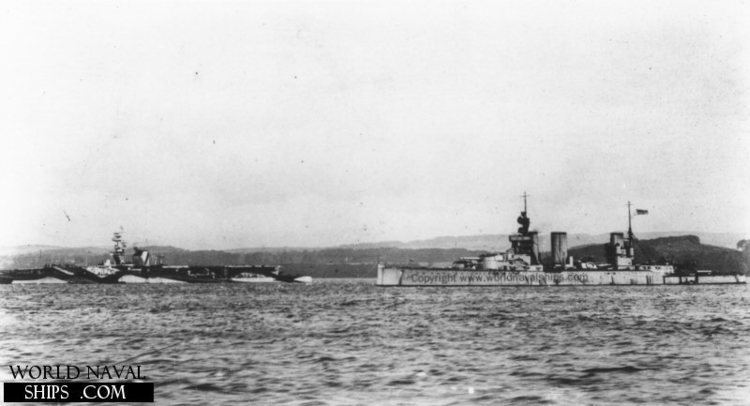
Laid down in 1912 and commissioned in 1913, Princess Royal served in the Battle of Heligoland Bight a month after the war began. She was then sent to the Caribbean to prevent the German East Asia Squadron from using the Panama Canal. After the East Asia Squadron was sunk at the Battle of the Falkland Islands in December 1914, Princess Royal rejoined the 1st Battlecruiser Squadron. During the Battle of Dogger Bank, Princess Royal scored only a few hits, although one crippled the German armoured cruiser Blücher. Shortly afterwards, she became the flagship of the 1st Battlecruiser Squadron, under the command of Rear-Admiral Osmond Brock.
Princess Royal was moderately damaged during the Battle of Jutland and required a month and a half of repairs. Apart from providing distant support during the Second Battle of Heligoland Bight in 1917, the ship spent the rest of the war on uneventful patrols of the North Sea. Princess Royal was placed into reserve in 1920, then was sold for breaking up as scrap in 1922 to meet the terms of the Washington Naval Treaty.
Design
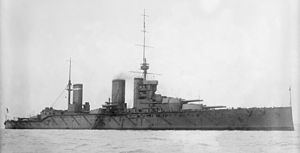
The Lion-class battlecruisers, nicknamed the "Splendid Cats", were designed by Philip Watts, the Director of Naval Construction, to be as superior to the new German battlecruisers of the Moltke class as the German ships were to the Invincible class. The increase in speed, armour and gun size forced a 70% increase in size over the Indefatigable class and made them the largest warships in the world.
General characteristics
Princess Royal was significantly larger than her predecessors. She had an overall length of 700 feet (213.4 m), a beam of 88 feet 6.75 inches (27.0 m), and a draught of 32 feet 5 inches (9.9 m) at deep load. The ship normally displaced 26,270 long tons (26,690 t) and 30,820 long tons (31,310 t) at deep load, over 8,000 long tons (8,100 t) more than the earlier ships. She had a metacentric height of 5.95 feet (1.8 m) at deep load.
Propulsion
Princess Royal had two paired sets of Parsons direct-drive steam turbines housed in separate engine-rooms. Each set consisted of a high-pressure ahead-and-astern turbine driving an outboard shaft, and a low-pressure ahead-and-astern turbine driving an inner shaft. Designed power was 70,000 shaft horsepower (52,199 kW) for a speed of 28 knots (52 km/h; 32 mph). In September 1912, Princess Royal began her sea trials and developed 78,803 shp (58,763 kW) for a speed of 28.5 knots (52.8 km/h; 32.8 mph). During maximum power trials in July 1913, the battlecruiser achieved 96,238 shp (71,765 kW) for a speed of 27.97 knots (51.80 km/h; 32.19 mph) while at the unusually high displacement of 29,660 long tons (30,140 t).
The steam plant consisted of 42 Yarrow large-tube boilers arranged in seven boiler rooms. Maximum bunkerage was 3,500 long tons (3,600 t) of coal and an additional 1,135 long tons (1,153 t) of fuel oil to be sprayed on the coal to increase its burn rate. At 10 knots (19 km/h; 12 mph), the ship's range was 5,610 nautical miles (10,390 km; 6,460 mi).
Armament
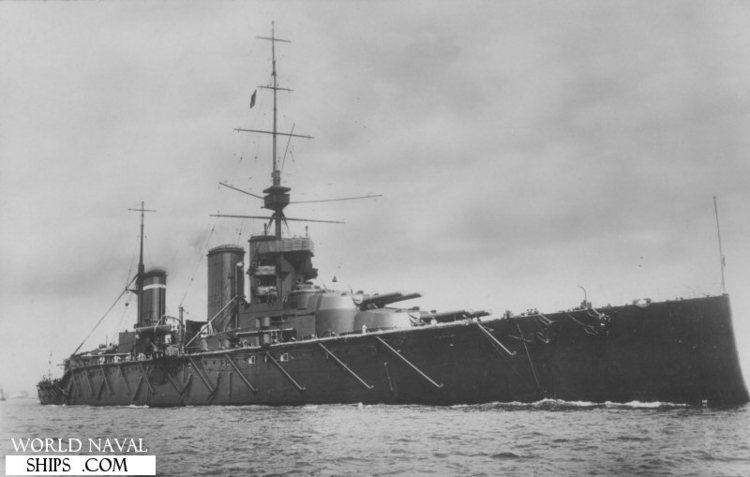
Princess Royal was armed with eight BL 13.5-inch Mk V guns ("BL" for breech-loading) in four twin hydraulically powered turrets, designated 'A', 'B', 'Q' and 'X' from bow to stern. Her secondary armament consisted of 16 BL 4-inch Mk VII guns, most of which were mounted in casemates in the superstructure. The two guns mounted on the deck above the forward group of casemates were fitted with gun shields in 1913 and 1914 to better protect their crews from enemy fire.
The battlecruiser was built without anti-aircraft (AA) guns, but from October 1914 to December 1916 she was fitted with a single QF 6 pounder Hotchkiss gun ("QF" for quick-firing) on a high-angle mount, which had a maximum depression of 8° and a maximum elevation of 60°. Its 6-pound (2.7 kg) shell was fired at a muzzle velocity of 1,765 ft/s (538 m/s) and a rate of fire of 20 rounds per minute. It had a maximum ceiling of 10,000 feet (3,000 m), but an effective range of only 3,600 feet (1,100 m). A single QF 3-inch 20 cwt AA gun was added in January 1915 and carried until April 1917. Its high-angle mount had a maximum depression of 10° and a maximum elevation of 90°. The gun fired a 12.5-pound (5.7 kg) shell at a muzzle velocity of 2,500 ft/s (760 m/s) at a rate of 12 to 14 rounds per minute. It had a maximum effective ceiling of 23,500 ft (7,200 m).
Princess Royal received a fire-control director between mid-1915 and May 1916 that centralised fire-control under the gunnery officer who now fired the guns. To align their guns on the target, the turret crewmen had to follow pointers whose position was transmitted from the director. This greatly increased accuracy as it was easier for the director to spot the fall of shells and eliminated the shell spread caused by the ship's roll as the turrets fired individually.
By early 1918, Princess Royal carried a Sopwith Pup and a Sopwith 1½ Strutter on flying-off ramps fitted on top of 'Q' and 'X' turrets. The Pup was intended to shoot down Zeppelins while the 1½ Strutter was used for spotting and reconnaissance. Each platform had a canvas hangar to protect the aircraft during inclement weather.
Armour
The armour protection given to Lion and Princess Royal was heavier than on the Indefatigables. The waterline belt of Krupp cemented armour measured 9 inches (229 mm) thick amidships; this thinned to 4 inches towards the ships' ends, and did not reach the bow or stern. The upper armour strake had a maximum thickness of 6 inches over the same length as the thickest part of the waterline armour and thinned to 5 inches (127 mm) abreast of the end turrets. The gun turrets and barbettes were protected by 8 to 9 inches (203 to 229 mm) of armour, except for the turret roofs which used 2.5 to 3.25 inches (64 to 83 mm). The thickness of the nickel steel deck ranged from 1 to 2.5 inches (25 to 64 mm). Nickel-steel torpedo bulkheads 2.5 inches (64 mm) thick were fitted abreast of the magazines and shell rooms. The sides of the conning tower were 10 inches (254 mm) thick. After the Battle of Jutland revealed a vulnerability to plunging shellfire, 1 inch of additional armour, weighing approximately 100 long tons (102 t), was added to the magazine crowns and turret roofs.
Pre-war career
Princess Royal was laid down at the Vickers Shipyard in Barrow-in-Furness on 2 May 1910. She was launched on 29 April 1911 by Princess Louise, The Princess Royal, and commissioned into the Royal Navy on 14 November 1912. She cost £1,955,922 plus an additional £120,300 for her armament. Upon commissioning, Princess Royal joined the 1st Cruiser Squadron, which was renamed the 1st Battlecruiser Squadron (BCS) in January 1913. Rear-Admiral Beatty assumed command of the 1st BCS on 1 March 1913. The squadron, including Princess Royal, visited Brest in February 1914 and ports in Russia during June.
Battle of Heligoland Bight
Princess Royal first saw combat during the Battle of Heligoland Bight on 28 August 1914. She was part of Admiral Beatty's battlecruiser force, which was originally to provide distant support to the British cruisers and destroyers closer to the German coast if the German High Seas Fleet sortied in response. The battlecruisers headed south at full speed at 11:35 a.m. when the British light forces failed to disengage on schedule, as the rising tide meant that German capital ships would be able to clear the bar at the mouth of the Jade Estuary. The British light cruiser Arethusa had been crippled earlier in the battle and was under fire from the German light cruisers Strassburg and Cöln when Beatty's battlecruisers appeared out of the mist at 12:37 p.m. Strassburg was able to duck into the mists and evade fire, but Cöln was quickly crippled by the squadron's guns. Before Cöln could be sunk, Beatty was distracted by the sudden appearance of the German light cruiser Ariadne directly to his front, and ordered pursuit. Ariadne was reduced to a burning hulk after only three salvos at less than 6,000 yards (5,500 m).
Princess Royal sailed from Cromarty on 28 September to rendezvous with a Canadian troop convoy bound for the United Kingdom. She rejoined the 1st BCS on 26 October, but was detached again a few days later to reinforce the North Atlantic and Caribbean Squadrons in the search for Admiral Graf Spee's German East Asia Squadron after it destroyed the West Indies Squadron on 1 November 1914. Princess Royal arrived at Halifax on 21 November, then spent several days off New York City before she steamed down to the Caribbean to guard against the possibility that Graf Spee would use the Panama Canal. The East Asia Squadron was sunk off the Falkland Islands on 7 December, and Princess Royal left Kingston, Jamaica to sail to the UK on 19 December.
Battle of Dogger Bank
On 23 January 1915 a force of German battlecruisers under the command of Admiral Franz von Hipper sortied to clear the Dogger Bank of any British vessels that might be collecting intelligence on German movements. The British were reading the German coded messages, and a large battlecruiser force under Admiral Beatty, aboard Lion, sailed to intercept. Contact was initiated at 7:20 a.m. on the 24th, when the British light cruiser Arethusa spotted the German light cruiser Kolberg. By 7:35, the Germans had seen Beatty's force; Hipper, aboard Seydlitz, ordered his ships south at 20 knots (37 km/h; 23 mph), thinking that he could outpace any British battleships, and could increase to Blücher's maximum speed of 23 knots (43 km/h; 26 mph) if the pursuing ships were battlecruisers.
Beatty ordered his battlecruisers to catch the Germans before they could escape. The leading ships, Lion, Princess Royal and Tiger, pursued at 27 knots (50 km/h; 31 mph), and Lion opened fire at 8:52 at a range of 20,000 yards (18,000 m). The other ships followed a few minutes later but the extreme range and decreasing visibility meant they did not start scoring hits until 9:09. The German battlecruisers opened fire two minutes later at a range of 18,000 yards (16,000 m) and concentrated their fire on Lion, hitting her once. At 9:35, Beatty signalled to "engage the corresponding ships in the enemy's line", but Tiger's captain, believing that Indomitable was already engaging Blücher, fired at Seydlitz, as did Lion, which left Moltke unengaged and able to fire on Lion without risk. Moltke and Derfflinger combined their fire to badly damage Lion over the next hour, even with Princess Royal attacking Derfflinger.
Meanwhile, Blücher had been heavily damaged; her speed had dropped to 17 knots (31 km/h; 20 mph), and her steering gear was jammed. Beatty ordered Indomitable to attack her at 10:48 a.m. Six minutes later, he spotted what he thought was a submarine periscope on the starboard bow and ordered an immediate 90° turn to port to avoid the submarine, although the submarine warning flag was not raised because most of Lion's signal halyards had been shot away. Soon afterwards Lion lost her remaining dynamo to the rising water, which knocked out all remaining light and power. At 11:02, Beatty had flags hoisted signalling "course north-east", to bring his ships back to their pursuit of Hipper, and "attack the rear of the enemy". Rear-Admiral Sir Gordon Moore, temporarily commanding the squadron from New Zealand, thought that the signals meant to attack Blücher, which was about 8,000 yards (7,300 m) to the north-east, and ordered the four other battlecruisers away from the pursuit of Hipper's main force to engage. Beatty tried to correct the mistake, but he was so far behind the leading battlecruisers that his signals could not be read in the smoke and haze.
Beatty transferred to the destroyer Attack at 11:50 and set off in pursuit of his battlecruisers, reaching them shortly before Blücher sank. He boarded Princess Royal at 12:20 p.m. and ordered the ships to pursue the main German force. This order was rescinded when it became clear that the time wasted in sinking Blücher meant the rest of Hipper's battlecruisers would reach friendly waters before they could be caught. Beatty's battlecruisers turned for home, catching up to Lion, which was limping along at 10 knots (19 km/h; 12 mph).
Princess Royal hit Derfflinger once, but only damaged two armour plates and caused a coal bunker to flood. She hit Blücher at least twice, including the shot that crippled her, out of a total of 271 13.5-inch (343 mm) shells fired during the battle, a hit rate of only 0.7%. By way of contrast, her sister Lion made four hits out of 243 shells fired, a rate of 1.6%. She also fired two 13.5-inch shrapnel shells at the German airship L5 as its crew attempted to bomb the sinking Blücher, mistaking it for a British ship, despite the fact that the maximum elevation of those guns was only 20°. Princess Royal was not damaged during the battle.
Battle of Jutland
On 31 May 1916, Princess Royal was the flagship of Rear-Admiral Osmond Brock and the 1st BCS under Beatty's overall command; they had put to sea with the rest of the Battlecruiser Fleet to intercept a sortie by the High Seas Fleet into the North Sea. The British had decoded the German radio messages, and left their bases before the Germans put to sea. Hipper's battlecruisers spotted the Battlecruiser Fleet to their west at 3:20 p.m., but Beatty's ships did not see the Germans to their east until 3:30. Two minutes later, Beatty ordered a course change to east south-east, positioning the British ships to cut off the Germans' line of retreat, and signalled action stations. Hipper ordered his ships to turn to starboard, away from the British, to assume a south-easterly course, and reduced speed to 18 knots (33 km/h; 21 mph) to allow three light cruisers of the 2nd Scouting Group to catch up. With this turn, Hipper was falling back on the High Seas Fleet, 60 miles (97 km) behind him. Beatty altered course to the east, as he was still too far north to cut Hipper off.
This began what was to be called the "Run to the South" as Beatty changed course to steer east south-east at 3:45, now paralleling Hipper's course less than 18,000 yards (16,000 m) away. The Germans opened fire first at 3:48, followed by the British. The British ships were still in the process of making their turn as only the two leading ships, Lion and Princess Royal, had steadied on their course when the Germans opened fire. The two battlecruisers engaged Lützow, the leading German ship, while Derfflinger targeted Princess Royal. The German fire was accurate from the start, with two hits on Princess Royal within the first three minutes. British gunnery was less effective; the range was incorrectly estimated as the German ships blended into the haze. Princess Royal's 'A' turret stopped working effectively early in the battle: the left gun was rendered inoperable when the breech pinion gear sheared, and the right gun misfired frequently. By 3:54, the range was down to 12,900 yards (11,800 m); Beatty ordered a course change two points to starboard to open up the range at 3:57.
At 4:11 p.m. a torpedo fired by Moltke passed under Princess Royal. Those aboard the British ship saw the torpedo's track, but incorrectly concluded that a U-boat was positioned on the opposite side of the British line (away from the German battlecruisers) and was firing towards both groups of ships. This false impression was compounded by reports of a periscope sighting by the destroyer HMS Landrail. By this time, the distance between the British and German ships was too great for accurate fire, so Beatty altered course four points to port between 4:12 and 4:15, closing the range. This manoeuvre exposed Lion to the fire of the German battlecruisers, and the smoke from multiple successful hits caused Derfflinger to lose sight of Princess Royal and switch targets to Queen Mary at 4:16. By 4:25, the range was down to 14,400 yards (13,200 m) and Beatty turned two points to starboard to open the range again. Around this time, Queen Mary was hit multiple times in quick succession and her forward magazines exploded. At 4:30, the light cruiser Southampton, scouting in front of Beatty's ships, spotted the lead elements of the High Seas Fleet charging north at top speed. Three minutes later, they sighted the topmasts of Vice-Admiral Reinhard Scheer's battleships, but did not report this to the fleet for another five minutes. Beatty continued south for another two minutes to confirm the sighting before ordering his force to turn north.
The German battlecruisers made their own turn north in pursuit, but Beatty's ships maintained full speed, and gradually moved out of range. The British battlecruisers turned north, then north-east, to try to rendezvous with the main body of the Grand Fleet, and at 5:40 p.m. opened fire again on their German counterparts. Facing the setting sun, the Germans could not make out the British ships and turned away to the north-east at 5:47. Beatty gradually turned towards the east so his ships could cover the Grand Fleet as it deployed into battle formation, but he mistimed his manoeuvre and forced the leading British division to manoeuvre away from the Germans. About 6:22, Princess Royal was hit by two 305-millimetre (12.0 in) shells fired by the battleship Markgraf; one of these disabled 'X' turret and the other penetrated the ship's side armour. By 6:35, Beatty was following the 3rd BCS as they were leading the Grand Fleet east-southeast, and continuing to engage Hipper's battlecruisers to their south-west. A few minutes earlier, Scheer had ordered a simultaneous 180° starboard turn, and Beatty lost sight of them in the haze. At 6:44, Beatty turned his ships south-east, then south-southeast four minutes later, to find Hipper's force. He then ordered the two surviving ships of the 3rd BCS to take position astern of New Zealand, while slowing to 18 knots (33 km/h; 21 mph) and altering course to the south. Beatty then ordered his ships to make a complete circle to stay within visual range of the Grand Fleet. At 6:55, Scheer ordered another 180° turn, which put the German ships on a converging course again with the Grand Fleet. However, the British had altered course to the south, allowing the Grand Fleet to cross Scheer's "T" and inflict damage on the leading German ships. Scheer ordered yet another 180° turn at 7:13, and successfully extricated the High Seas Fleet from the danger precipitated by his previous turn. About this time Princess Royal fired at the leading German battlecruiser for three minutes without result.
The British lost sight of the Germans until HMS Castor spotted smoke to the west-northwest at 8:05 p.m., then identified and engaged several German torpedo boats. Hearing the sound of gunfire, Beatty ordered his ships west, and spotted the German battlecruisers only 8,500 yards (7,800 m) away. Inflexible opened fire at 8:20, followed almost immediately by the rest of the battlecruisers. Shortly after 8:30, the pre-dreadnought battleships of Rear-Admiral Mauve's II Battle Squadron were spotted. The British battlecruisers and German pre-dreadnoughts exchanged fire; the Germans only fired a few times before turning away to the west because of poor visibility and the more accurate British gunnery, and disappeared into the mist around 8:40. Beatty's battlecruisers sailed south-southeast, ahead of both the Grand Fleet and the High Seas Fleet, until the order to reverse course for home was given at 2:55 a.m.
Along with the rest of the battlecruisers, Princess Royal reached Rosyth Dockyard in Scotland on the morning of 2 June, and she immediately received temporary repairs over the next eight days. She then sailed for Plymouth, where permanent repairs were completed on 15 July, and returned to Rosyth by 21 July. Princess Royal was hit nine times during the battle—six times by Derfflinger during the "Run to the South", twice by Markgraf during the "Run to the North", and once by Posen just after II Battle Squadron appeared—with 22 killed and 81 injured. The battlecruiser fired only 230 13.5-inch shells during the battle, as her visibility was often impaired by the funnel smoke and fires aboard Lion. She was credited with three hits on Lützow and two on Seydlitz. A torpedo fired at the German pre-dreadnoughts failed to hit.
Post-Jutland career
As the German High Seas Fleet was forbidden from taking any unnecessary risks, the majority of Princess Royal's post-Jutland activities consisted of uneventful patrols of the North Sea. On the evening of 18 August, the Grand Fleet put to sea in response to a deciphered message that the High Seas Fleet, minus the II Squadron, would be leaving harbour that night. The Germans planned to bombard the port of Sunderland on the 19th, with extensive reconnaissance provided by airships and submarines. The Grand Fleet sailed with 29 dreadnought battleships and 6 battlecruisers to their anticipated rendezvous in the North Sea; for fear that they had entered a minefield after HMS Nottingham was torpedoed, they turned north before turning south again. Scheer steered south-eastward pursuing a lone British battle squadron reported by an airship, which was in fact the Harwich Force under Commodore Tyrwhitt. Realising their mistake, the Germans then set course for home. The only contact came in the evening when Tyrwhitt sighted the High Seas Fleet but was unable to achieve an advantageous attack position before dark, and broke off. Both the British and German fleets returned home; two British light cruisers, HMS Nottingham and Falmouth had been sunk by submarines, and the German dreadnought Westfalen had been damaged by a torpedo.
Princess Royal provided support for British light forces involved in the Second Battle of Heligoland Bight on 17 November 1917, but never came within range of any German ships. She sailed with the 1st BCS on 12 December after German destroyers sank seven ships of a Norway-bound convoy, including HMS Partridge, four naval trawlers and four cargo ships earlier that day, but the British were unable to intercept and returned to base the following day. Princess Royal, along with the rest of the Grand Fleet, sortied on the afternoon of 23 April 1918 after radio transmissions revealed that the High Seas Fleet was at sea after a failed attempt to intercept the regular British convoy to Norway. However, the Germans were too far ahead of the British, and no shots were fired. Starting in July 1918, the Grand Fleet was affected by the 1918 flu pandemic; at one point, Princess Royal lacked sufficient healthy crewmen to sail.
Following the surrender of the High Seas Fleet at the end of the war, Princess Royal and the 1st BCS made up part of the guard force in Scapa Flow. Princess Royal was reassigned to the Atlantic Fleet in April 1919. The battlecruiser was placed in reserve in 1920, and an attempt to sell her to Chile later that year was unsuccessful. She became the flagship of the Commander-in-Chief of the Scottish Coast on 22 February 1922. She was sold for scrap in December 1922 to meet the tonnage limitations set on the Royal Navy by the Washington Naval Treaty, and arrived at the breakers on 13 August 1923.