This is a list of the ground forces from the United Kingdom that took part in the Falklands War. For a list of ground forces from Argentina, see Argentine ground forces in the Falklands War
Land Forces
The land forces employed by the United Kingdom during the Falklands War amounted to a divisional sized formation, named as Land Forces Falkland Islands, consisting of two brigades:
3 Commando Brigade - formed primarily by the Royal Marines, 3 Commando Brigade was the primary British rapid reaction force, tasked with reinforcing the NATO northern flank in Norway in the event of war with the Soviet Union in Europe. 3 Commando Brigade was the formation with most experience of amphibious operations. In its NATO role, 3 Commando Brigade was reinforced by the Dutch Korps Mariniers. However, the situation required reinforcement by British units, with the result that 2nd & 3rd Battalions of the Parachute Regiment were reassigned from 5 Infantry Brigade.
5 Infantry Brigade - the UK's main "out of area" reaction formation, tasked with operations outside the European theatre. At the time, it would normally be formed using two battalions of the Parachute Regiment, together with the UK based Gurkha battalion. However, since both 2 PARA and 3 PARA were used to reinforce 3 Commando Brigade for the initial landings in the Falklands, 5 Brigade was reinforced with two battalions of foot guards then on public duties in London. These were chosen as they were immediately available, as they were neither on internal security duties in Northern Ireland nor attached to BAOR.
Land Forces HQ
Commander, Land Forces, Falkland Islands (CLFFI): Major-General Jeremy Moore, Royal Marines
Deputy commander: Brigadier John Waters
Commander, Royal Artillery: Colonel Brian Pennicott
3 Commando Brigade
Commander: Brigadier Julian Thompson
29 Commando Regiment Royal Artillery (Lt Col Mike Holroyd Smith)
18 x 105 mm L118 Light Guns (3 x 6 gun batteries)
148 (Meiktila) Battery (Primary role is as a Naval Gunfire Support Forward Observation (NGSFO) battery.)
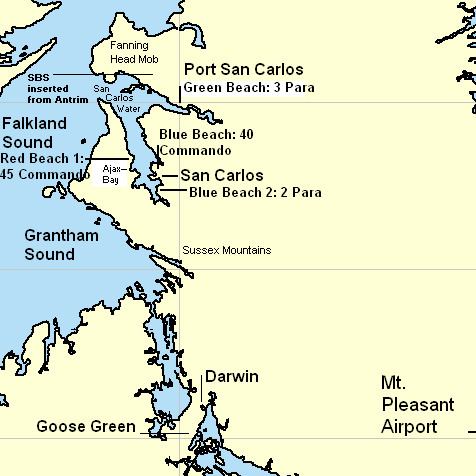
40 Commando, Royal Marines (Lt Col Malcolm Hunt) — Blue Beach 1 - Sapper Hill. (†1)
42 Commando, Royal Marines (Lt Col Nick Vaux) — Mount Kent - Mount Harriet. (†2)
45 Commando, Royal Marines (Lt Col Andrew Whitehead) — Red Beach - Douglas Settlement - Two Sisters. (†12)
2nd Battalion, Parachute Regiment (Lt Col H. Jones VC)^1 — Blue Beach 2 - Goose Green & Darwin - Wireless Ridge. (†18)
29 Field Battery RA
Blowpipe Troop of 43 Air Defence Battery
Field Troop, 9 Parachute Engineer Squadron (†4)
Troop, 16 Field Ambulance
Department 81 Ordnance Company
613 TACP
3rd Battalion, Parachute Regiment (Lt Col Hew Pike) — Green Beach - Teal Inlet - Mount Longdon. (†21)
1 x Section Field Ambulance
1 x Ordnance Coy Detachment
Commando Logistics Regiment, Royal Marines (Lt Col Ivar Helberg) (†1)
3 Commando Brigade HQ and Signals Squadron (Major Richard Dixon) (†1)
3 Commando Brigade Aviation Squadron (Major Peter Cameron)
9 x Gazelle AH.1 helicopters (†3)
6 x Scout helicopters (†1)
Reconnaissance Troops (Lt. Mark Coreth)
4 x FV101 Scorpion CVR(T) (Combat Vehicle Reconnaissance (Tracked))
4 x FV107 Scimitar CVR(T) (Combat Vehicle Reconnaissance (Tracked))
1 x FV106 Samson CVR(T) (Combat Vehicle Reconnaissance (Tracked))
T Battery 12 Air Defence Regiment
12 x Rapier Missile FS.B2 Launcher
Air Defence Troop
12 x Blowpipe Missile launchers
Raiding Squadron, Royal Marines (Captain Chris Baxter)
17 x Rigid Raiding Craft
Mountain and Arctic Warfare Cadre, Royal Marines (Captain Rod Boswell)
2, 3 and 6 Sections, Special Boat Squadron (SBS), Royal Marines, (Major Jonathan Thomson) (†1)
67 men
D and G Squadrons, 22nd SAS Regiment (Lt Col Michael Rose) (†19)
107 men
3 x Tactical air control parties
Air maintenance group
Rear link detachment, 30 Signal Regiment (†3)
Elements of 17 Port Regiment Royal Corps of Transport.
3 x Mexeflote detachments.
5 x Landing ship logistics detachments.
3 x Surgical support teams
Postal courier communications unit detachment of 1 PC regiment
Detachment 47 Air Despatch Squadron RCT.
59 Independent Commando Squadron, Royal Engineers (Major Roddy MacDonald). (†3)
Detachment 49 EOD Squadron, 33 Engineer Regiment (†1)
2 man bomb disposal team
Y Troop detachment communications
Commando forces Band (stretcher-bearers)
^1 - Replaced by Lt Col David Chaundler
Commander: Brigadier Sir Mathew John Anthony (Tony) Wilson, 6th Baronet, OBE, MC
2nd Bn, Scots Guards (Lt Col Michael Scott) — Mount Tumbledown. (†8)
1st Bn, Welsh Guards (Lt Col John Rickett) — Sapper Hill. (†33)
1st Bn, 7th Duke of Edinburgh's Own Gurkha Rifles (Lt Col David Morgan) — Mount William. (†1)
97 Battery Royal Artillery
6 x 105 mm L118 Light Guns
HQ 4 Field Regiment, RA
36 Engineer Regiment RE Lt Col Geoff Field OBE (CRE)
9 Parachute Squadron RE Maj Chris Davis
11 Field Squadron RE Maj Bruce Hawkins
61 Field Support Squadron RE Maj Taffy Morgan
1 x Field Troop, 20 Field Squadron RE (att 9 Para Sqn RE) Captain David Foxley
STRE
Postal section
656 Squadron Army Air Corps (†2)
6 x Gazelle
6 x Scout
10 Field Workshop REME (†3)
16 Field Ambulance (†3)
81 Ordnance Company
Forward Air Control Party
2 x FAC
Army Catering Corps (†4)
407 Troop, Royal Corps of Transport, 2nd Lt Ash
63 Squadron RAF Regiment
8 x Rapier Missile FS.A Launchers and DN181 Radar Trackers
518 Company, Royal Pioneer Corps
L9A1 Browning
L1A1 SLR (main infantry weapon)
L42A1 (Sniper rifle)
L2-A2 (Hand grenade)
M79 (infantry grenade launcher)
L4 Bren
L7A2 GPMG
L14A1 Carl Gustav Recoilless Rifle
Rocket 66mm HEAT L1A1
MILAN ATGM (used against Argentine bunkers)
L9A1 51 mm Mortar
L16A1 81 mm Mortar
Blowpipe MANPADS (infantry use)
FIM-92 Stinger MANPADS (special forces use)
M16A1 & M203 (special forces weapon)
L2A3 Sterling (support services weapon i.e. for tank crewmen, engineers and artillerymen)