
Dates 2 Jul 1945 – 7 Aug 1945 | Result Decisive British victory | |
 | ||
Total 2,00095 killed, 322 wounded & 1,600 non-combat Total 14,0008,500 killed, 740 captured & over 5,000 non combat Combatants Myanmar (Burma), Empire of Japan, British Raj Similar World War II, Battle of Meiktila and Man, Battle of Sittang Bridge, Battle of Elephant Point, Battle of the Admin Box | ||
The Battle of the Sittang Bend and the Japanese Breakout across Pegu Yomas were linked Japanese military operations during the Burma Campaign, which took place nearly at the end of World War II. Surviving elements of the Imperial Japanese Army who had been driven into the Pegu Yoma attempted to break out eastwards, to join other Japanese troops retreating from the British forces. The break-out was the objective of the Japanese Twenty-Eighth Army with support at first from the Thirty-third Army and later the Fifteenth Army. As a preliminary, the Japanese Thirty-third Army attacked Allied positions in the Sittang Bend, near the mouth of the river, to distract the Allies. The British had been alerted to the break-out attempt and it ended calamitously, with many losses and some formations being wiped out.
Contents
Around 14,000 Japanese were lost, with well over half being killed, while British forces suffered only 95 killed and 322 wounded. The break-out attempt and the ensuing battle became the last significant land battle of the Western powers in the Second World War.
Background
By early 1944, the British forces in India had been reinforced and had expanded their supply infrastructure, which made it possible for them to contemplate an attack into Burma. The Japanese attempted to forestall them by an invasion of India (Operation U-Go), which led to a great Japanese defeat and other setbacks in Northern Burma. Following a further defeat at the hands of William Slim and the Fourteenth Army at Meiktila and Mandalay and Operation Dracula, the recapture of Rangoon, the Japanese were further handicapped in their defence of Burma.
By this time the Burmese National Army under Aung San had switched sides (becoming the Burma Patriotic Army) and was hunting down Japanese patrols and foraging parties.
During April, the British and Indian IV Corps advanced 300 miles (480 km) from Central Burma down the valley of the Sittang River. Japanese rearguards prevented them advancing all the way to Rangoon, the capital and main port of Burma but on 2 May, Rangoon fell to an Allied amphibious landing (Operation Dracula). On 6 May, the leading troops of 17th Division, leading the IV Corps advance, linked up with the troops who had carried out Dracula at Hlegu 28 miles (45 km) north east of Rangoon.
After the fall of Rangoon, the Fourteenth Army HQ under Slim moved to Ceylon to plan operations to recapture Malaya and Singapore. A new Twelfth Army headquarters under Lieutenant-General Montagu Stopford was formed from XXXIII Corps HQ. It took over IV Corps in the Sittang valley and directly commanded some divisions in the Irrawaddy valley.
The Japanese Twenty-Eighth Army under Lieutenant General Shōzō Sakurai, after retreating from Arakan and the Irrawaddy valley, had reached the Pegu Yomas, a range of low mountains, hills and uplands between the Irrawaddy and the Sittang River in central Burma. They were joined by Major General Hideji Matsui's 105th Independent Mixed Brigade, also known as "Kani" Force (men of anti-aircraft batteries, airfield construction battalions, naval anchorage units and NCO schools) which had faced IV Corps.
The Japanese trapped in the Pegu Yomas prepared a break-out operation to rejoin the Burma Area Army and escape into Thailand with them. The Sittang was unfordable and was therefore a significant military barrier, as it had been in 1942 during the first Burma campaign. General Heitarō Kimura, the commander of Burma Area Army, ordered the Thirty-Third Army to cover this break-out by a diversionary offensive across the Sittang, although the entire army could muster the strength of barely a brigade. In support, the Fifteenth Army were to co-ordinate their efforts with the Twenty-eighth Army, if the operation was failing to meet its objective.
Operation
British intelligence were aware of the intended break-out but had no detailed information, so Stopford ordered General Frank Messervy the IV Corps commander to spread the corps over more than a hundred miles of front to block their way. On 2 July 1945 a Gurkha patrol ambushed and wiped out a small Japanese force and captured a dispatch bag containing the complete operational plan for the Japanese break-out. The intelligence was quickly distributed among the British forces, which had two weeks to prepare. One of the intended Japanese routes of march lay directly across the 17th Indian Division headquarters at Penwegon and Messervy reinforced this critical sector with 64th Indian Brigade from the 19th Indian Division.
The Japanese planned to advance to the Sittang in three columns, under strict rules of engagement forbidding use of firearms in favour of the bayonet and forbidding any radio communication, once they had crossed the Sittang on rafts mostly made of bamboo. Sakurai underestimated the British strength arrayed against him but believed he could get over half his force across in fighting shape.
1st Battle
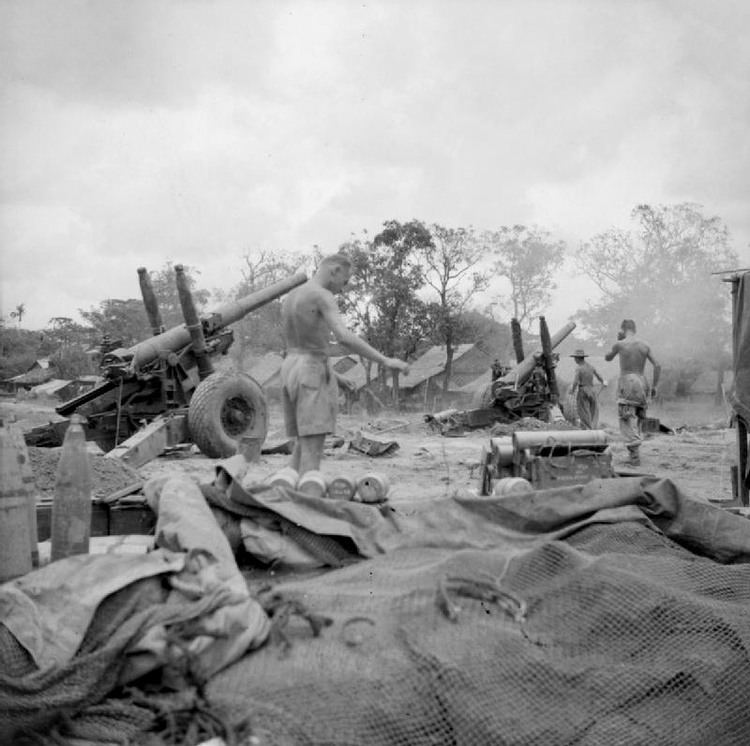
The Japanese Thirty-third Army attacked the Sittang Bend on 3 July 1945, attempting to assist the break-out. The attack was mistimed, taking place a week before the Twenty-eighth Army made its advance to the river. The Japanese were allowed to advance, unaware that their plans were known to the British, until many of their troops were in exposed positions and then a barrage of shell fire and bombing started. Artillery bombarded the Japanese attack; Royal Artillery forward observation officers (FOOs) continually monitored Japanese movements and gave the signal to fire.
Royal Air Force cab rank patrols under the direction of visual control posts, called upon squadrons of Spitfires and Thunderbolts on Japanese targets. The destruction on 4 July of three 105 mm guns by the Thunderbolts of No. 42 Squadron was an example of air power success.
By 7 July, Kimura ordered Thirty-third Army, having suffered casualties, to halt operations and pulled them back hoping it would be enough to enable the Twenty-eighth army to break-out. The British knew of this anyway and switched their attention to that sector.
Battle of the Breakout
On 15 July the Twenty-Eighth Army, despite the mistiming of the Thirty-third Army's attack, began their break-out attempt, unaware that the British knew of their plans. The monsoon had begun and the British created two killing fields, the first for artillery (targeting twelve Japanese crossing points along the highway) and the second using aircraft (which were able to fly even in poor weather conditions) to attack those who managed to cross the road, especially between the Sittang and the Salween rivers. FOOs were used in the air and the ground. Tanks and infantry motorised and on foot, covered the gaps between the positions despite the monsoon. The Allied Patriotic Burma Forces would deal with any survivors on the east bank of the Sittang.
As such, the Japanese 55th Division ran straight into the 19th Indian Division strong point at Penwegon; tanks and infantry repelled every attack inflicting huge losses. British forward observation officers on the far side of the Sittang, continued to call down artillery fire on the Japanese as the survivors attempted to reform and move south; casualties were appalling and it was in reality a one-sided battle. The RAF had also attacked troop concentrations and river craft of all kinds; 273 Squadron and 607 Squadron had killed about 500 Japanese in the village of Hpa-An, when British and Burmese troops came in to take control.
The 600 men of the Japanese 13th Naval Guard Force broke out separate from the main body, due to confusion and ambushes and only a handful survived. On 21 July the Japanese began the last and most desperate attempt to cross the Sittang with the remaining 15,000 troops, many of whom were sick. The 54th Division having suffered heavily from cholera and dysentery, stepped off from the Pegu Yomas and crossed the flooded paddy fields to the Sittang. Every available Allied tank, gun, mortar and machine gun was at once thrown in against them and despite low clouds and heavy rains, every squadron which was able to sortie. The Thunderbolt could carry three 500-pound (230 kg) bombs and the Spitfire a 500-pound (230 kg) bomb and these played havoc among concentrations of moving Japanese troops. Many incidents occurred where RAF ground observers exposed themselves to friendly fire. A visual Controller, Flight Lieutenant J. Taylor and a corporal, were able to direct around seventeen aircraft at a time on to targets only 250 yards (230 m) from their post - both were wounded by bomb-splinters from RAF fighter-bombers. With British guns, in particular the devastation caused by the 5.5-inch, 4.5-inch and the 25-pounders already shelling the routes, the Japanese were slaughtered and this would last until the end of July.
Last Actions
Near the end of July, a last desperate offensive of the Japanese had been brought to a halt. The Japanese Fifteenth Army then stepped in to help the shattered survivors of the 28th Army. The Karen guerrillas were able to ambush hundreds of Japanese soldiers and attack elements from the Fifteenth Army. The Allied liaison organisation Force 136 operated with them and used Westland Lysanders to remove the seriously wounded, prisoners and documents and bring in urgent stores. They provided targets not only for Spitfires and Thunderbolts but called on the Beaufighters and Mosquitos of the Tactical Air Force. By 29 July, the Fifteenth Army retired, realising that the break-out was a disaster but had succeeded in at least rescuing a number of scattered groups. By the time the battle had died down only a few Japanese units made it across, having reached the Sittang by 7 August before the whole area was cleared by Allied infantry.
Aftermath
The break-out was a dismal failure and sapped Japanese morale further; the ragged elements were continually harassed by Karen guerrillas and the RAF. Messervy and Stopford described the break-out as a heroic effort and stated that most of the 660 prisoners were taken only because they were incapable of further effort, highlighting the tenacity of the Japanese soldier even when starved and disease ridden.
Of the Japanese losses the unit that suffered the lowest percentage of casualties was in the 105th Independent Mixed Brigade, of 4,173 men more than 2,000 got across the Sittang. The 13th Naval Guard Force was annihilated, with only a handful of its original 600 men escaping. A substantial number, at least 70 and perhaps more, deserted while still in the Pegu Yomas. This force suffered the heaviest casualties of any formation in this costly operation. The 54th Division had suffered huge losses, more than 5,000 were lost breaking out across the Sittang. Of the 9,000 men of the 55th division that started the break-out, fewer than 4,000 made it to the Tenasserim. Out of 18,000 men directly controlled by Twenty-eighth Army less than 6,000 in total managed to reach the east bank of the Sittang. The British and Allied forces in addition to having claimed 1,500 being sick to disease throughout the period had suffered no more than 95 men killed and 322 wounded, a small number of these coming from 'friendly fire'.
The Royal Air Force flew a total of 3,045 sorties and dropped some 750 long tons (760 t) of bombs. The loss of so many Japanese troops was largely due to British air power and artillery fire; to the soldiers that fought here they coined the battle a gunners war.
With this defeat, the Japanese Burma Area Army was reduced to an ineffective fighting force. With the majority of Burma liberated, word that Japan had surrendered on 15 August only increased the anxiety of the Japanese to get to the Tenasserim hills. They did not however wish to be immobilised on the eastern bank of the Sittang so another 2,000 more died after the battle had been fought, many in the first days of peace. It was the last big battle on land of World War II involving the Western Allies.
On 13 September 1945, the remaining units of the once formidable Japanese Burma Area Army surrendered to the British.