Samiksha Jaiswal (Editor)

Battle of the Komandorski Islands

Updated on
Edit
Like
Comment
Share on FacebookTweet on TwitterShare on LinkedInShare on Reddit
Date
  
27 March 1943

Battle of the Komandorski Islands The Battle of the Komandorski Islands The National WWII Museum Blog

1 heavy cruiser severely damaged,2 destroyers slightly damaged,7 killed,20 wounded
  
1 heavy cruiser moderately damaged,1 heavy cruiser slightly damaged,14 killed,26 wounded

Combatants
  
United States of America, Empire of Japan

Results
  
Tactically inconclusive, Strategic United States victory

Similar
  
World War II, Aleutian Islands Campaign, Pacific War, Battle off Horaniu, Battle of Attu

Battle of the komandorski islands


The Battle of the Komandorski Islands was a naval battle between American and Japanese forces which took place on 27 March 1943 in the North Pacific, south of the Soviet Komandorski Islands. The battle was a daylight surface engagement in which air support played a negligible role and in which the inferior force escaped complete destruction mostly by luck.

Contents

Battle of the Komandorski Islands USN Combat Narrative The Aleutians Campaign

Background

Battle of the Komandorski Islands USS BAILEY DD492 CHAPTER 2 THE BATTLE OF THE KOMANDORSKI ISLANDS

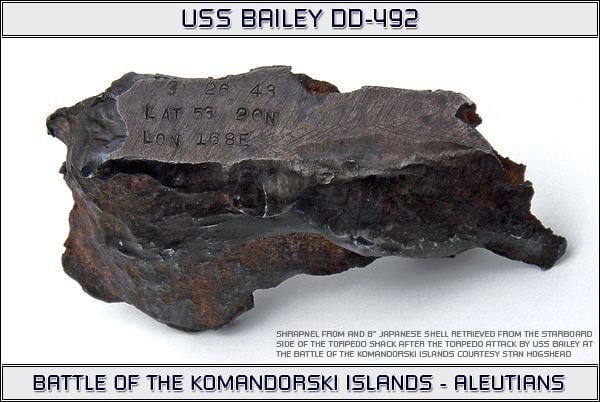
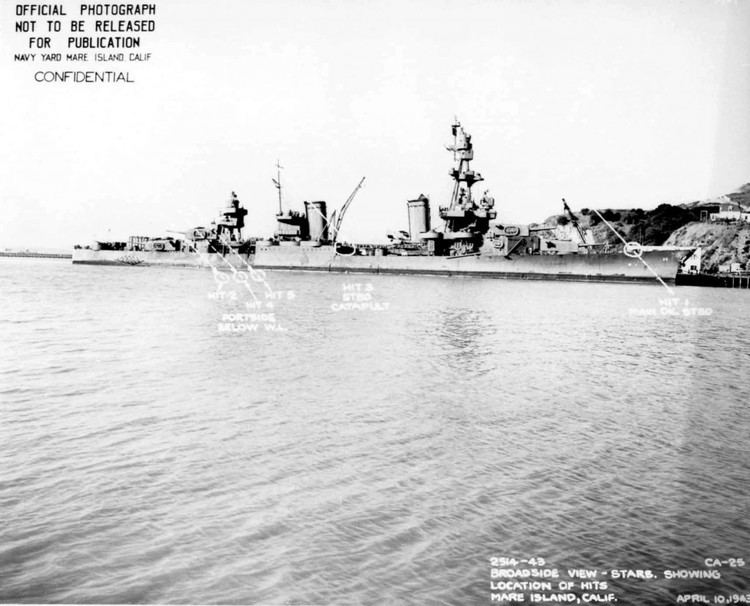
When the United States became aware of Japanese plans to send a supply convoy to their forces on the Aleutian Islands of Alaska, U.S. Navy ships commanded by Rear Admiral Charles McMorris were sent to prevent this. The fleet consisted of the heavy cruiser Salt Lake City, the light cruiser Richmond and the destroyers Coghlan, Bailey, Dale and Monaghan.

Battle of the Komandorski Islands Battle of Komandorski Island 27 March 1943 by Vincent P O39Hara

American intelligence estimated that the Japanese escort consisted of one heavy cruiser, one light cruiser, and four destroyers. However, the Japanese 5th fleet had been reinforced by two more cruisers, so that the Japanese escort force actually consisted of the heavy cruisers Nachi and Maya, the light cruisers Tama and Abukuma, and the destroyers Wakaba, Hatsushimo, Ikazuchi, and Inazuma, commanded by Vice Admiral Boshiro Hosogaya. On the early morning of 26 March, the Japanese convoy was intercepted by the American picket line some 100 miles south of the Komandorski islands and 180 miles west of Kiska, just to the west of the International Date Line. Because of the remote location of the battle and chance encounter on open ocean, neither fleet had air or submarine assistance, making this one of the few engagements exclusively between surface ships in the Pacific Theater and one of the last pure gunnery duels between fleets in naval history.

Battle of the Komandorski Islands USN Combat Narrative The Aleutians Campaign

Although the Japanese cruisers heavily outgunned the American force, the engagement was tactically inconclusive. Both fleets suffered damage, with the U.S. Navy warships escaping almost by luck. With the Japanese fleet on the edge of victory, Admiral Hosogaya — not realizing the heavy damage his ships had inflicted and fearing American war planes would appear — retired without destroying his enemy. This amounted to a strategic defeat, as it ended Japanese attempts to resupply the Aleutian garrisons by surface ship, leaving only submarines to conduct supply runs. Hosogaya was accordingly retired from active service after the battle.

Battle


  • 0600: The United States ships were formed in a scouting line at six-mile intervals zig-zagging at 15 knots on base course 020°.
  • 0730: Lead ships Coghlan and Richmond made radar contact with the two trailing Japanese transports and a destroyer on course 080° at 13 kn (15 mph; 24 km/h). A navigating officer on one of the transports visually observed the American force minutes later.
  • 0740: The Americans changed course to 080° and the rear ships increased speed to operate as a compact group. Five radar contacts were counted.
  • 0755: The Japanese turned northward to course 340° and the Americans came to course 000° to follow.
  • 0811: The Americans visually identified the radar contacts as two transports, two light cruisers, and a destroyer.
  • 0820: The Americans sighted the masts of four more Japanese ships on the horizon.
  • 0835: The Americans identified the masts as two heavy cruisers and two destroyers and turned to course 240°.
  • 0838: The Japanese transports swerved off to the northwest.
  • 0839: The Americans increased speed to 25 kn (29 mph; 46 km/h).
  • 0840: Nachi opened fire on Richmond at a range of 20,000 yd (18,000 m). The second and third salvos were straddles.
  • 0841: Richmond opened fire on Nachi. The third salvo was a straddle.
  • 0842: Salt Lake City opened fire on Nachi at a range of 21,000 yd (19,000 m). The second salvo was a straddle.
  • As the range closed, Bailey opened fire on Nachi at a range of 14,000 yd (13,000 m) and then switched to a light cruiser. Coghlan opened fire on Nachi at a range of 18,000 yd (16,000 m).

  • 0845: Nachi launched eight torpedoes. All missed.
  • 0850: One of Richmond′s 6 in (150 mm) shells hit the starboard side of Nachi′s signal bridge, killing 11 and wounding 21. Another shell hit Nachi′s mainmast and severed the flagship radio communication.
  • 0852: One of Richmond′s 6-inch shells hit Nachi′s torpedo compartment. Another of Richmond′s 6-inch shells hit Nachi′s control room, killing two and wounding five. Nachi dropped back after losing electrical power to ammunition hoists and gun mounts.
  • 0903: Richmond ceased firing. Salt Lake City continued firing from stern turrets.
  • 0910: Salt Lake City was hit by an 8 in (200 mm) projectile fired by Maya. The starboard observation plane caught fire and was jettisoned.
  • 0920: Salt Lake City was hit by an 8-inch projectile fired by Maya. Two men were killed.
  • 1010: Salt Lake City was hit by an 8-inch projectile fired by Maya.
  • 1059: Salt Lake City was hit by an 8-inch projectile fired by Maya.
  • 1103: Salt Lake City was hit by an 8-inch projectile fired by Maya. Salt Lake City transferred water to correct a list caused by flooding.
  • 1152: Salt Lake City was hit by an 8-inch projectile fired by Maya.
  • 1153: Salt water entered a fuel tank in use and extinguished Salt Lake City′s boiler fires.
  • 1154: Salt Lake City slowed to a stop. Bailey, Coghlan and Monaghan approached the Japanese cruisers for a torpedo attack while Richmond and Dale made smoke to shield Salt Lake City.
  • 1203: Salt Lake City restarted boilers and increased speed to 15 knots.
  • 1213: Salt Lake City increased speed to 22 kn (25 mph; 41 km/h).
  • 1225: Bailey launched five torpedoes at 9,500 yd (8,700 m). All missed. Bailey was hit twice by 8-inch shells and came to a stop with five dead. Coghlan was hit once.
  • 1230: Japanese ships retired westward. Neither Coghlan nor Monaghan launched torpedoes.
  • Salt Lake City fired 806 armor-piercing projectiles and then 26 high-capacity shells after the supply of armor-piercing ammunition was exhausted. Powder and shells were manhandled aft from the forward magazines to keep the after guns firing. Salt Lake City′s rudder stops were carried away, limiting her to 10° course changes.

    United States Navy

    Task Group 16.6 - RADM Charles McMorris, Commander, Task Group 16.6

  • Salt Lake City - CAPT Bertram J. Rodgers
  • Richmond - CAPT Theodore Waldschmidt (F)
  • Destroyer Squadron 14 - CAPT Ralph Riggs

  • Coghlan - CMDR Benjamin Tompkins
  • Bailey - LCDR John Atkeson (F)
  • Dale - CMDR Anthony Rorschach
  • Monaghan - LCDR Peter Horn
  • Imperial Japanese Navy

    Northern Force - VADM Boshiro Hosogaya, Commander, Fifth Fleet (Northern Force) Cruiser Division One:

  • CA Nachi - CAPT Akira Sone (F)(Myoko class)
  • CA Maya - CAPT Takeji Matsumoto
  • CL Tama - CAPT Zensuke Kanome
  • Destroyer Division 21: - CAPT Amano Shigetaka

  • DD Wakaba - LCDR Suetsugu Nobuyoshi (F)
  • DD Hatsushimo - LCDR Nittono Suzuo
  • D Convoy - RADM Tomoichi Mori, Commander, Destroyer Squadron One

  • CL Abukuma - CAPT Shiro Shibuya (F)
  • Destroyer Division Six: - CAPT Takahashi Kameshiro

  • DD Ikazuchi - LCDR Maeda Saneho
  • DD Inazuma - LCDR Terauchi Masamichi
  • Transport Asaka Maru - CAPT Sakuma Takeo
  • Transport Sakito Maru
  • 2nd Escort Force

  • DD Usugumo (not engaged in the battle) - LCDR Ikeda Shunsaku
  • Transport Sanko Maru
  • References

    Battle of the Komandorski Islands Wikipedia


    Similar Topics