
1 division 1 regiment Result German victory | ||
Similar World War I, Battle of Messines, Battle of Passchendaele, First Battle of Ypres, Second Battle of Ypres | ||
The battle of hill 60 lunatic persistence in gallipoli i the great war week 57
The Battle of Hill 60 (17 April – 7 May 1915) took place near Hill 60 south of Ypres on the Western Front, during the First World War. Hill 60 had been captured by the German 30th Division on 11 November 1914, during the First Battle of Ypres (19 October – 22 November 1914). Initial French preparations to raid the hill were continued by the British 28th Division, which took over the line in February 1915 and then by the 5th Division. The plan was expanded into an ambitious attempt to capture the hill, despite advice that Hill 60 could not be held unless the Caterpillar nearby was also occupied. It was found that Hill 60 was the only place in the area not waterlogged and a French 3 ft × 2 ft (0.91 m × 0.61 m) mine gallery was extended.
Contents
- The battle of hill 60 lunatic persistence in gallipoli i the great war week 57
- TopographyEdit
- Strategic developmentsEdit
- British offensive preparationsEdit
- 1722 AprilEdit
- 17 MayEdit
- Air operationsEdit
- AnalysisEdit
- CasualtiesEdit
- Subsequent operationsEdit
- Victoria CrossEdit
- References
Experienced miners from Northumberland and Wales were recruited for the digging and the British attack began on 17 April 1915. The hill was captured quickly with only seven casualties but then it was found that the salient which had been created, made occupation of the hill very costly. Both sides mistakenly accused the other of using poison gas in the April fighting; German attacks on the hill in early May included the use of gas shells and the Germans recovered the ground at the second attempt on 5 May. It remained in German hands until the Battle of Messines in 1917, when two of the Mines in the Battle of Messines were detonated beneath Hill 60 and the Caterpillar.
TopographyEdit

The ground south of Zillebeke rises for 2,000 yd (1,800 m) to a ridge between Zwarteleen and Zandvoorde. Roads ran north-west to south-east through the area from Ypres to Verbrandenmoelen and Hollebeke and from Zillebeke to Zwartelen and Zandvoorde. The Ypres–Comines railway ran roughly parallel to the roads from Ypres and 600 yd (550 m) from Zillebeke, went through a cutting 15–20 ft (4.6–6.1 m) deep, which extended beyond the crest of the ridge. Earth excavated when the railway was built had been dumped on either side, to form small hillocks. Two were on the west side, one a long irregular mound atop the ridge called the Caterpillar and a smaller mound 300 yd (270 m) down the slope towards Zillebeke, known as the Dump. On the east side of the cutting, on the highest point of the ridge, was a third mound known as Hill 60, from which observers had an excellent view of the ground around Zillebeke and Ypres.
Strategic developmentsEdit
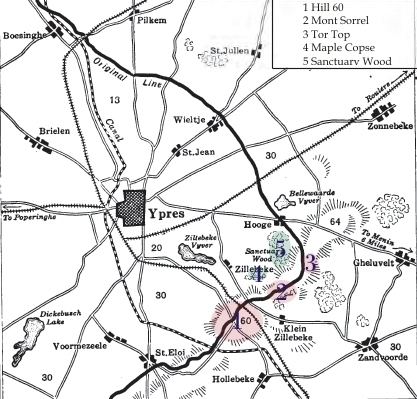
Hill 60 was a spoil heap 750 ft (230 m) long and 150 ft (46 m) high, made from the diggings of a cutting for the Ypres–Comines railway. The hill formed a low rise on the crest of Ypres ridge, at the southern flank of the Ypres Salient and was named after the contour which marked its boundary. The hill had been captured on 11 November 1914, by the German 30th Division, during fighting against a mixed force of French and British infantry and cavalry, in the First Battle of Ypres. Observation from the hill towards Ypres and Zillebeke was coveted by both sides, for the duration of the war. Hill 60 and the vicinity were held by Saxon Infantry Regiment 105 of the 30th Division, which with the 39th Division formed XV Corps of the 4th Army, at the time of the British attack.
British offensive preparationsEdit
In the first British operation of its kind, Royal Engineer tunnelling companies laid six mines by 10 April 1915, an operation planned by Major-General Edward Bulfin, commander of the 28th Division and continued by the 5th Division when the 28th Division was relieved. The 173rd Tunnelling Company began work early in March and three tunnels were begun towards the German line, about 50 yd (46 m) away, a pit first having been dug some 16 ft (4.9 m) deep. By the time the work was finished, the tunnels stretched more than 100 yd (91 m). Two mines in the north were charged with 2,000 pounds (910 kg) of explosives each, two mines in the centre had 2,700 pounds (1,200 kg) charges and in the south one mine was packed with 500 pounds (230 kg) of guncotton, although work on it had been stopped when it ran close to a German tunnel. The locality was photographed from the air, which revealed German gun emplacements and entrenchments. On 16 April, British artillery was ranged by air observers onto the approaches to Hill 60, ready for the attack. British infantry began to assemble after dark and 1 Squadron Royal Flying Corps (RFC) was made responsible for keeping German aircraft away from the area.
17–22 AprilEdit
On 17 April at 7:05 p.m., the first pair of mines were blown and the rest ten seconds later. Débris was flung almost 300 ft (91 m) into the air and scattered for 300 yd (270 m) in all directions, causing some casualties to the attacking battalions of the 13th Brigade of the 5th Division. The German garrison, a company of Saxon Infantry Regiment 105, was devastated and the survivors overwhelmed, those capable of resistance being bayonetted; twenty Germans were taken prisoner for a British loss of seven casualties. The British began to consolidate and by 12:30 a.m., had dug two communication trenches to connect the new positions to the old front line. German artillery-fire gradually increased on the hill, after falling around it for some time and at around 4:00 a.m. on 18 April, three German counter-attacks began which were repelled with many losses. German high explosive and gas shells and machine-gun fire in enfilade from Zandvorde and the Caterpillar, forced the British back to the crest, except on the right flank, where they were forced further back. German attacks continued all day on 18 April but at 6:00 p.m., a counter-attack by two British battalions retook all of the hill. Before dawn on 19 April, most of the 13th Brigade was relieved by the 15th Brigade. The Germans maintained a heavy bombardment of the hill and on 20 April, attacked again mainly with bombing parties, before infantry assaults were attempted at 6:30 and 8:00 p.m. German attacks continued into 21 April, by when the hill had become a moonscape of overlapping shell-holes and mine craters. The divisions of II Corps and V Corps simulated attack preparations on 21 April but on 22 April, British attention was diverted further north, where the French 45th Division was struck by the first German gas attack of the Second Battle of Ypres.
1–7 MayEdit
Hill 60 was retaken by the Germans following a series of gas attacks from 1–5 May. On 1 May, a German attack preceded by a chlorine gas discharge failed for the first time; after a bombardment by heavy artillery, the Germans released the gas at 7:00 p.m. from positions fewer than 100 yd (91 m) away from Hill 60, on a front of 0.25-mile (0.40 km). The gas arrived so quickly that most of the British troops were unable to put on their improvised respirators. As soon the gas reached the British positions, the Germans attacked from the flanks with bombing parties, as artillery laid a barrage on the British approaches to the hill. Some of the British garrison were able to return fire, which gave enough time for reinforcements to arrive, after rushing through the gas cloud. The German infantry were forestalled and bombing parties forced them back. The original garrison suffered severely for holding on despite the gas and lost many casualties.
The 15th Brigade held the hill and about 1.25 miles (2.01 km) of the line on either side, when the Germans discharged gas from two places opposite the hill at 8:45 a.m. on 5 May. The wind blew the gas along rather than across the British defences and only one sentry was able to sound the gas alarm. The British defence plan required troops under gas attack to move to the flanks but the course of the gas cloud made this impossible. The gas hung so thick that even after re-damping cotton respirators, it was impossible to remain in the trenches and those troops who stood their ground were overcome. German infantry of the 30th Division advanced fifteen minutes after the gas cloud and occupied nearly all of the front line on the lower slope of the hill. British reinforcements arrived and bombed their way up a communication trench and two more battalions were sent up; before they arrived, the Germans released more gas at 11:00 a.m. to the north-east of the hill.
The right flank of the British defence at the Zwarteleen salient was overwhelmed, which increased the gap left by the first discharge; enough men on the left survived to pin the German infantry down until 12:30 p.m., when a battalion arrived after advancing through the gas cloud and an artillery barrage. Constant counter-attacks forced some of the Germans back and regained several lost trenches. The Germans held on to the crest and released more gas at 7:00 p.m., which had little effect and an infantry attack which followed was repulsed by rifle-fire. At 9:00 p.m., the 13th Brigade arrived with orders from Major-General Morland, the 5th Division commander to retake the hill. The brigade attacked at 10:00 p.m. after a twenty-minute bombardment but found that the darkness, broken state of the ground and alert German infantry made it impossible to advance, except for one party which reached the top of the hill, only to be forced to withdraw at 1:00 a.m. by enfilade-fire from the Caterpillar and Zwarteleen. The hill was untenable unless the Caterpillar a considerable amount of ground on the flanks was also occupied; both sides were exhausted and spent the next day digging-in. At dawn on 7 May, the British attacked the hill with two companies of infantry and attached bombers using hand grenades, all of whom were killed or captured.
Air operationsEdit
No. 1 Squadron began standing patrols on 17 April at 4:30 a.m. with Avro 504s and B.E.8s, to cover the front between Kemmel Hill and Ypres until 7:15 p.m. No German aircraft were able to interfere and surprise was ensured; British artillery began a counter-battery bombardment when the attack began and one pilot was able to identify camouflaged German guns by flash-spotting. By the morning of 18 April, British troops had been pushed back to the near slope but a wireless and signal light station had been established at the headquarters of the 5th Division, to which air observers could report direct. British fighters drove away German aircraft which tried to operate over the battlefield and during the evening the crest was recaptured. 1 Squadron had eight aircraft over the hill at 6:00 p.m. to flash spot and discovered 33 guns; on 19 April, British artillery bombarded the areas where the guns had been seen, while aircraft patrolled the area and noted that the German guns were far less active.
Next day, 1 Squadron searched for a German battery firing on trenches on the hill and located the battery which ceased fire and on 21 April, more German guns were suppressed by artillery-fire directed from the air. German attacks diminished until 1 May, when an aircraft flying towards Hill 60 caused the German artillery to cease fire as soon as it arrived, until 7:15 a.m. when failing light forced the crew to return, at which the German artillery resumed the bombardment until a German infantry attack, which was repulsed. On 5 May, the Germans attacked again and captured the crest, then held it against British counter-attacks. On 6 May, 1 Squadron conducted a photographic reconnaissance before another attack and quickly delivered them to the commander of the attacking battalion; the attack failed and operations were ended.
AnalysisEdit
The German army had been waiting for favourable weather to use gas in an attack at Ypres and used the fighting at Hill 60, to lay blame on the British for being the first to use gas, after the British mistakenly accused the Germans. Doubts among some of the British commanders, as to the tactical wisdom of converting a raid into an attack intended to retain the hill, were borne out by the cost of holding the hill and its loss, as soon as the Germans had the opportunity to launch an organised counter-attack (Gegenangriff). Both sides alleged that their opponent had used gas; the Germans had dug in gas cylinders along the XV Corps front, including Hill 60 and feared that some of the cylinders had fallen into British hands. The British noticed the presence of gas but attributed it to gas shells, which were not fired onto the hill by the Germans until 20 April. The German Official History Der Weltkrieg, recorded that the British used new sapper detachments to prepare the attack on Hill 60 and that on 18 April, Saxon troops had recaptured the hill except for the craters, where the attack failed because new chemical shells (T-Geschosse) had been ineffective. The hill was re-captured by the Germans on 5 May and skirmishing continued until 7 May.
CasualtiesEdit
In the attack on 7 April, the British lost only seven casualties. On 1 May, the 1st Dorsets lost over 90 men to gas poisoning; 207 were brought to dressing stations where 46 men died immediately and another twelve men died later; the battalion had only 72 survivors. The 1st Bedfords suffered similarly, having recently taken on many fresh and inexperienced replacements. Of 2,413 British casualties admitted to hospital 227 men died. The 13th Brigade casualties from 17–19 April were 1,362 men and the 15th Brigade lost 1,586 casualties from 1–7 May, out of the 5th Division total of 3,100 losses.
Subsequent operationsEdit
Deep mining under the German galleries beneath Hill 60 began in late August 1915 with the 175th Tunnelling Company which began a gallery 220 yd (200 m) behind the British front line and passed 90 ft (27 m) beneath. The 3rd Canadian Tunnelling Company took over in April 1916 and completed the galleries, the Hill 60 mine being charged with 53,300 pounds (24,200 kg) of explosives in July 1916 and a branch gallery under the Caterpillar filled with a 70,000-pound (32,000 kg) charge in October. The 1st Australian Tunnelling Company took over in November 1916, led in part by Captain Oliver Woodward and maintained the mines over the winter. At 3:10 a.m. on 7 June 1917, a series of mines filled with 990,000 pounds (450,000 kg) of explosives, were detonated under the German lines. Although several British mines were in the end not fired, the blasts created one of the largest explosions in history, reportedly heard in London and Dublin, demolishing a large part of the hill and killing c. 10,000 German soldiers.
The Battle of Messines (7–14 June 1917) was conducted by the British Second Army, under the command of General Herbert Plumer, on the Western Front near the village of Messines. The offensive forced the German army to move reserves to Flanders from the Arras and Aisne fronts, which relieved pressure on the French. The tactical objective of the attack at Messines was to capture the German defences on the ridge, which ran from Ploegsteert (Plugstreet) Wood in the south through Messines and Wytschaete to Mt. Sorrel, to deprive the 4th Army of the high ground south of Ypres. The ridge commanded the British defences and back areas further north, from which the British intended to conduct the Northern Operation to advance to Passchendaele Ridge, then capture the Belgian coast up to the Dutch frontier.
The 47th and 23rd Divisions formed the left defensive flank of the attack, advancing onto the ridge around the Ypres–Comines canal and railway, past the mines at Caterpillar and Hill 60. The cuttings of the canal and railway were a warren of German dug-outs but the 47th Division crossed the 300 yd (270 m) of the German front position in 15 minutes, close up to the creeping barrage, German infantry surrendering along the way. Soft ground in the valley south of Mt. Sorrel, led the two infantry brigades of the 23rd Division to advance on either side, up to the near crest of the ridge, arriving while the ground still shook from the mines at Hill 60. North of the canal, the 47th Division had to capture a spoil heap 400 yd (370 m) long, where several German machine-gun nests had been dug in. The British attacks established a footing on the heap at great cost, due to machine-gun fire from the spoil heap and others in Battle Wood further north. The 23rd Division had many casualties caused by flanking machine-gun fire from the spoil heap while clearing Battle Wood, which took until the evening.