
Date 28 August 1914 | Result British victory | |
 | ||
5 battlecruisers8 light cruisers33 destroyers8 submarines 6 light cruisers19 torpedo boats12 minesweepers 35 killed55 wounded1 light cruiser heavily damaged3 destroyers damaged 712 killed149 wounded336 captured3 light cruisers sunk2 torpedo boats sunk1 destroyer sunk3 destroyers heavily damaged1 light cruiser heavily damaged2 light cruisers moderately damaged Similar World War I, Battle of Dogger Bank, Battle of Coronel, Battle of the Falkland I, Raid on Scarborough - Hartlepoo | ||
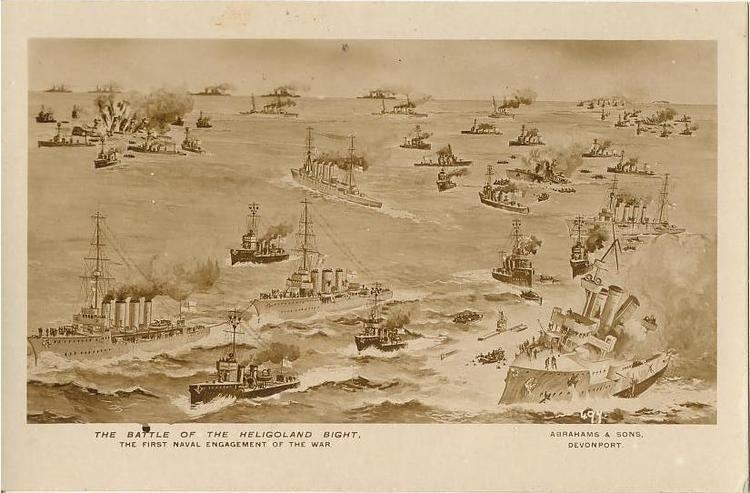
The First Battle of Heligoland Bight was the first naval battle of the First World War, fought on 28 August 1914, between the United Kingdom and Germany. The battle took place in the south-eastern North Sea when the British attacked German patrols off the north-west German coast.
Contents
- Prelude
- Plan of attack
- Battle
- Confusion of ships
- Actions with German cruisers
- Battlecruisers
- Analysis
- Casualties
- References
The German High Seas Fleet remained largely in safe harbours on the north German coast while the British Grand Fleet remained in the northern North Sea. Both sides engaged in long-distance sorties with cruisers and battlecruisers, and close reconnaissance of the area of sea near the German coast—the Heligoland Bight—by destroyer. The British devised a plan to ambush German destroyers on their daily patrols. A British fleet of 31 destroyers and two cruisers under Commodore Reginald Tyrwhitt and submarines commanded by Commodore Roger Keyes was dispatched. They were supported at longer range by an additional six light cruisers commanded by William Goodenough, and five battlecruisers commanded by Vice Admiral David Beatty.
Three German light cruisers and one destroyer were sunk. Three more light cruisers were damaged, 712 sailors killed, 530 injured and 336 taken prisoner. The British suffered one light cruiser and three destroyers damaged, 35 killed and 40 wounded. The battle was regarded as a great victory in Britain, where the returning ships were met by cheering crowds. Publicly, Vice Admiral Beatty was regarded as a hero, although he had taken little part in the action or planning of the raid, which was led by Commodore Tyrwhitt and conceived by himself and Keyes, who had persuaded the Admiralty to adopt it. However, the raid might have led to disaster had the additional forces under Beatty not been sent by Admiral John Jellicoe at the last minute.
The effect upon the German government and in particular the Kaiser was to restrict the freedom of action of the German fleet, instructing it to remain in port and avoid any contact with superior forces for several months thereafter.
Prelude
The battle took place less than a month after Britain's declaration of war against Germany on 5 August 1914. Initially, the war on land went badly for the French and their allies, with German forces invading France and an urgent need to gather all possible troops to send to France to resist them. The British government was in a position of having nothing but bad news, and looked to the navy, the largest in the world and traditionally the mainstay of British military power, for some success to report. British naval tactics had typically involved a close blockade of enemy ports, taking the fight to the enemy, and this had been the British plan for war against Germany up to 1913. Such an approach was still expected by the British population. However, it was realised that the advent of submarines armed with torpedoes and mines hidden in open sea meant that any operations involving stationing capital ships near enemy ports would place them at great risk of surprise attack and loss. Then, there was the issue of fuel for the ships: traditional sail-powered ships did not need refuelling but powered ships, obliged to keep moving to reduce their vulnerability as sitting targets, were continuously using fuel and had to return to port every few days.
The German fleet had expected that Britain would adopt its traditional approach, and had prepared by investing in submarines and coastal defences. The main body of the German navy—the High Seas Fleet—was smaller than the British Grand Fleet stationed around home waters and could not expect victory in a head to head fight. It therefore adopted a strategy of waiting in defended home ports for opportunities to attack the larger British force when the anticipated attack came. The British, appreciating this situation chose to adopt a strategy of patrolling the North Sea rather than waters close to Germany. Any German ships seeking to leave their home ports on the German coast must either pass the 20 mi (17 nmi; 32 km)-wide Straits of Dover, defended by British submarines and mines, or the North Sea, where the British fleet was stationed around its main wartime base at Scapa Flow in Scotland, defending the 200 mi (170 nmi; 320 km)-wide narrowest point between Britain and Norway. This led to a stand off, with neither fleet doing more than hold the other endlessly waiting. The German ships were contained in an area where they could not attack merchant shipping arriving on the west of Britain, which was vital for British survival. To encourage the German fleet to stay at home, the British would make occasional forays with the Grand Fleet and patrol with smaller cruiser and battlecruiser squadrons.
The bulk of the British Expeditionary Force was transported to France between 12 and 21 August. This operation was protected from German attack by British destroyers and submarines patrolling Heligoland Bight, which German ships would have to cross when leaving their home ports. The Grand Fleet remained in the centre of the North Sea ready to move south should any German attack commence, but none came. Although the German army had anticipated a rapid transfer of the British army to aid France, German naval planning had anticipated it would take longer for the British to organise. Thus they were caught by surprise when it commenced, with submarines which might have been ordered to attack the British transports away on patrols seeking the main British fleet.
Plan of attack
Two British officers believed they had determined an opening to carry the war to the German fleet. Commodore Roger Keyes commanded a squadron of long-range submarines that regularly patrolled Heligoland Bight, while Commodore Reginald Tyrwhitt commanded a destroyer patrol, both operating from Harwich. They observed that German destroyers had adopted a regular pattern of patrols where each evening cruisers would escort out destroyers, which would patrol for British ships during the night before being met and escorted home each morning. Their idea was to send in a superior force during darkness to catch the German destroyers as they returned. Three British submarines would surface in a position to draw the destroyers back out to sea while a larger British force of 31 destroyers accompanied by nine submarines would cut them off from Germany. Other submarines would wait for any larger German ships leaving the Jade estuary to help. Keyes impressed First Lord of the Admiralty Winston Churchill by the daring of his plan, which was adopted but not without changes. An attack at 08:00 on the German daytime patrol was preferred. Keyes and Tyrwhitt requested support for their operation, in particular bringing the Grand Fleet south and the support of the squadron of six light cruisers commanded by Commodore William Goodenough. This was refused by the Chief of Staff—Vice Admiral Doveton Sturdee—who instead agreed to place only lighter forces; "Cruiser Force K" under Rear Admiral Gordon Moore consisting of two battlecruisers HMS New Zealand and Invincible 40 mi (35 nmi; 64 km) to the northwest, and "Cruiser Force C" a squadron of five Cressy-class armoured cruisers—HMS Cressy, Aboukir, Bacchante, Hogue and Euryalus—100 mi (87 nmi; 160 km) west.
It was decided that the attack would take place on 28 August. The submarines were to leave to take up their positions on 26 August, while Keyes would travel on the destroyer Lurcher. The surface ships would depart at dawn on 27 August. Tyrwhitt—aboard the brand new light cruiser HMS Arethusa—would command the 3rd Flotilla of 16 modern L-class destroyers, whilst his subordinate, Captain William F. Blunt—aboard the light cruiser HMS Fearless—would command the 1st Flotilla of 16 older destroyers. Tyrwhitt had for some time been requesting replacement of his previous cruiser HMS Amethyst because she was too slow to keep up with his destroyers, but Arethusa did not arrive until 26 August. Her crew were inexperienced, and it was discovered that her new 4 in (100 mm) Mk V guns jammed when fired.
Although the plan had been agreed by the Admiralty, Admiral John Jellicoe commanding the Grand Fleet was not informed until 26 August. Jellicoe immediately requested permission to send reinforcements to join the raid and to move the fleet closer to the action, but received permission only to send battle cruisers in support. He dispatched Vice Admiral David Beatty with the battlecruisers HMS Lion, Queen Mary and Princess Royal, and Goodenough with the 1st Light Cruiser Squadron, made up of the light cruisers HMS Southampton, Birmingham, Falmouth, Liverpool, Lowestoft and Nottingham. He then sailed south from Scapa Flow with the remainder of the fleet. Jellicoe despatched a message advising Tyrwhitt that he should expect reinforcements, but this was delayed at Harwich and never received. Tyrwhitt did not discover the additional forces until Goodenough's ships appeared through the mist, leading to immediate concern whether they were friend or foe at a time when he was expecting to meet only enemy vessels. Eight British submarines were deployed. E-class submarines HMS E4, E5 and E9 were ordered to attack reinforcing or retreating German vessels. HMS E6, E7 and E8 were positioned 4 mi (3.5 nmi; 6.4 km) further out to draw the German destroyers out to sea. HMS D2 and D8 were stationed off the river Ems to attack reinforcements should they come from that direction.
Battle
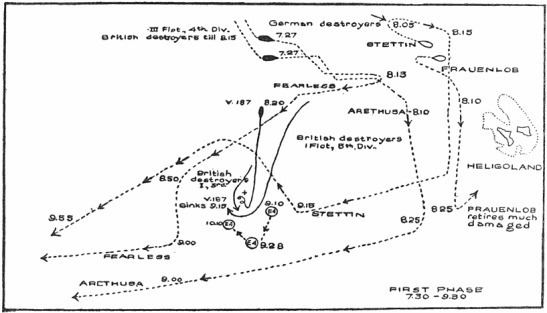
At around 07:00, Arethusa, steaming south towards the anticipated position of the German ships, sighted a German destroyer, G-194. Accompanying Arethusa were the 16 destroyers of the 3rd Flotilla. 2 mi (1.7 nmi; 3.2 km) behind were Fearless with the 1st Flotilla of 16 destroyers, and 8 mi (7.0 nmi; 13 km) behind them Goodenough with his six cruisers. Visibility was no more than 3 mi (2.6 nmi; 4.8 km). G-194 immediately turned towards Heligoland, radioing Rear Admiral Leberecht Maass, commander of the German destroyer squadron. Maass informed Rear Admiral Franz Hipper who commanded the German battlecruiser squadron, and who was responsible for local defence. Hipper was unaware of the scale of the attack, but ordered the light cruisers SMS Stettin and Frauenlob to defend the destroyers. Six other light cruisers were ordered to raise steam and join the defense as soon as they could: SMS Mainz moored on the river Ems; SMS Strassburg, Cöln, Ariadne, Stralsund and Kolberg from the river Jade; Danzig and München from Brunsbüttelkoog on the river Elbe.
Tyrwhitt ordered four destroyers to detach and attack G-194. The sound of firing alerted the remaining German destroyers, who had been moving north, but turned south towards home. Before they could complete the turn, they were sighted by British destroyers who commenced firing. The trailing destroyer V-1 was hit, followed by the destroyer-minesweepers D-8 and T-33. G-9 called for fire against the attacking ships from coastal artillery, but the mist meant the artillery were unable to determine which ships were which. At 07:26, Tyrwhitt turned east, attempting to follow the sound of gunfire and his four destroyers. He sighted 10 German destroyers which he chased through increasing mist for 30 minutes until the ships reached Heligoland and he was forced to turn away. At 07:58, Stettin and Frauenlob arrived, reversing the situation so that the British destroyers were obliged to retreat toward their own cruisers Arethusa and Fearless. Stettin withdrew, since the German destroyers had now escaped, but Frauenlob was engaged by Arethusa. While Arethusa was theoretically the better armed ship, two of her four 4 in (100 mm) guns were jammed, while another was damaged by fire. Frauenlob—armed with ten 10.5 cm (4.1 in) guns—was able to cause considerable damage before a shell from one of Arethusa's two 6 in (150 mm) guns destroyed her bridge, killing 37 men including the captain, and forcing her to withdraw. Although badly damaged, she returned to Wilhelmshaven.
At 08:12, Tyrwhitt returned to the original plan, which was to sweep across the area from east to west. Six returning German destroyers were sighted but turned to flee, when one—V-187—turned back. The German ship had seen two cruisers, Nottingham and Lowestoft from Goodenough's squadron ahead of her and turned back in the hope of passing through the British destroyers by surprise. This was partially successful, but V-187 was surrounded by eight destroyers and sunk. As British ships attempted to rescue survivors from the water, the German light cruiser Stettin approached and opened fire, forcing the British to abandon the rescue, leaving behind British sailors. The British submarine E4 had observed the action and launched a torpedo at Stettin, but missed. Stettin attempted to ram the submarine, which dived to escape. When she resurfaced all the larger ships had gone, and the submarine rescued the British crewmen, still afloat in small boats together with German sailors. The Germans were left behind with a compass and direction toward the mainland as the submarine was too small to take them.
Confusion of ships
At 08:15, Keyes—with Lurcher and another destroyer—sighted two four-funnelled cruisers. Still unaware that any additional British ships had been sent to support the action, he signalled Invincible that he was chasing two German cruisers. Goodenough received the signal and abandoning his own search for enemy vessels to attack, steamed to assist Keyes against his own ships, Lowestoft and Nottingham. Keyes, seeing he was now being chased by four more enemy cruisers attempted to lead them towards Invincible and New Zealand, reporting them as enemy ships. Eventually, Keyes recognised Southampton, and the ships attempted to rejoin Tyrwhitt. However, the danger to Goodenough's ships was not over, since the British submarines were still unaware the additional ships were present. At 09:30, one of the British submarines attacked Southampton with two torpedoes, missing and in turn escaping when Southampton tried to ram. Lowestoft and Nottingham remained out of communication range, and separated from the rest of their squadron took no further part in the action.
Tyrwhitt turned back to assist Keyes on receipt of the signal that he was being chased. He sighted Stettin, but lost her in the mist before coming upon Fearless and her destroyer squadron. Arethusa was badly damaged, so at 10:17 Fearless came alongside and both cruisers were stopped for 20 minutes while repairs were made to the boilers.
Actions with German cruisers
By now, Cöln, Strassburg and Ariadne had sailed from Wilhelmshaven to join the German defence, while Mainz was approaching from a different direction. Admiral Maass was still unaware of the nature of the attack, so he spread his ships in search of the enemy. Strassburg was first to find Arethusa and attacked with shells and torpedoes, but was driven off by torpedo attacks from the destroyers. As Tyrwhitt turned away to the west, Cöln—with Admiral Maass—approached from the south-east, and was also chased away by torpedoes. Tyrwhitt signalled Beatty requesting reinforcements, and Goodenough with the four cruisers remaining with him came to assist. The force turned west.
Beatty had been following the events by radio 40 mi (35 nmi; 64 km) to the north-west. By 11:35, the British ships had still not completed their mission and withdrawn and with the rising tide larger German ships would be able to leave harbour and join the engagement. He decided to intervene and took his five battlecruisers south-east at maximum speed, an hour away from the engagement. While the advantages of using his more powerful ships to rescue the others was clear, this had to be weighed against the possibility of mischance by torpedo or of meeting German dreadnoughts once the tide permitted them to sail and losing one or more of the important battlecruisers.
At 11:30, Tyrwhitt's squadron came upon another German cruiser, Mainz and the ships engaged for 20 minutes, before the arrival of Goodenough caused Mainz to attempt an escape. Goodenough gave chase and in trying to lose him, Mainz came back across the path of Arethusa and her destroyers. Her steering was damaged, causing her to turn back into the path of Goodenough's ships and she was hit by shells and torpedo. At 12:20, her captain ordered his ship to be scuttled and the crew to abandon ship. Keyes had now joined the main body of ships and brought Lurcher alongside Mainz to take off the crew. Three British destroyers had been seriously damaged in the engagement.
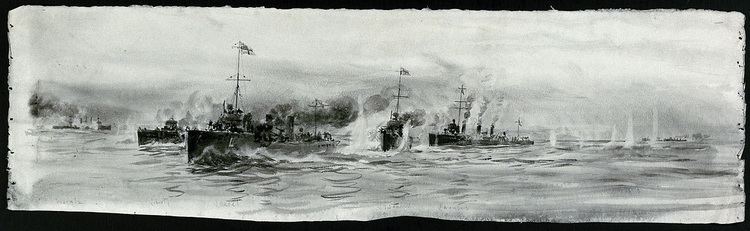
Strassburg and Cöln now attacked together, but the battle was interrupted by the further arrival of Beatty and the battlecruisers. An officer on one of the destroyers wrote
There straight ahead of us in lovely procession, like elephants walking through a pack of ... dogs came Lion, Queen Mary, Princess Royal, Invincible and New Zealand ...How solid they looked, how utterly earthquaking. We pointed out our latest aggressor to them ... and we went west while they went east ... and just a little later we heard the thunder of their guns.
Battlecruisers
Strassburg managed to disengage and escape when the battlecruisers approached but Cöln was not so fortunate. Cut off from escape she was quickly disabled by the much larger guns of the battlecruisers. She was saved from immediate sinking by the sighting of another German light cruiser, Ariadne, to which Beatty gave chase and again quickly overcame. Ariadne was left to sink, which she eventually did at 15:00, attended by the German ships Danzig and Stralsund who took off survivors. At 13:10, Beatty turned north-west and ordered all the British ships to withdraw, since the tide had now risen sufficiently for larger German ships to pass out through the Jade estuary. Passing Cöln again, he opened fire, sinking her. Attempts to rescue the crew were interrupted by the arrival of a submarine; one survivor was rescued by a German ship two days later out of some 250 who had survived the sinking. Rear Admiral Maass perished with his ship.
Four German cruisers survived the engagement, which they would not have done except for the mist. Strassburg nearly approached the battlecruisers but saw them in time and turned away. She had four funnels, like the British Town-class cruisers, which caused sufficient confusion to allow her time to disappear into the mist. The German battlecruisers Moltke and Von der Tann left the Jade at 14:10 and began a cautious search for other ships. Rear Admiral Hipper arrived with Seydlitz at 15:10, but by then the battle was over.
Analysis
The most significant result of the battle was the effect on the attitude of the Kaiser. To preserve his ships the Kaiser determined that the fleet should, "hold itself back and avoid actions which can lead to greater losses". Admiral Pohl, Chief of the German Naval Staff, wired Ingenohl that, "in his anxiety to preserve the fleet [William] ... wished you to wire for his consent before entering a decisive action". Tirpitz was outraged by this decision. He wrote after the war, "The Emperor did not wish for losses of this sort ... Orders [were] issued by the Emperor ... after an audience with Pohl, to which I as usual was not summoned, to restrict the initiative of the Commander-in-Chief of the North Sea Fleet. The loss of ships was to be avoided; fleet sallies and any greater undertakings must be approved by His Majesty in advance. I took the first opportunity to explain to the Emperor the fundamental error of such a muzzling policy. This step had no success, but on the contrary there sprang up from that day forth an estrangement between the Emperor and myself which steadily increased."
After the war, Churchill wrote
All they saw was that the British did not hesitate to hazard their greatest vessels as well as their light craft in the most daring offensive action and had escaped apparently unscathed. They felt as we should have felt had German destroyers broken into the Solent and their battle cruisers penetrated as far as the Nab. The results of this action were far-reaching. Henceforward, the weight of British Naval prestige lay heavy across all German sea enterprise ... The German Navy was indeed "muzzled". Except for furtive movements by individual submarines and minelayers, not a dog stirred from August till November.
The Germans knew nothing of our defective staff work or the risks we had run.
One of the officers present on Southampton—Lieutenant Stephen King-Hall—later wrote about the battle that
As may be deduced from these extracts the staff work was almost criminally negligent and it was a near miracle that we did not sink one or more of our submarines or that one of them did not sink us. Furthermore if anyone had suggested, say in 1917, that our battle-cruisers should rush about without anti-submarine protection and hundreds of miles away from the battle fleet in a mine infested area a few miles from the German battle fleet, he would have been certified on the spot.
It was precisely because on paper the presence of the battle-cruisers (unsupported) was absurd that the logical Germans were sitting in Wilhelmshafen unable to move because the tide was too low on the bar of the Jade river!
I should like to be able to write that this important hydrographical circumstance was part of the plan, but it was only discovered long afterwards.
Nevertheless the strategical and indeed political consequences of this affair were of great importance.
The German Navy was manned by a personnel no less courageous and at least as well trained as our own; their ships were superior type for type; their gunnery was more accurate. Yet in the mind of every German seaman was the reflection that they were challenging the might of a navy which, by and large, had dominated the seas for four centuries. The German seaman had a respect and almost traditional veneration for the British Royal navy, and entered the war with an inferiority complex in striking contrast to the superiority complex which the German Army felt towards all other armies.
Both sides had lessons to learn from the battle. The Germans had assumed that their cruisers, leaving port one by one, would not meet larger ships or major forces. They failed to keep their ships together so they might have better odds in any engagement. Beatty—when faced with the choice of leaving one of his ships to finish off disabled enemies—had elected to keep his squadron together and only later return in force to finish off those ships. Goodenough, on the other hand, had managed to lose track of two cruisers, which therefore played no further part in the battle.
German light cruisers armed with larger numbers of faster firing 10.5 cm (4.1 in) guns proved inferior to similar British cruisers with fewer but more powerful 6 in (150 mm) guns. However, their ships proved difficult to sink despite severe damage and impressed the British with the quality of their firing. Both British and German sources reported the determination and bravery of the defeated German ships when overwhelmed.
No one reported the presence of British cruisers to Admiral Hipper until 14:35. Had he known, he could have brought his own battlecruisers to sea faster and consolidated his fleet, possibly preventing the German losses and instead inflicting some on the departing British ships. The British operation had dragged out longer than anticipated so that the large German ships would have had sufficient high water to join the battle.
The British side also suffered from poor communications, with ships failing to report engagement with the enemy to each other. The initial failure to include Jellicoe in planning the raid could have led to disaster had he not sent reinforcements, although the subsequent communications failures which meant British ships were unaware of the new arrivals could then have led to British ships attacking each other. There was no way to warn off British submarines which might have targeted their own ships. It had been the decision of Admiral Sturdee—Admiralty Chief of Staff—not to inform Jellicoe and also not to send additional larger ships which had originally been requested by Keyes. Jellicoe in effect countermanded this decision once he knew of the raid by sending ships which were part of his command. Keyes was disappointed that the opportunity for a greater success had been lost by not including the additional cruisers properly into the plan as he had originally intended. Jellicoe was disturbed by the Admiralty failure to discuss the raid with their commander in chief of the fleet at sea.
The Germans appreciated that constant patrols by destroyers was both wasteful of time and resources of those ships, and left them open to attack. Instead, they designed defensive minefields to prevent enemy ships approaching and freed up the destroyers for duties escorting larger ships. In the future, ships were never to be sent out one by one. The British realised it was foolish to have sent Arethusa into battle with inadequate training and jammed guns. British ships were criticised for having fired considerable ammunition and torpedoes with little effect: this criticism later proved counter-productive when at the Battle of Dogger Bank, ships became excessively cautious of wasting ammunition and thus missed opportunities to damage enemy vessels.
Casualties
Germany lost the light cruisers Mainz, Köln and Ariadne and the destroyer V-187 sunk. The light cruisers Frauenlob, Strassburg and Stettin had also been damaged and returned to base with casualties. German casualties were 1,242 with 712 men killed, including the Flotilla Admiral, Rear Admiral Maass and the Destroyer Commodore. There were 336 prisoners of war taken, of which 224 Germans were rescued by Commodore Keyes on the destroyer Lurcher and brought to England. A son of Tirpitz was among the prisoners. The Royal Navy had lost no ships and casualties did not exceed 35 men killed, with about 40 wounded.