This is the order of battle for the Battle of Megiddo (1918), the concluding engagement of the Sinai and Palestine Campaign of the First World War. The Entente's Egyptian Expeditionary Force, commanded by General Edmund Allenby and composed mainly of British, Indian, Australian and New Zealand troops, with a small French and Armenian contingent, cooperated with the Arab Northern Army, which was part of the Arab Revolt and was under the overall command of the Emir Feisal, in an all-out offensive against the Yıldırım Army Group, part of the army of the Ottoman Empire.
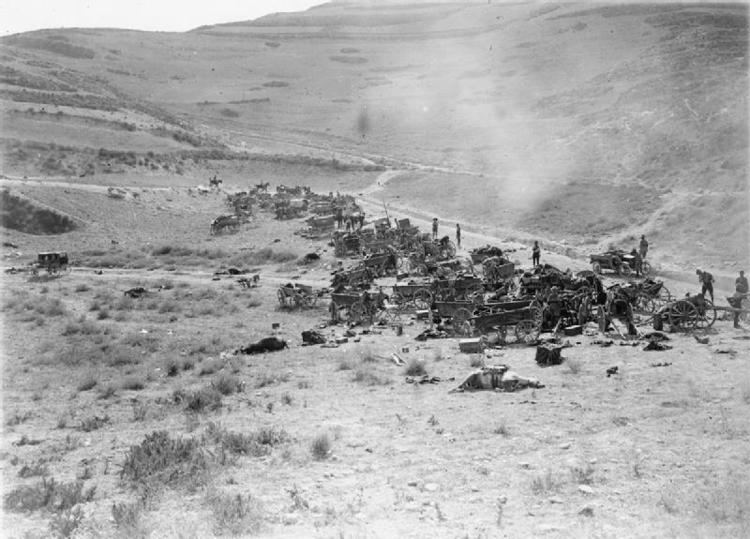
After preliminary attacks beginning late on 16 September 1918, Allenby's main attack overran the Ottoman front lines on 19 September. British Indian Army and Australian mounted divisions seized objectives far behind the front line, while British and Australian aircraft crippled the Ottoman armies' headquarters and attacked retreating Ottoman troops, turning their retreat into a rout.
Most of the Ottoman formations were destroyed by 26 September. Allenby's mounted divisions and Arab irregulars captured Damascus on 1 October. The surviving Ottoman troops were pursued to Aleppo, and the war in the Middle East ended on 31 October.
On 17 September 1918, the opposing armies in Palestine, Trans Jordan and Syria were deployed as follows:
Yildirim Army Group (Otto Liman von Sanders)
Eighth Army (Jevad Pasha) — Tulkarm
XXII Corps (Refet Bey)
46th Division (Shefik Avni Bey) (recently arrived at Tyre)
7th Division (Nasuhi Bey)
20th Division (Veysel Bey)
Asia Korps (Oberst Gustav von Oppen) also named Left Wing Group19th Division (Sami Sabit Bey)
16th Division (Rushdi Bey)
German "Pasha II" detachment (regiment)
2nd Caucasian Cavalry Division
Seventh Army (Mustafa Kemal Pasha) — Nablus
III Corps (Ismet Bey)
1st Division (Hans Guhr Bey)
11th Division (Kiazim Bey)
XX Corps (Ali Fuad Pasha)
26th Division (Mehmed Hayri Bey)
53rd Division (Reshad Bey)
German 146 Infantry Regiment
Fourth Army (Mersinli Djemal Pasha, "the Lesser") – Es Salt
VIII Corps (Jordan River) (Yasin Hilmi Bey, also known as Salman el-Hashimi)
48th Division (Âsım Bey)
Composite Division (Hussein Nureddin Bey)
II Corps (Galatali Shevket Bey)
Jordan Group (Amman)
24th Division
3rd Cavalry Division (Esad Bey)
Ma'an and Hauran detachment
62nd Division
Three composite detachments
43rd Division (arrived Beirut early October)
Egyptian Expeditionary Force (General Edmund Allenby)
Chief of Staff – Lieutenant General Louis Bols
XXI Corps (Lieutenant General Edward Bulfin) — main attack
Corps Cavalry Regiment (3 mixed squadrons Yeomanry)
Royal Garrison Artillery (5 Heavy Batteries, 12 Siege Batteries, 6 Mountain Batteries)
60th Division (Major General J.S.M. Shea)
179th, 180th, 181st Brigades
7th (Meerut) Division (Major General V.B. Fane)
19th (Dehra Dun), 21st (Bareilly), 28th Brigades
75th Division (Major General P.C. Palin)
232nd, 233rd, 234th Brigades
3rd (Lahore) Division (Major General A.R. Hoskins)
7th (Ferozepur), 8th (Jullundur), 9th (Sirhind) Brigades
54th (East Anglian) Division (Major General S.W. Hare)
161st, 162nd, 163rd Brigades
Détachement Français de Palestine et de Syrie (including French Armenian Legion)
XX Corps (Lieutenant General Philip Chetwode) — subsidiary attack
1/1 Worcestershire Yeomanry
Royal Garrison Artillery (1 Heavy Battery, 6 Siege Batteries)
1 Indian Mountain Battery, Hong Kong and Singapore Mountain Battery
10th (Irish) Division (Major General A.R. Longley)
29th, 30th, 31st Brigades
53rd Division (Major General S.F. Mott)
158th, 169th, 160th Brigades
Chaytor's Force (Major General Edward Chaytor) — eastern flank
Anzac Mounted Division (Major General Edward Chaytor)
1st Australian Mounted, 2nd Australian Mounted, New Zealand Mounted Rifles Brigades
20th Indian Brigade (Brigadier General E.R.B. Murray)
West India Regiment (two battalions)
Jewish Legion (38th & 39th Battalions Royal Fusiliers)
1 attached Field Battery, 1 Heavy Battery, 2 Indian Mountain Batteries
Desert Mounted Corps (Lieutenant General Harry Chauvel) — exploitation
2 Light Armoured Motor Batteries, Machine Gun Corps (Armoured cars), 2 Light Car Patrols
4th Cavalry Division (Major General G. de S. Barrow)
10th Cavalry, 11th Cavalry, 12th Cavalry Brigades
5th Cavalry Division (Major General H.A. MacAndrew)
13th Cavalry, 14th Cavalry, 15th (Imperial Service) Cavalry Brigades
Australian Mounted Division (Major General Henry West Hodgson)
3rd Australian Light Horse, 4th Australian Light Horse, 5th Australian Light Horse Brigades
RAF Palestine Brigade (Brigadier-General Amyas Borton)Fifth (Corps) Wing (Lieutenant-Colonel Charles Burnett)
No. 14 Squadron
No. 113 Squadron
No. 142 Squadron
Fortieth (Army) Wing (Lieutenant-Colonel Richard Williams)
No. 1 Squadron Australian Flying Corps
No. 111 Squadron RAF
No. 144 Squadron RAF
No. 145 Squadron (1 flight only)
Arab forces
Arab Northern Army (Emir Feisal)
Regular Forces (Jafar Pasha el-Askari)1st Division (Aqaba) (Brigadier General Amin al-Asil)
Hashemite Infantry Brigade (800)
2nd Division (Quwayra) (Lieutenant Colonel Majid Hasun)
Hashemite Infantry Brigade (800)
Hejaz Camel Corps battalion (400) (part of T. E. Lawrence's detachment)
Small artillery, machine gun, mule-mounted infantry, medical and logistical detachments
Irregular Forces
Howeitat, Bani 'Ali, Bali, Juhaynah, Utaybah bedouin (Nuri as-Said, Auda abu Tayi and others)
Haurani and Druze insurgents