
 | ||
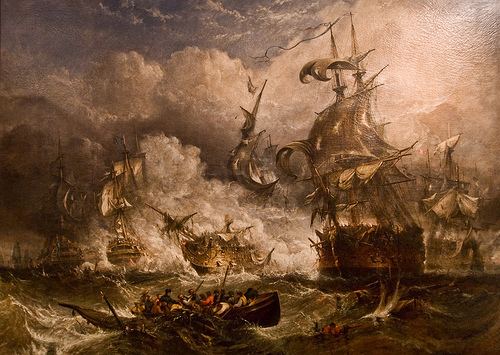
The Battle of Camperdown was an important naval action of the French Revolutionary Wars, fought off Camperduin on the North Holland coast on 11 October 1797 between a British fleet under Admiral Adam Duncan and a Dutch fleet under Vice-Admiral Jan de Winter. The French Republic had overrun the Dutch Republic two years earlier, reforming it into the Batavian Republic. In early 1797, the Dutch Navy was ordered to sail to Brest and unite with the French Atlantic Fleet in preparation for an invasion of Ireland. Shortly afterwards, the British fleets were paralysed by the Spithead and Nore mutinies, in which the sailors refused to take their ships to sea until they were awarded better pay and conditions. For two months, the English Channel was undefended, but the Dutch failed to take the opportunity to sail from their harbour in the Texel: their preparations were not complete, and a small squadron of loyal British ships under Duncan convinced de Winter that the British fleet was at sea by sending nonsensical signals to fictitious ships over the horizon.
By October 1797, the plan to attack Ireland had been abandoned and the British North Sea Fleet was again at full strength. During a brief period replenishing supplies at Yarmouth, news reached Duncan on 10 October that the Dutch had sailed on a raiding cruise and he returned to the Dutch coast, intercepting de Winter's fleet on its way back to the Texel. The Dutch formed a line of battle in shallow coastal waters to meet Duncan's attack, which was conducted in a confused mass, the British fleet separating into two groups that struck the vanguard and rear of the Dutch fleet, overwhelming each in turn and capturing eleven ships, including de Winter's flagship Vrijheid. On the return journey, three of the captured ships were lost, and none of the surviving Dutch prizes was ever suitable for active service again. Both sides suffered heavy casualties during the battle as each fleet had been trained to aim at the hulls of their opponents, maximising the damage to personnel.
Although the sailors of both fleets fought hard, they were suffering from popular unrest; the mutinies in Britain continued to overshadow the Royal Navy, while the Dutch sailors were unhappy with French dominion and, in marked difference to their officers, were generally supporters of the exiled House of Orange. In addition, the Dutch were disaffected and poorly trained due to the long months blockaded in their harbours, which made them inferior seamen and gunners when compared with the highly experienced British crews, and the Dutch ships were more weakly constructed than their British counterparts with a shallower draught, a necessity in the shallow waters of the Dutch coast but a liability when fighting warships built for the open ocean. The Dutch did, however, have the advantage of weight of shot, especially when their well-armed frigates and brigs are included statistically. Unlike their British equivalents, these lighter craft were intended to contribute in battle, covering the gaps in the line between their larger companions.
Orders of battle
The ships in the orders of battle below are listed in the order in which they appeared in the respective battle lines. Listed in the casualties section are the totals of killed and wounded as best as can be established: due to the nature of the battle, Dutch losses were hard to calculate precisely. Officers killed in action or who subsequently died of wounds received are marked with a † symbol. As carronades were not traditionally taken into consideration when calculating a ship's rate, these ships may have actually been carrying additional or fewer guns than indicated below.